神经网络初识——MINIST手写数字识别(可视化输出结果)
手写数字识别是每个学习神经网络的人上手操作的必由之路,今天在前人肩膀上做了些小小的尝试。
话不多说,开始~
1.导入相关模块数据包(需提前配置tenseorflow模块)
在tenseorflow模块中内置了MNIST数据集,其中测试集包含60000条数据,验证集包含10000条数据。导入模块和数据集的操作如下(已经提前下载好数据集,并放在指定目录下):
import tensorflow as tf
import urllib
from  tensorflow.examples.tutorials.mnist  import  input_data
import numpy as np
import matplotlib.pyplot as plt
from PIL import Image, ImageFilter
mnist = input_data.read_data_sets("MNIST_data/", one_hot = True)
输出结果:
Extracting MNIST_data/train-images-idx3-ubyte.gz
Extracting MNIST_data/train-labels-idx1-ubyte.gz
Extracting MNIST_data/t10k-images-idx3-ubyte.gz
Extracting MNIST_data/t10k-labels-idx1-ubyte.gz2.模型的建立过程
#建立BP神经网络模型
num_classes = 10#数据类型0-9
input_size = 784#28*28
hidden_units_size = 30#层节点数
batch_size = 100#
training_iterations = 50000#迭代次数
# 设置变量
X = tf.placeholder (tf.float32, shape = [None, input_size])
Y = tf.placeholder (tf.float32, shape = [None, num_classes])
W1 = tf.Variable (tf.random_normal ([input_size, hidden_units_size],
                                    stddev = 0.1))#hidden_units_size = 30#正态分布随机数
B1 = tf.Variable (tf.constant (0.1),
                  [hidden_units_size])#常数为1,形状为(1,1)
W2 = tf.Variable (tf.random_normal ([hidden_units_size,
                                     num_classes], stddev = 0.1))#正态分布随机数
B2 = tf.Variable (tf.constant (0.1), [num_classes])
# 搭建计算网络 使用 relu 函数作为激励函数 这个函数就是 y = max (0,x) 的一个类似线性函数 拟合程度还是不错的
# 使用交叉熵损失函数 这是分类问题例如 : 神经网络 对率回归经常使用的一个损失函数
#第1层神经网络
hidden_opt = tf.matmul (X, W1) + B1#矩阵运算
hidden_opt = tf.nn.relu (hidden_opt)#激活函数
#第2层神经网络
final_opt = tf.matmul (hidden_opt, W2) + B2#矩阵运算
final_opt = tf.nn.relu (final_opt)#激活函数,最终的输出结果
loss = tf.reduce_mean (
    tf.nn.softmax_cross_entropy_with_logits (labels = Y, logits = final_opt))#损失函数,交叉熵方法
opt = tf.train.GradientDescentOptimizer (0.1).minimize (loss)
init = tf.global_variables_initializer ()#全局变量初始化
correct_prediction = tf.equal (tf.argmax (Y, 1), tf.argmax (final_opt, 1))
accuracy = tf.reduce_mean (tf.cast (correct_prediction, 'float'))#将张量转化成float
3. 模型的训练以及预测结果
# 进行计算 打印正确率
sess = tf.Session ()#生成能进行TensorFlow计算的类
sess.run (init)
for i in range (training_iterations) :
    batch = mnist.train.next_batch (batch_size)#每次迭代选用的样本数100
    batch_input = batch[0]
    batch_labels = batch[1]
    training_loss = sess.run ([opt, loss], feed_dict = {X: batch_input, Y: batch_labels})
    if (i+1) % 10000 == 0 :
        train_accuracy = accuracy.eval (session = sess, feed_dict = {X: batch_input,Y: batch_labels})
        print ("step : %d, training accuracy = %g " % (i+1, train_accuracy))
输出结果为:
step : 10000, training accuracy = 0.98
step : 20000, training accuracy = 0.98
step : 30000, training accuracy = 1
step : 40000, training accuracy = 1
step : 50000, training accuracy = 1
================================================================================================
下面开始搞事情~
4.预测结果的可视化展示:
###测试集输出结果可视化
def res_Visual(n):
    #sess=tf.Session()
    #sess.run(tf.global_variables_initializer())
    final_opt_a=tf.argmax (final_opt, 1).eval(session=sess,feed_dict = {X: mnist.test.images,Y: mnist.test.labels})
    fig, ax = plt.subplots(nrows=int(n/5),ncols=5 )
    ax = ax.flatten()
    print('前{}张图片预测结果为:'.format(n))
    for i in range(n):
        print(final_opt_a[i],end=',')
        if int((i+1)%5) ==0:
            print('\t')
        #图片可视化展示
        img = mnist.test.images[i].reshape((28,28))#读取每行数据,格式为Ndarry
        ax[i].imshow(img, cmap='Greys', interpolation='nearest')#可视化
    print('测试集前{}张图片为:'.format(n))
res_Visual(20)
输出结果:
前20张图片预测结果为:
7,2,1,0,4,
1,4,9,6,9,
0,6,9,0,1,
5,9,7,3,4,
测试集前20张图片为:
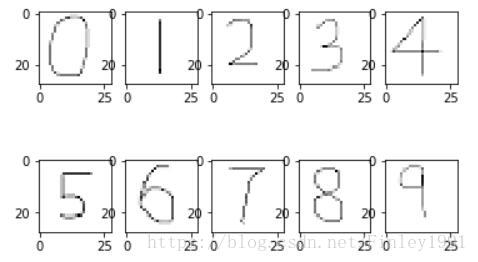
我们可以看到,预测结果前20个结果和原本的标签符合的很好,说明模型训练的很好。那现在如果我想试一下自己手写的数字能不能被正确识别呢?于是我用写字板写了0~9共10个数字,让模型去识别,首先要将图片数值化。
5.手写数字的数值化操作
#验证自己手写图片的识别效果
#导入图片,二值化,并输出模型可识别的格式
def image_to_number(n):
    from PIL import Image
    import numpy as np
    fig, ax = plt.subplots(nrows=int(n/5),ncols=5 )
    ax = ax.flatten()
    image_test = []
    label_test = np.zeros((n,10))#手写图片的lebel
    for i in range(n):
        label_test[i][i] =1#将(0,0)(1,1)等位置赋值为1
        line = []
        img = Image.open("{}.png".format(i))     # 打开一个图片,并返回图片对象
        img = img.convert('L')    # 转换为灰度,img.show()可查看图片
        img = img.resize((28,28))   # 将图片重新以(w,h)尺寸存储
        for y in range(28):
            for x in range(28):
                line.append((255-img.getpixel((x,y)))/255)# getpixel 获取该位置的像素信息
        image_test.append(line)#存储像素点信息
        line = np.array(line)#转化为np.array
        ax[i].imshow(line.reshape(28,28), cmap='Greys', interpolation='nearest')
        #plt.imshow(line.reshape(28,28), cmap='Greys')#显示图片,imshow能够将数字转换为灰度显示出图像
    image_test = np.array(image_test)
    return image_test,label_test
image_test,label_test = image_to_number(10)
输出结果:

