一、步骤
从“文件”菜单中选择“新建”>“项目” 。
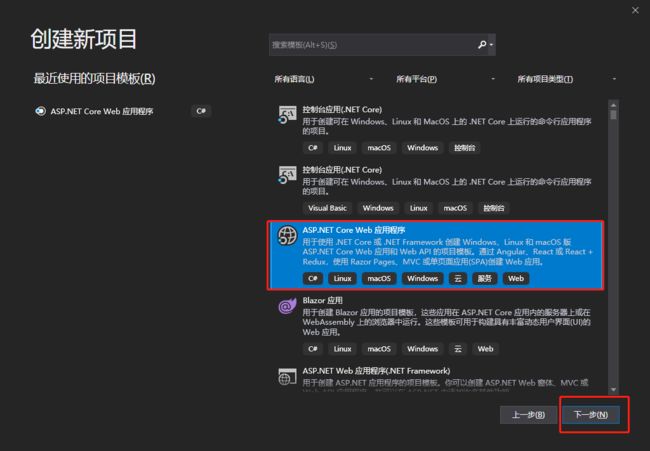
选择“ASP.NET Core Web 应用程序”模板,再单击“下一步” 。
将项目命名为 NetCoreWebApi,然后单击“创建” 。
选择“.NET Core”和“ASP.NET Core 2.2” 。 选择“API”模板,然后单击“创建” 。
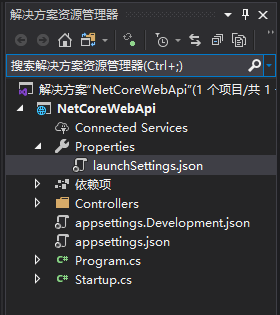
创建完成后,项目结构如下:
二、项目解读
Properties——launchSettings.json
启动配置文件,一个ASP.NET Core应用保存特有的配置标准,用于应用的启动准备工作,包括环境变量,开发端口等。
 1 {
 2   "$schema": "http://json.schemastore.org/launchsettings.json",
 3   "iisSettings": { //选择以IIS Express启动
 4     "windowsAuthentication": false, //是否启用windows身份验证
 5     "anonymousAuthentication": true, //是否启用匿名身份验证
 6     "iisExpress": {
 7       "applicationUrl": "http://localhost:60953", //IIS Express随机端口
 8       "sslPort": 0
 9     }
10   },
11   "profiles": {
12     "IIS Express": {
13       "commandName": "IISExpress",
14       "launchBrowser": true, //是否在浏览器中启动
15       "launchUrl": "api/values", //在浏览器中启动的相对URL
16       "environmentVariables": { //将环境变量设置为键/值对
17         "ASPNETCORE_ENVIRONMENT": "Development"
18       }
19     },
20     "NetCoreWebApi": {
21       "commandName": "Project",
22       "launchBrowser": true,
23       "launchUrl": "api/values",
24       "applicationUrl": "http://localhost:5000",
25       "environmentVariables": {
26         "ASPNETCORE_ENVIRONMENT": "Development"
27       }
28     }
29   }
30 }
appsetting.json
appsetting.json是应用程序配置文件,类似于ASP.NET MVC应用程序中的Web.config配置文件。
例如:连接字符串,等等....
 1 {
 2     "Logging":{
 3         "LogLevel":{
 4             "Default":"Warning"
 5         }
 6     },
 7     "AllowedHosts":"*",
 8     "ConnectionStrings":{
 9         "SqlServer":"Data Source=.;Initial Catalog=NetCoreWebApi;User Id=sa;Password=123;"
10     }
11 }
Program.cs
Program.cs文件是应用的入口, 启动后通过UseStartup
 1  public class Program
 2     {
 3         public static void Main(string[] args)
 4         {
 5             CreateWebHostBuilder(args).Build().Run();
 6         }
 7
 8         public static IWebHostBuilder CreateWebHostBuilder(string[] args) =>
 9             WebHost.CreateDefaultBuilder(args)//创建WebHostBuilder。
10                 .UseStartup();//指定启动类,用于依赖注入和中间件注册。
11     }
Startup.cs
该文件是默认文件,不可随意删除,在此文件中可以以包含服务配置、定义请求处理管道的重要操作。
ConfigureServices 方法用于将服务注入到 IServiceCollection 服务容器中。
Configure方法用于应用响应 HTTP 请求,将中间件注册到 ApplicationBuilder中来配置请求管道。
 1  public class Startup
 2     {
 3         public Startup(IConfiguration configuration)
 4         {
 5             Configuration = configuration;
 6         }
 7
 8         public IConfiguration Configuration { get; }
 9
10         //负责注入服务
11         public void ConfigureServices(IServiceCollection services)
12         {
13             services.AddMvc().SetCompatibilityVersion(CompatibilityVersion.Version_2_2);
14         }
15
16         // 响应 HTTP 请求的方式。可将中间件注册到IApplicationBuilder 实例来配置请求管道。
17         public void Configure(IApplicationBuilder app, IHostingEnvironment env)
18         {
19             if (env.IsDevelopment())
20             {
21                 app.UseDeveloperExceptionPage();
22             }
23
24             app.UseMvc();
25         }
26     }
三、测试
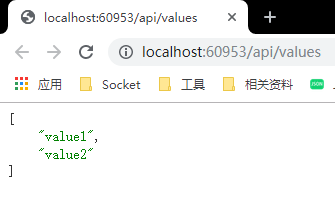
此时项目已经完成,按 Ctrl+F5 运行之后,就能看到


