节选自:http://www.cnblogs.com/lee0oo0/p/4225730.html
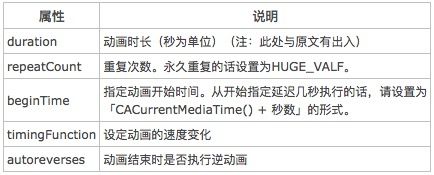
设定动画的属性。以下是属性及其对应的说明:
animation.duration = 2.5; // 动画持续时间
animation.repeatCount = 1; // 不重复
animation.beginTime = CACurrentMediaTime() + 2; // 2秒后执行
animation.autoreverses = YES; // 结束后执行逆动画
// 动画先加速后减速
animation.timingFunction =  [CAMediaTimingFunction functionWithName: kCAMediaTimingFunctionEaseInEaseOut];

设定动画开始和结束帧时的状态。设定的值会变为KeyPath所指定的属性的值。
// 指定position属性(移动)
CABasicAnimation *animation =  [CABasicAnimation animationWithKeyPath:@"position"];
// 设定动画起始帧和结束帧
animation.fromValue = [NSValue valueWithCGPoint:CGPointMake(0, 0)]; // 起始点
animation.toValue = [NSValue valueWithCGPoint:CGPointMake(320, 480)]; // 终了点
-
缩放动画(不停止)
@property (weak, nonatomic) IBOutlet UIView *redView;
@property (weak, nonatomic) IBOutlet UIImageView *imageV;
- (void)touchesBegan:(NSSet *)touches withEvent:(UIEvent *)event
{
// 创建动画
CABasicAnimation *anim = [CABasicAnimation animation];// 描述下修改哪个属性产生动画 // anim.keyPath = @"position"; // 只能是layer属性 anim.keyPath = @"transform.scale"; // 设置值 // anim.toValue = [NSValue valueWithCGPoint:CGPointMake(250, 500)]; anim.toValue = @0.5; // 设置动画执行次数 anim.repeatCount = MAXFLOAT; // 取消动画反弹 // 设置动画完成的时候不要移除动画 anim.removedOnCompletion = NO; // 设置动画执行完成要保持最新的效果 anim.fillMode = kCAFillModeForwards; [_imageV.layer addAnimation:anim forKey:nil]; }
-
手指画一条线,让view随着这条线走
@interface DrawView ()@property (nonatomic, strong) UIBezierPath *path; @end @implementation DrawView - (void)touchesBegan:(NSSet *)touches withEvent:(UIEvent *)event { // touch UITouch *touch = [touches anyObject]; // 获取手指的触摸点 CGPoint curP = [touch locationInView:self]; // 创建路径 UIBezierPath *path = [UIBezierPath bezierPath]; _path = path; // 设置起点 [path moveToPoint:curP]; } - (void)touchesMoved:(NSSet *)touches withEvent:(UIEvent *)event { // touch UITouch *touch = [touches anyObject]; // 获取手指的触摸点 CGPoint curP = [touch locationInView:self]; [_path addLineToPoint:curP]; [self setNeedsDisplay]; } - (void)touchesEnded:(NSSet *)touches withEvent:(UIEvent *)event { // 给imageView添加核心动画 // 添加核心动画 CAKeyframeAnimation *anim = [CAKeyframeAnimation animation]; anim.keyPath = @"position"; // anim.values = @[@(angle2Radion(-10)),@(angle2Radion(10)),@(angle2Radion(-10))]; anim.path = _path.CGPath; anim.duration = 1; anim.repeatCount = 1; //给这个view的图层加一个动画 [[[self.subviews firstObject] layer] addAnimation:anim forKey:nil]; } - (void)drawRect:(CGRect)rect { //根据_path画一条线 [_path stroke]; } @end
-
转场动画
@interface ViewController ()
@property (weak, nonatomic) IBOutlet UIImageView *imageView;@end @implementation ViewController static int i = 1; - (void)touchesBegan:(NSSet *)touches withEvent:(UIEvent *)event { // 转场代码 if (i == 4) { i = 1; } // 加载图片名称 NSString *imageN = [NSString stringWithFormat:@"%d",i++]; _imageView.image = [UIImage imageNamed:imageN]; // 转场动画 CATransition *anim = [CATransition animation]; anim.type = @"pageCurl"; anim.duration = 0.5; [_imageView.layer addAnimation:anim forKey:nil]; } @end
-
动画组
@property (weak, nonatomic) IBOutlet UIView *redView;
- (void)touchesBegan:(NSSet *)touches withEvent:(UIEvent *)event
{
// 同时缩放,平移,旋转
CAAnimationGroup *group = [CAAnimationGroup animation];CABasicAnimation *scale = [CABasicAnimation animation]; scale.keyPath = @"transform.scale"; scale.toValue = @0.5; CABasicAnimation *rotation = [CABasicAnimation animation]; rotation.keyPath = @"transform.rotation"; rotation.toValue = @(arc4random_uniform(M_PI)); CABasicAnimation *position = [CABasicAnimation animation]; position.keyPath = @"position"; position.toValue = [NSValue valueWithCGPoint:CGPointMake(arc4random_uniform(200), arc4random_uniform(200))]; group.animations = @[scale,rotation,position]; [_redView.layer addAnimation:group forKey:nil]; }
- 折叠(根据x旋转)动画

    #import "ViewController.h"

    @interface ViewController ()
    @property (weak, nonatomic) IBOutlet UIImageView *topView;
    @property (weak, nonatomic) IBOutlet UIImageView *bottomView;
    // 添加手势的View
    @property (weak, nonatomic) IBOutlet UIView *dragView;

    @property (nonatomic, weak) CAGradientLayer *gradientL;

    @end

    @implementation ViewController
    // 一张图片必须要通过两个控件展示,旋转的时候,只旋转上部分控件
    - (void)viewDidLoad {
        [super viewDidLoad];
        // Do any additional setup after loading the view, typically from a nib.
        // 通过设置contentsRect可以设置图片显示的尺寸,取值0~1
        //topView和bottomView的frame一样 通过设置铆点anchorPoint来调整
        _topView.layer.contentsRect = CGRectMake(0, 0, 1, 0.5);
        _topView.layer.anchorPoint = CGPointMake(0.5, 1);

        _bottomView.layer.contentsRect = CGRectMake(0, 0.5, 1, 0.5);
        _bottomView.layer.anchorPoint = CGPointMake(0.5, 0);

        // 添加手势
        UIPanGestureRecognizer *pan = [[UIPanGestureRecognizer alloc] initWithTarget:self action:@selector(pan:)];

        [_dragView addGestureRecognizer:pan];

        // 渐变图层
        CAGradientLayer *gradientL = [CAGradientLayer layer];

        // 注意图层需要设置尺寸
        gradientL.frame = _bottomView.bounds;

        gradientL.opacity = 0;
        gradientL.colors = @[(id)[UIColor clearColor].CGColor,(id)[UIColor blackColor].CGColor];
        _gradientL = gradientL;

        [_bottomView.layer addSublayer:gradientL];
    }

    // 拖动的时候旋转上部分内容,200(垂直(Y)偏移量) M_PI(旋转180度)
    - (void)pan:(UIPanGestureRecognizer *)pan
    {
        // 获取偏移量
        CGPoint transP = [pan translationInView:_dragView];
        NSLog(@"%@", NSStringFromCGPoint(transP));
        // 旋转角度,往下逆时针旋转
        CGFloat angle = -transP.y / 200.0 * M_PI;

        CATransform3D transfrom = CATransform3DIdentity;


        // 增加旋转的立体感,近大远小,d:距离图层的距离
        transfrom.m34 = -1 / 500.0;

        transfrom = CATransform3DRotate(transfrom, angle, 1, 0, 0);

        _topView.layer.transform = transfrom;

        // 设置阴影效果
        _gradientL.opacity = transP.y * 1 / 200.0;


        if (pan.state == UIGestureRecognizerStateEnded) { // 反弹
            /**
             * 弹簧效果的动画
             * usingSpringWithDamping 参数:  usingSpringWithDamping的范围为0.0f到1.0f,数值越小「弹簧」的振动效果越明显。
             * initialSpringVelocity 参数: initialSpringVelocity则表示初始的速度,数值越大一开始移动越快。
             *  http://www.renfei.org/blog/ios-8-spring-animation.html
             */
            [UIView animateWithDuration:0.6 delay:0 usingSpringWithDamping:0.2 initialSpringVelocity:10 options:UIViewAnimationOptionCurveEaseInOut animations:^{

                _topView.layer.transform = CATransform3DIdentity;

            } completion:^(BOOL finished) {

            }];
        }

    }
    @end
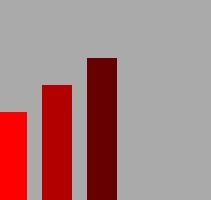
- 音量震动
   #import "ViewController.h"

    @interface ViewController ()
    @property (weak, nonatomic) IBOutlet UIView *lightView;

    @end

    @implementation ViewController

    - (void)viewDidLoad {
        [super viewDidLoad];
        // CAReplicatorLayer复制图层,可以把图层里面所有子层复制
        // 创建复制图层
        CAReplicatorLayer *repL = [CAReplicatorLayer layer];
        repL.frame = _lightView.bounds;
        [_lightView.layer addSublayer:repL];

        //设置一个layer震动条
        CALayer *layer = [CALayer layer];
        layer.anchorPoint = CGPointMake(0.5, 1);
        layer.position = CGPointMake(15, _lightView.bounds.size.height);
        layer.bounds = CGRectMake(0, 0, 30, 150);
        layer.backgroundColor = [UIColor whiteColor].CGColor;
        [repL addSublayer:layer];

        //设置图层的动画
        CABasicAnimation *anim = [CABasicAnimation animation];
        anim.keyPath = @"transform.scale.y";
        anim.toValue = @0.1;
        anim.duration = 0.5;
        anim.repeatCount = MAXFLOAT;

        // 设置动画反转 动画结束时是否执行逆动画
        anim.autoreverses = YES;
        [layer addAnimation:anim forKey:nil];

        // 复制层中子层总数
        // instanceCount:表示复制层里面有多少个子层,包括原始层
        repL.instanceCount = 3;
        // 设置复制子层偏移量,不包括原始层,相对于原始层x偏移
        repL.instanceTransform = CATransform3DMakeTranslation(45, 0, 0);
        // 设置复制层动画延迟时间
        repL.instanceDelay = 0.1;
        // 如果设置了原始层背景色,就不需要设置这个属性
        repL.instanceColor = [UIColor redColor].CGColor;
        // 颜色值递减
        repL.instanceRedOffset = -0.3;
    }

    @end
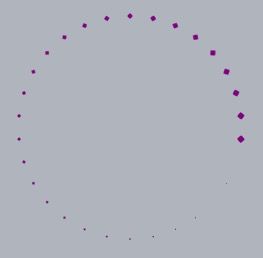
- 菊花
    #import "ViewController.h"

    @interface ViewController ()
    @property (weak, nonatomic) IBOutlet UIView *redView;

    @end

    @implementation ViewController

    - (void)viewDidLoad {
        [super viewDidLoad];
        // Do any additional setup after loading the view, typically from a nib.

        CAReplicatorLayer *repL = [CAReplicatorLayer layer];
        repL.frame = _redView.bounds;
        [_redView.layer addSublayer:repL];


        CALayer *layer = [CALayer layer];
        layer.transform = CATransform3DMakeScale(0, 0, 0);
        layer.position = CGPointMake(_redView.bounds.size.width / 2, 20);
        layer.bounds = CGRectMake(0, 0, 10, 10);
        layer.cornerRadius = 10.0;
        layer.masksToBounds = YES;
        layer.backgroundColor = [UIColor purpleColor].CGColor;
        [repL addSublayer:layer];

        // 设置缩放动画
        CABasicAnimation *anim = [CABasicAnimation animation];
        anim.keyPath = @"transform.scale";
        anim.fromValue = @1;
        anim.toValue = @0;
        anim.repeatCount = MAXFLOAT;
        CGFloat duration = 1;
        anim.duration = duration;

        [layer addAnimation:anim forKey:nil];


        int count = 30;
        CGFloat angle = M_PI * 2 / count;
        // 设置子层总数
        repL.instanceCount = count;
        repL.instanceTransform = CATransform3DMakeRotation(angle, 0, 0, 1);
        repL.instanceDelay = duration / count;

    }
    @end


