自定义控件 非常有质感的音量控制按钮
制作一个非常有质感的音量控制按钮
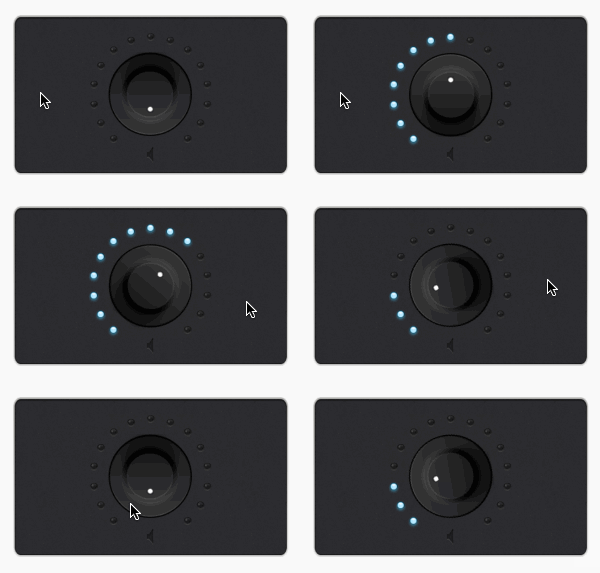
上一篇做了一个纯自定义view的音量控制按钮,今天偶然看到一个素材决定实现了,看效果图

实际上用到4张图片,把按钮放到背景中间,然后让黑色灯均匀分布在按钮周围,增加音量时让按钮的白点对准的黑灯覆盖上亮灯


![]()
![]()
1、按钮放到背景图中部,旋转180°,让白点朝下(初始状态)
- 1、构造函数并进行初始化
    public VolumeButton(Context context) {
        this(context, null);
    }

    public VolumeButton(Context context, AttributeSet attrs) {
        this(context, attrs, 0);
    }

    public VolumeButton(Context context, AttributeSet attrs, int defStyleAttr) {
        super(context, attrs, defStyleAttr);
        init();
    }

    private void init() {
        mPaint = new Paint();
        matrix_button = new Matrix();
        matrix_black = new Matrix();
        matrix_light = new Matrix();
        button = BitmapFactory.decodeResource(getResources(), R.mipmap.button);
        bm_light = BitmapFactory.decodeResource(getResources(), R.mipmap.light);
        bm_black = BitmapFactory.decodeResource(getResources(), R.mipmap.black);
    }
- 2.测量
  @Override
    protected void onMeasure(int widthMeasureSpec, int heightMeasureSpec) {
        int widthSize = MeasureSpec.getSize(widthMeasureSpec);
        int widthMode = MeasureSpec.getMode(widthMeasureSpec);
        int heightSize = MeasureSpec.getSize(heightMeasureSpec);
        int heightMode = MeasureSpec.getMode(heightMeasureSpec);
        if (widthMode == MeasureSpec.EXACTLY){
            mWidth = widthSize;
        }
        if (heightMode == MeasureSpec.EXACTLY){
            mHeight = DensityUtil.dip2px(getContext(),200);
        }
        setMeasuredDimension(mWidth, mHeight);
}- 3.在onDraw中画按钮
    float centerX = button.getWidth() / 2;
    float centerY = button.getHeight() / 2;
    //先把按钮中心平移到背景图中心
    matrix_button.setTranslate(mWidth / 2 - centerX, mHeight / 2 - centerY);
    //再让按钮旋转180°,degress是用来控制旋转角度的
    matrix_button.postRotate(180f + degrees, mWidth / 2, mHeight / 2);
    canvas.drawBitmap(button, matrix_button, mPaint);
关于Matrix的操作是我困惑了好久,我详细说一下我的认识,不对的地方大家给我指正。
2、Matrix的三种操作方法介绍
matrix.set…(平移、旋转、缩放等)
matrix.pre…(平移、旋转、缩放等)
matrix.post…(平移、旋转、缩放等)
这三个方法在同时操作matrix时有先后顺序的,如果不能掌握顺序,缩放和旋转时的中心就不好确定。
matrix在执行操作时类似按照一个队列的顺序在执行,set方法会清空队列里的操作,pre方法是加到当前队列最前方,post方式是加到队列的最后放。加入队列时是按照代码顺序自上往下添加,执行时是按照队列的顺序由前往后执行的。
1、matrix.set;matrix.post;matrix.pre;执行顺序为pre-set-post;
2、matrix.post;matrix.set;matrix.pre;执行顺序为pre-set;添加set时把前面的post方法给重置了。
3、matrix.set;matrix.post1;matrix.pre1;matrix.post2;matrix.pre2;执行顺序为pre2 - pre1 - set - post1 - post2;
3、两种灯的绘制
- 1、黑灯
如何让黑灯均匀的分布在按钮周围,上面学的matrix可以用上了。把黑灯移动到按钮正下方,然后以按钮的中心旋转这个黑灯,每旋转20°绘制一个黑灯,再让这个黑灯以自己的中心反向旋转,上代码
      for (int i = 0;i <15;i++){
      matrix_black.setTranslate(mWidth/2-bm_black.getWidth()/2,
                    mHeight/2 - bm_black.getHeight()/2 + button.getHeight()/2 + bm_black.getWidth()*2);
      matrix_black.postRotate(40 + i * 20, mWidth / 2, mHeight / 2);
      matrix_black.preRotate(-(40 + i * 20), bm_black.getWidth() / 2, bm_black.getHeight()/2);
       canvas.drawBitmap(bm_black, matrix_black,mPaint);
        }
代码中是先preRotate以自身旋转,然后setTranslate移动到按钮下方,再postRotate以按钮中心旋转。
- 2、白灯类似,主要是要与按钮上的白点同步
 for (int i = 0;i
            matrix_light.setTranslate(mWidth/2-bm_light.getWidth()/2,
                    mHeight/2-bm_light.getHeight()/2+button.getHeight()/2+bm_black.getWidth()*2);
            matrix_light.postRotate(40 + i * 20, mWidth / 2, mHeight / 2);
            matrix_light.preRotate(-(40 + i * 20), bm_light.getWidth() / 2, bm_light.getHeight()/2);
            canvas.drawBitmap(bm_light, matrix_light,mPaint);
        }
源码 https://github.com/JoinHi/MyVolumeButton