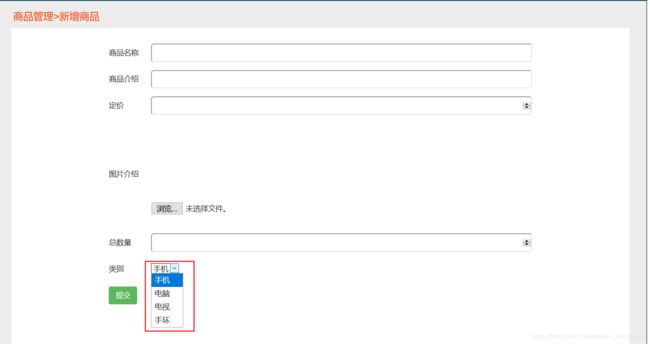
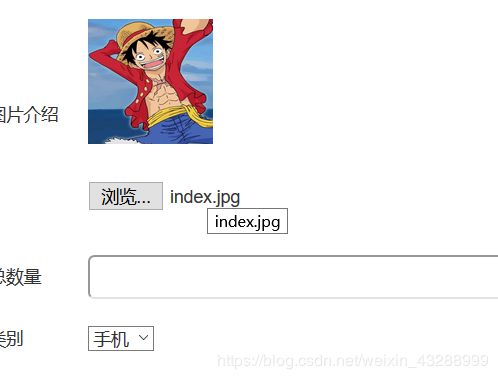
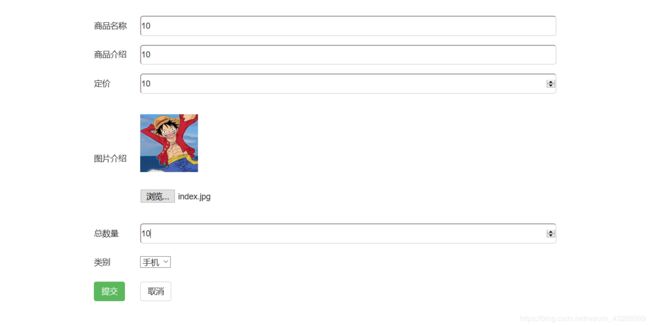
SSM整合仿小米商城后台(四)------新增商品
一、 新增商品思路
二、实现
- 实现产品类型的全局作用域,新建编写一个ProductTypeService接口
package com.oracle.xiaomi.service;

import com.oracle.xiaomi.pojo.ProductType;

import java.util.List;

public interface ProductTypeService {
//获得所有类型
    public List<ProductType> getAll();
}
- 新建编写一个ProductTypeServiceImpl实现类
package com.oracle.xiaomi.service.impl;

import com.oracle.xiaomi.mapper.ProductTypeMapper;
import com.oracle.xiaomi.pojo.ProductType;
import com.oracle.xiaomi.pojo.ProductTypeExample;
import com.oracle.xiaomi.service.ProductTypeService;
import org.springframework.beans.factory.annotation.Autowired;
import org.springframework.stereotype.Service;

import java.util.List;
//加@Service的目的是让spring接管此类的对象的创建,并依赖注入给控制器
@Service("ProductTypeServiceImpl")
public class ProductTypeServiceImpl implements ProductTypeService {
    //一定会有ProductTypeMapper对象,SPRING会完成依赖注入
    @Autowired
    ProductTypeMapper productTypeMapper;
    @Override
    public List<ProductType> getAll() {
        ProductTypeExample productTypeExample=new ProductTypeExample();
        return productTypeMapper.selectByExample(new ProductTypeExample());
    }
}
- 新建一个listener包并创建一个ProductTypeListener监听器
package com.oracle.xiaomi.listener;

import com.oracle.xiaomi.pojo.ProductType;
import com.oracle.xiaomi.service.ProductTypeService;
import org.springframework.context.ApplicationContext;
import org.springframework.context.support.ClassPathXmlApplicationContext;

import javax.servlet.ServletContextEvent;
import javax.servlet.ServletContextListener;
import javax.servlet.annotation.WebListener;
import java.util.List;


@WebListener
public class ProductTypeListener implements ServletContextListener {

    @Override
    public void contextInitialized(ServletContextEvent servletContextEvent) {
        //取出所有商品类型,并放入全局作用域中,供项目在任何地方使用商品类型集合
        //监听器无法使用spring的依赖注入,手工取出ProductTypeService对象
        ApplicationContext context=new ClassPathXmlApplicationContext("applicationContext-*.xml");
        //从bean工厂取出商品类型的业务实现类
        ProductTypeService productTypeService= (ProductTypeService) context.getBean("ProductTypeServiceImpl");
        //调用商品类型的Service,取出所有集合
        List<ProductType> list=productTypeService.getAll();
        //取出全局作用域,将商品类型集合放入
        servletContextEvent.getServletContext().setAttribute("ptlist",list);
    }

    @Override
    public void contextDestroyed(ServletContextEvent servletContextEvent) {

    }
}
- 创建一个utils包并导入语文件上传工具类FileNameUtil.java在ProductInfoController中编写图片回显的内容
FileNameUtil.java
package com.oracle.xiaomi.utils;

import java.util.UUID;

public class FileNameUtil {
	//根据UUID生成文件名
	public static String getUUIDFileName() {
		UUID uuid = UUID.randomUUID();
		return uuid.toString().replace("-", "");
	}
	//从请求头中提取文件名和类型
	public static String getRealFileName(String context) {
		// Content-Disposition: form-data; name="myfile"; filename="a_left.jpg"
		int index = context.lastIndexOf("=");
		String filename = context.substring(index + 2, context.length() - 1);
		return filename;
	}
	//根据给定的文件名和后缀截取后缀
	public static String getFileType(String fileName){
		//9527s.jpg
		int index = fileName.lastIndexOf(".");
		return fileName.substring(index);

		//8b7cb153974c4947ad6934a3213dd1f4.jpg
	}
}
控制器中代码
   @ResponseBody
    @RequestMapping("/ajaxImg")
    public String ajaxImg(@RequestParam MultipartFile pimage, HttpServletRequest request) {

        //创建存储文件名
         saveFileName = FileNameUtil.getUUIDFileName() + FileNameUtil.getFileType(pimage.getOriginalFilename());
        //找到存储的路径
        String path = request.getServletContext().getRealPath("/image_big");
        //转存
        try {
            pimage.transferTo(new File(path + saveFileName));
        } catch (IOException e) {
            e.printStackTrace();
        }
        return saveFileName;
    }
- 在接口和实现类中编写增加功能的内容
ProductInfoService接口
   //增加商品
    public int save(ProductInfo info);
ProductInfoServiceImpl.java
   @Override
    public int save(ProductInfo info) {
        return productInfoMapper.insert(info);
    }
- 在ProductInfoController控制器中实现商品的增加
   @RequestMapping("/save")
    public String save(ProductInfo info) {
        info.setpDate(new Date());
        info.setpImage(saveFileName);
        productInfoService.save(info);
        saveFileName="";
        return "redirect:/prod/split.action";


    }
- 页面addproduct.jsp不需要修改
<%@ page contentType="text/html;charset=UTF-8" language="java" %>
<%@taglib prefix="c" uri="http://java.sun.com/jsp/jstl/core" %>
<!DOCTYPE html>
<html>
<head>
<meta charset="UTF-8">
<title></title>
<link rel="stylesheet" href="${pageContext.request.contextPath}/css/bootstrap.css" />
<link rel="stylesheet" href="${pageContext.request.contextPath}/css/addBook.css" />
<script type="text/javascript" src="${pageContext.request.contextPath}/js/jquery-3.3.1.js"></script>
<script type="text/javascript" src="${pageContext.request.contextPath}/js/bootstrap.js"></script>
<script type="text/javascript" src="${pageContext.request.contextPath }/js/jquery.js"></script>
<script type="text/javascript" src="${pageContext.request.contextPath }/js/ajaxfileupload.js"></script>
</head>
<script type="text/javascript">
function fileChange(){//注意:此处不能使用jQuery中的change事件,因此仅触发一次,因此使用标签的:onchange属性
alert("change");
$.ajaxFileUpload({
url: '/prod/ajaxImg.action',//用于文件上传的服务器端请求地址
secureuri: false,//一般设置为false
fileElementId: 'pimage',//文件上传控件的id属性
dataType: 'text',//返回值类型
success: function(obj) //服务器成功响应处理函数
{
alert(obj);
$("#imgDiv").empty(); //清空原有数据
//创建img 标签对象
var imgObj = $("![]() ");
//给img标签对象追加属性
imgObj.attr("src","/image_big/"+obj);
imgObj.attr("width","100px");
imgObj.attr("height","100px");
//将图片img标签追加到imgDiv末尾
$("#imgDiv").append(imgObj);
//将图片的名称(从服务端返回的JSON中取得)赋值给文件本框
//$("#imgName").html(data.imgName);
},
error: function (e)//服务器响应失败处理函数
{
alert(e.message);
}
});
}
</script>
<body>
<!--取出上一个页面上带来的page的值-->
<div id="addAll">
<div id="nav">
<p>商品管理>新增商品</p>
</div>
<div id="table">
<form action="${pageContext.request.contextPath}/prod/save.action" enctype="multipart/form-data" method="post" id="myform">
<table>
<tr>
<td class="one">商品名称</td>
<td><input type="text" name="pName" class="two"></td>
</tr>
<!--错误提示-->
<tr class="three">
<td class="four"></td>
<td><span id="pnameerr"></span></td>
</tr>
<tr>
<td class="one">商品介绍</td>
<td><input type="text" name="pContent" class="two"></td>
</tr>
<!--错误提示-->
<tr class="three">
<td class="four"></td>
<td><span id="pcontenterr"></span></td>
</tr>
<tr>
<td class="one">定价</td>
<td><input type="number" name="pPrice" class="two"></td>
</tr>
<!--错误提示-->
<tr class="three">
<td class="four"></td>
<td><span id="priceerr"></span></td>
</tr>
<tr>
<td class="three">图片介绍</td>
<td> <br><div id="imgDiv" style="display:block; width: 40px; height: 50px;"></div><br><br><br><br>
<input type="file" id="pimage" name="pimage" onchange="fileChange()">
<span id="imgName"></span><br>
</td>
</tr>
<tr class="three">
<td class="four"></td>
<td><span></span></td>
</tr>
<tr>
<td class="one">总数量</td>
<td><input type="number" name="pNumber" class="two"></td>
</tr>
<!--错误提示-->
<tr class="three">
<td class="four"></td>
<td><span id="numerr"></span></td>
</tr>
<tr>
<td class="one">类别</td>
<td>
<select name="typeId">
<c:forEach items="${ptlist}" var="type">
<option value="${type.typeId}">${type.typeName}</option>
</c:forEach>
</select>
</td>
</tr>
<!--错误提示-->
<tr class="three">
<td class="four"></td>
<td><span></span></td>
</tr>
<tr>
<td>
<input type="submit" value="提交" class="btn btn-success">
</td>
<td>
<input type="reset" value="取消" class="btn btn-default" onclick="myclose(${param.page})">
<script type="text/javascript">
function myclose(ispage) {
window.location="${pageContext.request.contextPath}/prod/split.action?page="+ispage;
}
</script>
</td>
</tr>
</table>
</form>
</div>
</div>
</body>
</html>
");
//给img标签对象追加属性
imgObj.attr("src","/image_big/"+obj);
imgObj.attr("width","100px");
imgObj.attr("height","100px");
//将图片img标签追加到imgDiv末尾
$("#imgDiv").append(imgObj);
//将图片的名称(从服务端返回的JSON中取得)赋值给文件本框
//$("#imgName").html(data.imgName);
},
error: function (e)//服务器响应失败处理函数
{
alert(e.message);
}
});
}
</script>
<body>
<!--取出上一个页面上带来的page的值-->
<div id="addAll">
<div id="nav">
<p>商品管理>新增商品</p>
</div>
<div id="table">
<form action="${pageContext.request.contextPath}/prod/save.action" enctype="multipart/form-data" method="post" id="myform">
<table>
<tr>
<td class="one">商品名称</td>
<td><input type="text" name="pName" class="two"></td>
</tr>
<!--错误提示-->
<tr class="three">
<td class="four"></td>
<td><span id="pnameerr"></span></td>
</tr>
<tr>
<td class="one">商品介绍</td>
<td><input type="text" name="pContent" class="two"></td>
</tr>
<!--错误提示-->
<tr class="three">
<td class="four"></td>
<td><span id="pcontenterr"></span></td>
</tr>
<tr>
<td class="one">定价</td>
<td><input type="number" name="pPrice" class="two"></td>
</tr>
<!--错误提示-->
<tr class="three">
<td class="four"></td>
<td><span id="priceerr"></span></td>
</tr>
<tr>
<td class="three">图片介绍</td>
<td> <br><div id="imgDiv" style="display:block; width: 40px; height: 50px;"></div><br><br><br><br>
<input type="file" id="pimage" name="pimage" onchange="fileChange()">
<span id="imgName"></span><br>
</td>
</tr>
<tr class="three">
<td class="four"></td>
<td><span></span></td>
</tr>
<tr>
<td class="one">总数量</td>
<td><input type="number" name="pNumber" class="two"></td>
</tr>
<!--错误提示-->
<tr class="three">
<td class="four"></td>
<td><span id="numerr"></span></td>
</tr>
<tr>
<td class="one">类别</td>
<td>
<select name="typeId">
<c:forEach items="${ptlist}" var="type">
<option value="${type.typeId}">${type.typeName}</option>
</c:forEach>
</select>
</td>
</tr>
<!--错误提示-->
<tr class="three">
<td class="four"></td>
<td><span></span></td>
</tr>
<tr>
<td>
<input type="submit" value="提交" class="btn btn-success">
</td>
<td>
<input type="reset" value="取消" class="btn btn-default" onclick="myclose(${param.page})">
<script type="text/javascript">
function myclose(ispage) {
window.location="${pageContext.request.contextPath}/prod/split.action?page="+ispage;
}
</script>
</td>
</tr>
</table>
</form>
</div>
</div>
</body>
</html>


