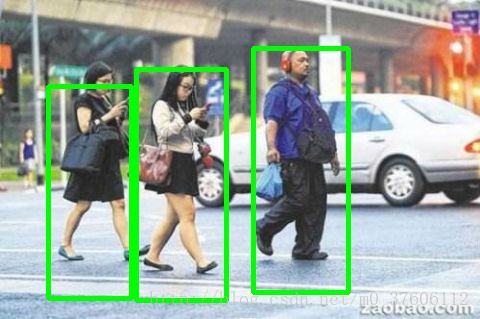
python3.6.3+opencv3.3.0学习笔记十二--基于HOG的静态图片人体探测
说明
基于opencv3.3.0自带的example例程而来
对例程做了较大的改动
参数需要根据实际的场景和应用来进行调整,相对于人脸识别,人体识别收到的影响更大,识别率和虚警率都较高,必须配合其他的模式一起方可实用。
步骤
读入图片
按照自带的训练集进行人体的识别
规范图片的显示顺序
图片矩形框的处理
图片显示和保存
'''
python3.6.3+opencv3.3.0
video_capture_HOG_people_detection
baseed on opencv3.3.0 example
'''
from __future__ import print_function
import cv2
import numpy as np
path='c://'

def inside(r, q):
    rx, ry, rw, rh = r
    qx, qy, qw, qh = q
    return rx > qx and ry > qy and rx + rw < qx + qw and ry + rh < qy + qh

def draw_detections(img, rects, thickness = 1):
    for x, y, w, h in rects:
        # the HOG detector returns slightly larger rectangles than the real objects.
        # so we slightly shrink the rectangles to get a nicer output.
        pad_w, pad_h = int(0.15*w), int(0.05*h)
        cv2.rectangle(img, (x+pad_w, y+pad_h), (x+w-pad_w, y+h-pad_h), (0, 255, 0), thickness)

if __name__ == '__main__':
    import sys
    from glob import glob
    import itertools as it
    #print(__doc__)

    hog = cv2.HOGDescriptor()
    hog.setSVMDetector( cv2.HOGDescriptor_getDefaultPeopleDetector() )

    default = [path+'people1.png ',path+'people2.png ',path+'people3.png ',path+'people4.png '] if len(sys.argv[1:]) == 0 else []
    sys.argv[1:]=[path+'people5.png ',path+'people6.png ',path+'people7.png ',path+'people8.png ']
    for fn in it.chain(*map(glob, default + sys.argv[1:])):
        print(fn, ' 图片中包含 ',)#打印图片的名字
        try:
            img = cv2.imread(fn)
            if img is None:
                print('Failed to load image file:', fn)
                continue
        except:
            print('loading error')
            continue

        found, w = hog.detectMultiScale(img, winStride=(4,4), padding=(32,32), scale=1.1)
        found_filtered = []

        for ri, r in enumerate(found):
            for qi, q in enumerate(found):
                if ri != qi and inside(r, q):
                    break
            else:
                found_filtered.append(r)
        draw_detections(img, found)
        draw_detections(img, found_filtered, 3)
        print('%d (%d) found' % (len(found_filtered), len(found)))
        cv2.imshow('img', img)

        cv2.imwrite(path+'%s_new' % fn[4:11]+'.png',img)
        print(path+'%s_new' % fn[4:11]+'.png', '已经保存在',path)

        cv2.waitKey(0)
        if cv2.waitKey(5)==27 or cv2.waitKey(5)==ord(' '):
            print('退出')
            break

    cv2.destroyAllWindows()


