EAST: An Efficient and Accurate Scene Text Detector
论文:An Efficient and Accurate Scene Text Detector
github:https://github.com/argman/EAST
旷世科技在CVPR2017的作品
优势:
提供了方向信息,可以检测各个方向的文本
缺点:
对较长的文本检测效果不好,感受野不够长
网络结构:
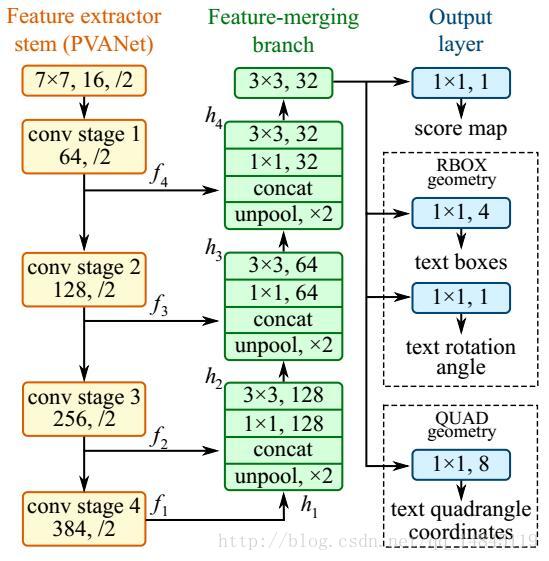
整体网络结构分为3个部分
(1) 特征提取层:
使用的基础网络结构是PVANet,分别从stage1,stage2,stage3,stage4抽出特征,一种FPN(feature pyramid network)的思想。
(2) 特征融合层:
第一步抽出的特征层从后向前做上采样,然后concat
(3) 输出层:
输出一个score map和4个回归的框+1个角度信息,或者输出,一个scoremap和8个坐标信息。
由于程序实现使用的基础网络不是pvanet网络,而是resnet50-v1。
在caffe版本的resnet50实现中,只有第一个卷积后面的pooling和最后一层的gloabl pooling,详细结构见reference,网络通过卷积层的stride=2操作实现类似pooling的效果
而本程序使用的slim中带的resnet50包含了5个pooling。
Resnet50结构,最后一个featuremap本质上将输入图像缩小16倍(4个pooling),最后一个gloabl pooling,类似于vgg中的全连接。gloabl pooling是googlenet和Resnet的专利。
本文网络结构主要取了pool2,pool3,pool4,pool5,的featuremap引出,分别进行uppooling,concat,conv操作,得到最终的featuremap,然后进行卷积,分别输出channel=1的F_score
,channel=4的geo_map,channel=1的angle_map。
标签生成过程:

(a) 中黄色的为人工标注的框,绿色为对黄色框进行0.3倍边长的缩放后的框,这样做可以进一步去除人工标注的误差,拿到更准确的label信息。
(b) 为根据(a)中绿色框生成的label信息
(c) 中先生成一个(b)中白色区域的最小外接矩,然后算每一个(b)中白色的点到粉色最小外接矩的上下左右边的距离,即生成(d),然后生成粉色的矩形和水平方向的夹角,即生成角度信息(e),e中所有灰色部分的角度信息一样,都是同样的角度。
损失函数:
总体loss:
![]()
分类loss:

分类loss的实现上没有采用论文中的class balanced cross-entrop loss,而是使用了dice_loss。
def dice_coefficient(y_true_cls, y_pred_cls,training_mask):
    '''
    dice loss
    :param y_true_cls:
    :param y_pred_cls:
    :param training_mask:
    :return:
    '''
    eps = 1e-5
    intersection = tf.reduce_sum(y_true_cls * y_pred_cls * training_mask)
    union = tf.reduce_sum(y_true_cls * training_mask) + tf.reduce_sum(y_pred_cls * training_mask) + eps
    loss = 1. - (2 * intersection / union)
    tf.summary.scalar('classification_dice_loss', loss)
return loss首先需要说明一下training_mask,
if min(poly_h, poly_w) < FLAGS.min_text_size:
cv2.fillPoly(training_mask,poly.astype(np.int32)[np.newaxis, :, :], 0)training_mask就是为了将长或宽小于某个阈值的框当做hard-example,这些样本太难训练,所以需要将这些样本去掉。所以,将包含这些样本的框里面置为黑色。正好和score_map的取值相反,从而去掉。
dice_loss 实现的就是交并比,由于loss需要不断减少,所以使用了1-操作。
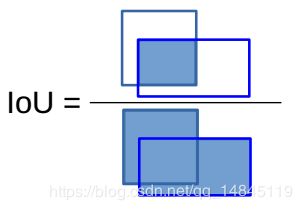
看到这里是不是又可以想到什么,有没有感觉这个dice_loss 和F1_score值很像。
dice_loss =(2*y_true_cls * y_pred_cls)/(y_true_cls+ y_pred_cls)
F1_score=(2*precision*recall)/(precision+recall)
回归loss:
![]()


def loss(y_true_cls, y_pred_cls,
         y_true_geo, y_pred_geo,
         training_mask):
    '''
    define the loss used for training, contraning two part,
    the first part we use dice loss instead of weighted logloss,
    the second part is the iou loss defined in the paper
    :param y_true_cls: ground truth of text
    :param y_pred_cls: prediction os text
    :param y_true_geo: ground truth of geometry
    :param y_pred_geo: prediction of geometry
    :param training_mask: mask used in training, to ignore some text annotated by ###
    :return:
    '''
    classification_loss = dice_coefficient(y_true_cls, y_pred_cls, training_mask)
    # scale classification loss to match the iou loss part
    classification_loss *= 0.01

    # d1 -> top, d2->right, d3->bottom, d4->left
    d1_gt, d2_gt, d3_gt, d4_gt, theta_gt = tf.split(value=y_true_geo, num_or_size_splits=5, axis=3)
    d1_pred, d2_pred, d3_pred, d4_pred, theta_pred = tf.split(value=y_pred_geo, num_or_size_splits=5, axis=3)
    area_gt = (d1_gt + d3_gt) * (d2_gt + d4_gt)
    area_pred = (d1_pred + d3_pred) * (d2_pred + d4_pred)
    w_union = tf.minimum(d2_gt, d2_pred) + tf.minimum(d4_gt, d4_pred)
    h_union = tf.minimum(d1_gt, d1_pred) + tf.minimum(d3_gt, d3_pred)
    area_intersect = w_union * h_union
    area_union = area_gt + area_pred - area_intersect
    L_AABB = -tf.log((area_intersect + 1.0)/(area_union + 1.0))
    L_theta = 1 - tf.cos(theta_pred - theta_gt)
    tf.summary.scalar('geometry_AABB', tf.reduce_mean(L_AABB * y_true_cls * training_mask))
    tf.summary.scalar('geometry_theta', tf.reduce_mean(L_theta * y_true_cls * training_mask))
    L_g = L_AABB + 20 * L_theta

    return tf.reduce_mean(L_g * y_true_cls * training_mask) + classification_loss
回归有2个loss,分别回归边框的上下左右距离L_AABB,和边框与水平方向的夹角L_theta。
其中,
L_AABB=-log(area_intersect/area_union),
L_theta = 1 - tf.cos(theta_pred - theta_gt)
其中,
d1_pred, d2_pred, d3_pred, d4_pred分别为距离上,右,下,左,边框的预测的距离。
d1 -> top, d2->right, d3->bottom, d4->left分别为距离上,右,下,左,边框的label的距离。
theta_pred为预测的角度。
theta_gt为label的角度。
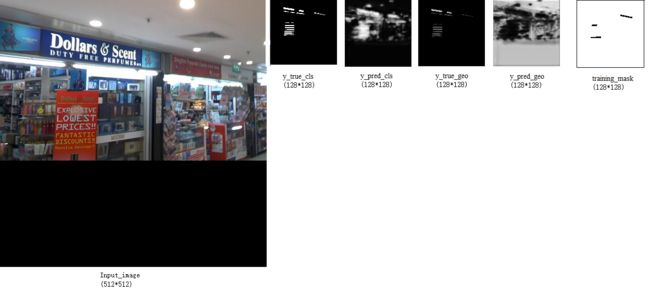
Input_image(512*512),y_true_cls(128*128),y_pred_cls(128*128),y_true_geo(128*128),y_pred_geo(128*128),training_mask(128*128)这几个特征图的可视化如下:
training_mask的外圈黑线为为了显示的需要(白底上显示白框)加的,实际没有。
Locality-Aware NMS:
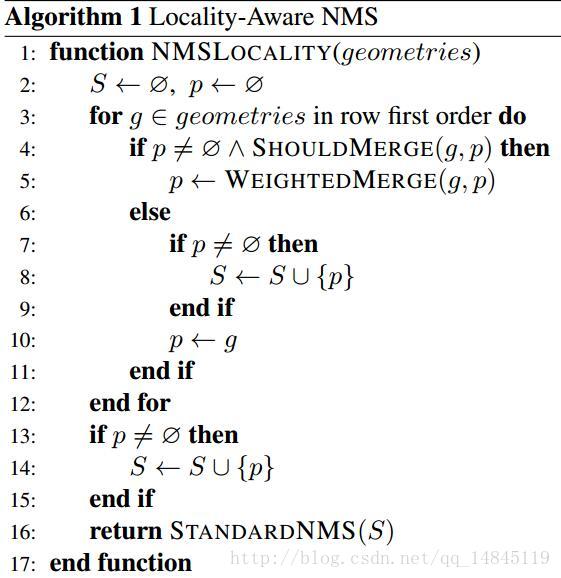
locality_aware_nms在标准nms的基础上加了weighted_merge,所谓weighted_merge就是将2个IOU高于某个threshold的输出框,进行基于得分的合并。合并后的输出框的坐标数值介于2个合并的输入框之间,感觉这样操作可以将所有回归出的框的坐标信息都利用起来,有助于减少位置误差,而不是像传统的nms一样,直接取分数最高的那个。
详细过程如下程序:
def weighted_merge(g, p):
    g[:8] = (g[8] * g[:8] + p[8] * p[:8])/(g[8] + p[8])
    g[8] = (g[8] + p[8])
    return g
看到这里,有木有感觉和凸函数的性质的那个不等式很像。
假设,2个点g和p,假设其分数分别为k1,k2,
上面程序表达是公式就是:
weighted_merge(g, p)=(k1*g+k2*p)/(k1+k2)
而凸函数的性质的公式是,(k1*f(x1)+k2*f(x2))/(k1+k2)>=f((k1*x1+k2*x2)/2)
举例如下:
其中g和p分别为2个输出框,假设都为1*9的大小,前8个为4个坐标的(x,y),最后一个为框的置信度分数。
g=[ 114.08222961 , 29.94154549 , 270.02160645 , 28.1983242 ,
270.58172607, 78.30197144 , 114.64233398 , 80.04519653 , 0.87047273]
P=[ 110.07213085 , 29.98007349 , 267.0800416 , 27.57254931 ,
267.85499947 , 78.08751085 , 110.84708252 , 80.49503197 , 7.11734003]
weighted_merge(g,p)=[110.50913178 , 29.9758749 , 267.40059893 , 27.64074319 , 268.15214478 , 78.11088172 , 111.26067044 , 80.4460111 , 7.98781276]
作者程序中提供了python和c++两种实现方式,其中,c++实现的locality_aware_nms相比python实现的速度快了近120倍。
求任意多边形面积:
def polygon_area(poly):
    '''
    compute area of a polygon
    :param poly:
    :return:
    '''
    edge = [
        (poly[1][0] - poly[0][0]) * (poly[1][1] + poly[0][1]),
        (poly[2][0] - poly[1][0]) * (poly[2][1] + poly[1][1]),
        (poly[3][0] - poly[2][0]) * (poly[3][1] + poly[2][1]),
        (poly[0][0] - poly[3][0]) * (poly[0][1] + poly[3][1])
    ]
    return np.sum(edge)/2.
具体思路如下,每算一次相当于计算一次梯形的面积。
ps,制作gif动图的程序,
#-*- coding: UTF-8 -*-

import imageio
import os

def create_gif(image_list, gif_name):

    frames = []
    for image_name in image_list:
        frames.append(imageio.imread("./pic/"+image_name))
    # Save them as frames into a gif
    imageio.mimsave(gif_name, frames, 'GIF', duration = 1.0)

    return

def main():
    image_list = os.listdir("./pic")
    gif_name = 'created_gif.gif'
    create_gif(image_list, gif_name)

if __name__ == "__main__":
    main()
训练事项:
程序实现中只实现了RBOX的方式,QUAD方式没有实现。
训练的话可以使用ICDAR2013,ICDAR2015,ICDAR2017。其中,2013,2015位英文,2017为中文。
ICDAR2013标注格式:xmin, ymin, xmax, ymax, text
其中,xmin, ymin为左上角坐标,xmax, ymax为右下角坐标
eg:38, 43, 920, 215, "Tiredness"
ICDAR2015标注格式:x1,y1,x2,y2,x3,y3,x4,y4,text
其中,x1,y1为左上角坐标,x2,y2为右上角坐标,x3,y3为右下角坐标,x4,y4为左下角坐标。‘###’表示text难以辨认。
eg:377,117,463,117,465,130,378,130,Genaxis Theatre
eg:374,155,409,155,409,170,374,170,###
ICDAR2018标注格式:x1,y1,x2,y2,x3,y3,x4,y4,difficult,text
x1,y1为左上角坐标,x2,y2为右上角坐标,x3,y3为右下角坐标,x4,y4为左下角坐标。difficult为1表示text难以辨认,0表示容易辨认。
eg:390,902,1856,902,1856,1225,390,1225,0,"金氏眼镜"
其中ICDAR2013的label只有左上和右下的坐标,需要自己做label,改为本文的label接口。
ICDAR2015,ICDAR2017可以直接使用,但是ICDAR2017中好多label的标注不是按照顺时针方向标的坐标,但是程序需要严格要求label坐标必须为顺时针方向。当然作者的程序中也会自动进行纠正。
针对EAST边界不准的一些改进尝试:
改进思想1:
直接取程序预测出的框的4个顶点坐标,然后以边框长边的60%长度为边长,做4个矩形,分别重新预测4个顶点的坐标。源于advanced EAST的改进思想,但是和而不同。
效果:no work
原因:如果第一次作者预测的框就不准确,那么这一次的矫正也会因为第一次的不准确而不准确。
#original
boxes, timer = detect(score_map=score, geo_map=geometry, timer=timer)
height_score,width_score=score.shape[1:3]
height_score-=1
width_score-=1
coor_mask=np.zeros_like(score)
for box in boxes:
    x1,y1,x2,y2,x3,y3,x4,y4=np.asarray(box[:8],np.int32)//4
    radius=max(int(min(x2-x1,x3-x4,y3-y2,y4-y1)*2.0),2)
    coor_mask[:,max(0,y1-radius):min(height_score,y1+radius),max(0,x1-radius):min(width_score,x1+radius),:]=1
    coor_mask[:,max(0,y2-radius):min(height_score,y2+radius),max(0,x2-radius):min(width_score,x2+radius),:]=1
    coor_mask[:,max(0,y3-radius):min(height_score,y3+radius),max(0,x3-radius):min(width_score,x3+radius),:]=1
    coor_mask[:,max(0,y4-radius):min(height_score,y4+radius),max(0,x4-radius):min(width_score,x4+radius),:]=1
    print(ratio_w,ratio_h)

#4_coor
boxes, timer = detect(score_map=score*coor_mask, geo_map=geometry, timer=timer,score_map_thresh=0.8,box_thresh=0.01)
改进思想2:
对score_map进行区域联通,找外接矩形。pixelLink的思想。
效果:no work
原因:本质原因还是score_map就不准确,所以得到的框也不准确。
def dilate_image(img, kernel_size=(3, 3), iter_size=5):
    kernel = cv2.getStructuringElement(cv2.MORPH_RECT, kernel_size)
    img_erode = cv2.dilate(img, kernel, iter_size)
    return img_erode

def findContours_func(input_image):
    gray=np.asarray(input_image*255,np.uint8)
    ret, imgbw = cv2.threshold(gray, 240, 255, cv2.THRESH_BINARY)
    img_dilate = dilate_image(np.asarray(imgbw))
    img, contours, hierarchy = cv2.findContours(
        img_dilate, cv2.RETR_EXTERNAL, cv2.CHAIN_APPROX_SIMPLE)

    boxes_array=np.zeros([len(contours),9])
    for i,cnt in enumerate(contours):
        x, y, w, h = cv2.boundingRect(cnt)
        boxes_array[i,:8]=(4*x,4*y,4*(x+w),4*y,4*(x+w),4*(y+h),4*x,4*(y+h))

    return boxes_array

boxes=findContours_func(score.reshape(score.shape[1],score.shape[2]))
改进思想3:
网络最后层加lstm,将score_map提亮,抹均匀。CTPN的思想。
效果: work
def horizontal_vertical_lstm_together(input_data, rnn_size, scope_n="layer1"):
    with tf.variable_scope("MultiDimensionalLSTMCell-horizontal-" + scope_n):
        # input is (b, h, w, c)
        #horizontal
        _, _, _, c_h = input_data.get_shape().as_list()
        shape_h=tf.shape(input_data)
        b_h, h_h, w_h= shape_h[0],shape_h[1],shape_h[2]
        # transpose = swap h and w.
        new_input_data_h = tf.reshape(input_data, (b_h*h_h, w_h, c_h))  # horizontal.
        # Forward
        lstm_fw_cell = tf.contrib.rnn.LSTMCell(rnn_size//4)
        lstm_fw_cell = tf.contrib.rnn.DropoutWrapper(lstm_fw_cell, output_keep_prob=0.5)
        # Backward
        lstm_bw_cell = tf.contrib.rnn.LSTMCell(rnn_size//4)
        lstm_bw_cell = tf.contrib.rnn.DropoutWrapper(lstm_bw_cell, output_keep_prob=0.5)


        rnn_out_h, _ = tf.nn.bidirectional_dynamic_rnn(
                lstm_fw_cell,
                lstm_bw_cell,
                inputs=new_input_data_h,
                dtype=tf.float32,
                time_major=False)
        rnn_out_h=tf.concat(rnn_out_h, 2)
        rnn_out_h = tf.reshape(rnn_out_h, (-1, h_h, w_h, rnn_size//2))
        #vertical
    with tf.variable_scope("MultiDimensionalLSTMCell-vertical-" + scope_n):
        new_input_data_v=tf.transpose(input_data,(0,2,1,3))
        _, _, _, c_v = new_input_data_v.get_shape().as_list()
        shape_v=tf.shape(new_input_data_v)
        b_v, h_v, w_v = shape_v[0],shape_v[1],shape_v[2]
        new_input_data_v = tf.reshape(new_input_data_v, (b_v*h_v, w_v, c_v))
        # Forward
        lstm_fw_cell = tf.contrib.rnn.LSTMCell(rnn_size//4)
        lstm_fw_cell = tf.contrib.rnn.DropoutWrapper(lstm_fw_cell, output_keep_prob=0.5)
        # Backward
        lstm_bw_cell = tf.contrib.rnn.LSTMCell(rnn_size//4)
        lstm_bw_cell = tf.contrib.rnn.DropoutWrapper(lstm_bw_cell, output_keep_prob=0.5)


        rnn_out_v, _ = tf.nn.bidirectional_dynamic_rnn(
                lstm_fw_cell,
                lstm_bw_cell,
                inputs=new_input_data_v,
                dtype=tf.float32,
                time_major=False)
        rnn_out_v=tf.concat(rnn_out_v, 2)

        rnn_out_v = tf.reshape(rnn_out_v, (-1, h_v, w_v, rnn_size//2))
        rnn_out_v=tf.transpose(rnn_out_v,(0,2,1,3))
        rnn_out=tf.concat([rnn_out_h,rnn_out_v],axis=3)
        #rnn_out=tf.add(rnn_out_h,rnn_out_v)
        return rnn_out

g[3]=horizontal_vertical_lstm_together(g[3], 128, scope_n="layer1")
改进思想4:
将分类的dice_loss修改为cross_entrop,并基于UNet的思想,加入点距离边框的距离进行学习,使得中心的loss相对降低,边缘的loss相对提高。实现上没有进行除distance的操作,因为这样做会使得loss爆炸,而是使用乘(1-distance)的操作。
效果: work
def distance_balanced_sigmoid_crossentrop(y_true_cls, y_pred_cls,y_true_geo,
                     training_mask):
    eps = 1e-5
    labels=y_true_cls*training_mask
    logits=tf.nn.sigmoid(y_pred_cls*training_mask)
    min_distance=tf.abs(tf.minimum(tf.minimum(y_true_geo[:,:,:,0],y_true_geo[:,:,:,1]),tf.minimum(y_true_geo[:,:,:,2],y_true_geo[:,:,:,3])))
    min_distance=tf.expand_dims(min_distance,3)
    beta = 1 - tf.reduce_mean(labels)
    loss = -1*tf.reduce_mean(tf.div(beta * labels * tf.log(logits + eps),min_distance) +(1 - beta) * (1 - labels) * tf.log(1 - logits + eps))
    tf.summary.scalar('classification_distance_balanced_sigmoid_crossentrop_loss', loss)
return loss
改进思想5:
采用LovaszSoftmax,细节可以看论文,The Lovasz-Softmax loss: A tractable surrogate for the optimization of the intersection-over-union measure in neural networks
效果: work
改进思想6:
尝试opencv的接口,做cpu端的加速,需要将原始ckpt模型转化为pb模型,然后调用opencv接口做预测。具体需要改动和实现的细节可以参考,https://github.com/watersink/opencv-east
效果: work,opencv的结果和TensorFlow的结果又细微差别
改进思想7:
EAST对于长边的左右两端预测不准,经常会切去1,2个字,对此进行下面的改进。
首先需要说明,east在制作polygon时采用了shrink_poly的策略,这样来缓解标注的误差。
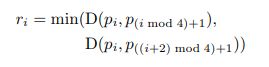
其中ri表示第i条边的长度,i=0,1,2,3,一共四条边。这里的计算直接求相邻2点之间的L2距离,然后取其中较小的一个。
实际边长r的计算如下,
r = [None, None, None, None]
for i in range(4):
    r[i] = min(np.linalg.norm(poly[i] - poly[(i + 1) % 4]),np.linalg.norm(poly[i] - poly[(i - 1) % 4]))
np.linalg.norm该函数默认表示求L2 norm。
这里的改进思想就是,对于短边可以取0.3倍的距离的shrink,而对于长边,shrink的太多,假如还是0.3的话,会导致训练完后,预测出现边界不准的情况。因此这里对于长边只shrink0.1。
修改后程序如下icdar.py,
def shrink_poly(poly, r):
    if np.linalg.norm(poly[0] - poly[1]) + np.linalg.norm(poly[2] - poly[3]) > \
                    np.linalg.norm(poly[0] - poly[3]) + np.linalg.norm(poly[1] - poly[2]):
        # first move (p0, p1), (p2, p3), then (p0, p3), (p1, p2)
        ## p0, p1
        R = 0.1
        theta = np.arctan2((poly[1][1] - poly[0][1]), (poly[1][0] - poly[0][0]))
        poly[0][0] += R * r[0] * np.cos(theta)
        poly[0][1] += R * r[0] * np.sin(theta)
        poly[1][0] -= R * r[1] * np.cos(theta)
        poly[1][1] -= R * r[1] * np.sin(theta)
        ## p2, p3
        theta = np.arctan2((poly[2][1] - poly[3][1]), (poly[2][0] - poly[3][0]))
        poly[3][0] += R * r[3] * np.cos(theta)
        poly[3][1] += R * r[3] * np.sin(theta)
        poly[2][0] -= R * r[2] * np.cos(theta)
        poly[2][1] -= R * r[2] * np.sin(theta)
        ## p0, p3
        R = 0.3
        theta = np.arctan2((poly[3][0] - poly[0][0]), (poly[3][1] - poly[0][1]))
        poly[0][0] += R * r[0] * np.sin(theta)
        poly[0][1] += R * r[0] * np.cos(theta)
        poly[3][0] -= R * r[3] * np.sin(theta)
        poly[3][1] -= R * r[3] * np.cos(theta)
        ## p1, p2
        theta = np.arctan2((poly[2][0] - poly[1][0]), (poly[2][1] - poly[1][1]))
        poly[1][0] += R * r[1] * np.sin(theta)
        poly[1][1] += R * r[1] * np.cos(theta)
        poly[2][0] -= R * r[2] * np.sin(theta)
        poly[2][1] -= R * r[2] * np.cos(theta)
    else:
        ## p0, p3
        # print poly
        R = 0.1
        theta = np.arctan2((poly[3][0] - poly[0][0]), (poly[3][1] - poly[0][1]))
        poly[0][0] += R * r[0] * np.sin(theta)
        poly[0][1] += R * r[0] * np.cos(theta)
        poly[3][0] -= R * r[3] * np.sin(theta)
        poly[3][1] -= R * r[3] * np.cos(theta)
        ## p1, p2
        theta = np.arctan2((poly[2][0] - poly[1][0]), (poly[2][1] - poly[1][1]))
        poly[1][0] += R * r[1] * np.sin(theta)
        poly[1][1] += R * r[1] * np.cos(theta)
        poly[2][0] -= R * r[2] * np.sin(theta)
        poly[2][1] -= R * r[2] * np.cos(theta)
        ## p0, p1
        R = 0.3
        theta = np.arctan2((poly[1][1] - poly[0][1]), (poly[1][0] - poly[0][0]))
        poly[0][0] += R * r[0] * np.cos(theta)
        poly[0][1] += R * r[0] * np.sin(theta)
        poly[1][0] -= R * r[1] * np.cos(theta)
        poly[1][1] -= R * r[1] * np.sin(theta)
        ## p2, p3
        theta = np.arctan2((poly[2][1] - poly[3][1]), (poly[2][0] - poly[3][0]))
        poly[3][0] += R * r[3] * np.cos(theta)
        poly[3][1] += R * r[3] * np.sin(theta)
        poly[2][0] -= R * r[2] * np.cos(theta)
        poly[2][1] -= R * r[2] * np.sin(theta)
    return poly
效果: work,对于边界的预测有改善
改进思想8:
训练的时候,加入旋转的数据增强操作。
def rotate_image_polys(im,text_polys,vis=False):
    #im:[height,width,channels]
    #text_polys:[[[x1,y1][x2,y2][x3,y3][x4,y4]],[[x1,y1][x2,y2][x3,y3][x4,y4]]]

    import math
    import random
    if vis:
        newimg = cv2.polylines(im.copy(), text_polys, 1, (255, 0, 0), 1)
        cv2.imwrite("before.jpg",newimg)

    rotate_angle=random.randint(-5,5)
    center_x=0
    center_y=0
    for n_tp in range(text_polys.shape[0]):
        for nn in range(4):
            text_polys[n_tp][nn][0]=abs((text_polys[n_tp][nn][0]-center_x)*math.cos(-rotate_angle*math.pi/180)-(text_polys[n_tp][nn][1]-center_y)*math.sin(-rotate_angle*math.pi/180)+center_x)
            text_polys[n_tp][nn][1]=abs((text_polys[n_tp][nn][0]-center_x)*math.sin(-rotate_angle*math.pi/180)-(text_polys[n_tp][nn][1]-center_y)*math.cos(-rotate_angle*math.pi/180)+center_y)


    text_polys = np.array(text_polys).astype(np.float64)
    text_polys = np.clip(text_polys, [0, 0], im.shape[:2][::-1])


    matrix = cv2.getRotationMatrix2D((int(im.shape[1]/ 2),int(im.shape[0] / 2)), rotate_angle, 1)
    im=cv2.warpAffine(im,matrix,(im.shape[1], im.shape[0]))


    if vis:
        newimg = cv2.polylines(im.copy(), text_polys, 1, (255, 0, 0), 1)
        cv2.imwrite("after.jpg",newimg)
    return im, text_polys
然后,在icdar.py的generator函数中调用。
                rd_scale = np.random.choice(random_scale)
                im = cv2.resize(im, dsize=None, fx=rd_scale, fy=rd_scale)
                im=np.expand_dims(im,2)
                text_polys *= rd_scale

                ##my rotate
                ##im,text_polys=rotate_image_polys(im,text_polys)
                ##my rotate


                # print rd_scale
                # random crop a area from image
                if np.random.rand() < background_ratio:
                    # crop background
                    im, text_polys, text_tags = crop_area(im, text_polys, text_tags, crop_background=True)
                    if text_polys.shape[0] > 0:
                        # cannot find background
                        continue
在测试的时候,多角度测试的集成学习方法,任意角度的旋转,可以参考,
def rotate_image(image, angle,keep_pixels=True):
    #image:rgb
    #angle:reverse close
    #keep_pixels:delete pixels or not
    (h, w) = image.shape[:2]
    (cX, cY) = (w // 2, h // 2)

    # grab the rotation matrix (applying the negative of the
    # angle to rotate clockwise), then grab the sine and cosine
    # (i.e., the rotation components of the matrix)
    M = cv2.getRotationMatrix2D((cX, cY), angle, 1.0)

    cos = np.abs(M[0, 0])
    sin = np.abs(M[0, 1])


    # compute the new bounding dimensions of the image
    nW = int((h * sin) + (w * cos))
    nH = int((h * cos) + (w * sin))

    if keep_pixels:
        # adjust the rotation matrix to take into account translation
        M[0, 2] += ((nW / 2) - cX)
        M[1, 2] += ((nH / 2) - cY)

        # perform the actual rotation and return the image
        return 255-cv2.warpAffine(255-image, M, (nW, nH))
    else:
        return 255-cv2.warpAffine(255-image, M, (w, h))
效果: work,
References:
https://github.com/KaimingHe/deep-residual-networks/tree/master/prototxt
https://github.com/huoyijie/AdvancedEAST