SpringBoot-RabbitMQ04-交换器【topic】介绍
交换器介绍
RabbitMQ中有三种主要的交互器分别如下
| 交换器 | 说明 |
|---|---|
| direct | 发布与订阅 完全匹配 |
| topic | 主体,规则匹配 |
| fanout | 广播 |
topic介绍
TopicExchange 是比较复杂也比较灵活的 种路由策略,在TopicExchange 中,Queue 通过routingkey 绑定到 TopicExchange 上,当消息到达 TopicExchange 后,TopicExchange 根据消息的routingkey 消息路由到一个或者多 Queue上,相比direct模式topic会更加的灵活些。

本案例通过两个项目来实现,一个consumer项目和一个provider项目。
1.创建消费者
项目结构
配置文件
spring.application.name=springcloud-mq
spring.rabbitmq.host=192.168.88.150
spring.rabbitmq.port=5672
spring.rabbitmq.username=dpb
spring.rabbitmq.password=123

#设置交换器的名称
mq.config.exchange=log.topic

#info 队列名称
mq.config.queue.info=log.info

#error 队列名称
mq.config.queue.error=log.error

# log 队列名称
mq.config.queue.logs=log.all
三个消费者
@Component
@RabbitListener(
        bindings=@QueueBinding(
                value=@Queue(value="${mq.config.queue.info}",autoDelete="true"),
                        exchange=@Exchange(value="${mq.config.exchange}",type= ExchangeTypes.TOPIC),
                        key="*.log.info"
                )
        )
public class InfoReceiver {

    /**
     * 接收消息的方法。采用消息队列监听机制
     * @param msg
     */
    @RabbitHandler
    public void process(String msg){
        System.out.println("Info........receiver: "+msg);
    }
}
@Component
@RabbitListener(
        bindings=@QueueBinding(
                value=@Queue(value="${mq.config.queue.error}",autoDelete="true"),
                        exchange=@Exchange(value="${mq.config.exchange}",type= ExchangeTypes.TOPIC),
                        key="*.log.error"
                )
        )
public class ErrorReceiver {

    /**
     * 接收消息的方法。采用消息队列监听机制
     * @param msg
     */
    @RabbitHandler
    public void process(String msg){
        System.out.println("Error........receiver: "+msg);
    }
}
@Component
@RabbitListener(
        bindings=@QueueBinding(
                value=@Queue(value="${mq.config.queue.logs}",autoDelete="true"),
                        exchange=@Exchange(value="${mq.config.exchange}",type= ExchangeTypes.TOPIC),
                        key="*.log.*"
                )
        )
public class LogsReceiver {

    /**
     * 接收消息的方法。采用消息队列监听机制
     * @param msg
     */
    @RabbitHandler
    public void process(String msg){
        System.out.println("All........receiver: "+msg);
    }
}
然后启动项目等待消息即可~
2.创建服务提供者
目录结构
配置文件
spring.application.name=springcloud-mq
spring.rabbitmq.host=192.168.88.150
spring.rabbitmq.port=5672
spring.rabbitmq.username=dpb
spring.rabbitmq.password=123
#设置交换器的名称
mq.config.exchange=log.topic
三个服务提供者
@Component
public class UserSender {

    @Autowired
    private AmqpTemplate rabbitAmqpTemplate;
    //exchange 交换器名称
    @Value("${mq.config.exchange}")
    private String exchange;
    /*
     * 发送消息的方法
     */
    public void send(String msg){
        //向消息队列发送消息
        //参数一:交换器名称。
        //参数二:路由键
        //参数三:消息
        this.rabbitAmqpTemplate.convertAndSend(this.exchange,"user.log.debug", "user.log.debug....."+msg);
        this.rabbitAmqpTemplate.convertAndSend(this.exchange,"user.log.info", "user.log.info....."+msg);
        this.rabbitAmqpTemplate.convertAndSend(this.exchange,"user.log.warn","user.log.warn....."+msg);
        this.rabbitAmqpTemplate.convertAndSend(this.exchange,"user.log.error", "user.log.error....."+msg);
    }
}
@Component
public class ProductSender {

    @Autowired
    private AmqpTemplate rabbitAmqpTemplate;
    //exchange 交换器名称
    @Value("${mq.config.exchange}")
    private String exchange;
    /*
     * 发送消息的方法
     */
    public void send(String msg){
        //向消息队列发送消息
        //参数一:交换器名称。
        //参数二:路由键
        //参数三:消息
        this.rabbitAmqpTemplate.convertAndSend(this.exchange,"product.log.debug", "product.log.debug....."+msg);
        this.rabbitAmqpTemplate.convertAndSend(this.exchange,"product.log.info", "product.log.info....."+msg);
        this.rabbitAmqpTemplate.convertAndSend(this.exchange,"product.log.warn","product.log.warn....."+msg);
        this.rabbitAmqpTemplate.convertAndSend(this.exchange,"product.log.error", "product.log.error....."+msg);
    }
}
@Component
public class OrderSender {

    @Autowired
    private AmqpTemplate rabbitAmqpTemplate;
    //exchange 交换器名称
    @Value("${mq.config.exchange}")
    private String exchange;
    /*
     * 发送消息的方法
     */
    public void send(String msg){
        //向消息队列发送消息
        //参数一:交换器名称。
        //参数二:路由键
        //参数三:消息
        this.rabbitAmqpTemplate.convertAndSend(this.exchange,"order.log.debug", "order.log.debug....."+msg);
        this.rabbitAmqpTemplate.convertAndSend(this.exchange,"order.log.info", "order.log.info....."+msg);
        this.rabbitAmqpTemplate.convertAndSend(this.exchange,"order.log.warn","order.log.warn....."+msg);
        this.rabbitAmqpTemplate.convertAndSend(this.exchange,"order.log.error", "order.log.error....."+msg);
    }
}
单元测试
@RunWith(SpringRunner.class)
@SpringBootTest(classes = RabbitmqDirectProviderApplication.class)
public class RabbitmqDirectProviderApplicationTests {

    @Autowired
    private UserSender usersender;
    @Autowired
    private ProductSender productsender;
    @Autowired
    private OrderSender ordersender;

    @Test
    public void contextLoads() throws Exception{
        this.usersender.send("UserSender.....");
        this.productsender.send("ProductSender....");
        this.ordersender.send("OrderSender......");
    }
}
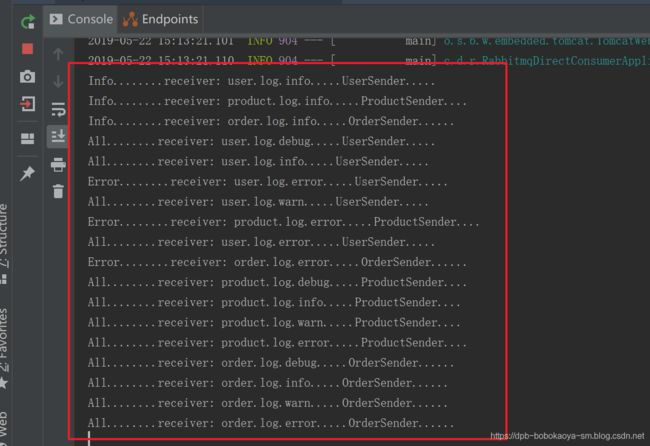
启动服务观察消费者控制台的输出
也可以观察控制台
搞定~


