Lesson 3A Object Oriented Programming
Content
- 1.Resources and Java Code
- 2.Resources Overview
- 3.Resource Types
- 4.Providing Resources
- 5.Accessing Resources
- 6.From XML to Java
- 7.Reading and Writing Logs
1. Resources and Java Code
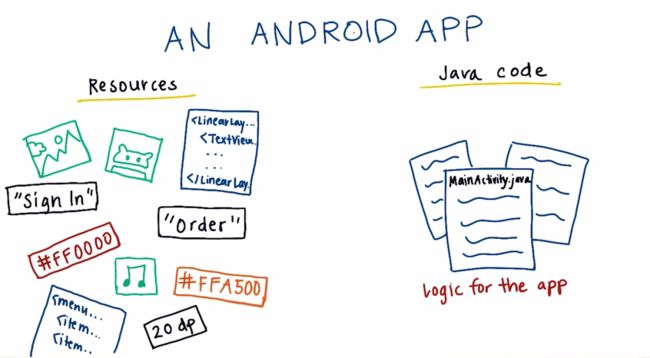
Resources live under the res directory of your app. Res is short for resources. On the other hand, java files live in the java folder. And we have MainActivity.java located inside this folder.
An Android app is mainly made of resources and java code. The java code consists of files like MainActivity.java. Altogether it handles what should happen when the app is running like responding to button clicks or other events. Then you have resources that live in the res directory of your app. This includes images, text strings, colors, dimensions, like for width and height, xml files like for menus and layouts, as well as raw media files like for audio or video.
One of the major advantages to separating out the java code and the resources is that we can provide alternative resources to make the app look better on certain devices. So if we want a different layout on larger screen devices, we can provide that by just swapping it out.Or, if we want to translate these strings into another language, then it makes it easier to swap out the strings in just the centralized location instead of having it scattered all over the code files.
2. Resources Overview
You should always externalize resources such as images and strings from your application code, so that you can maintain them independently. Externalizing your resources also allows you to provide alternative resources that support specific device configurations such as different languages or screen sizes, which becomes increasingly important as more Android-powered devices become available with different configurations. In order to provide compatibility with different configurations, you must organize resources in your project's res/ directory, using various sub-directories that group resources by type and configuration.
3. Resource Types
Each of the documents in this section describe the usage, format and syntax for a certain type of application resource that you can provide in your resources directory ( res/ ).
Here's a brief summary of each resource type:
- Animation Resources
Define pre-determined animations. Tween animations are saved inres/anim/and accessed from theR.animclass.
Frame animations are saved inres/drawable/and accessed from theR.drawableclass. - Color State List Resource
Define a color resources that changes based on the View state.Saved inres/color/and accessed from theR.colorclass. - Drawable Resources
Define various graphics with bitmaps or XML.
Saved inres/drawable/and accessed from theR.drawableclass. - Layout Resource
Define the layout for your application UI.
Saved inres/layout/and accessed from theR.layoutclass. - Menu Resource
Define the contents of your application menus.
Saved inres/menu/and accessed from theR.menuclass. - String Resources
Define strings, string arrays, and plurals (and include string formatting and styling).
Saved inres/values/and accessed from theR.string,R.array, andR.pluralsclasses. - Style Resource
Define the look and format for UI elements.
Saved inres/values/and accessed from theR.styleclass. - More Resource Types
Define values such as booleans, integers, dimensions, colors, and other arrays.
Saved inres/values/but each accessed from uniqueRsub-classes (such asR.bool,R.integer,R.dimen, etc.).
4. Providing Resources
This part shows you how to group your resources in your Android project and provide alternative resources for specific device configurations.
Quickview
- Different types of resources belong in different subdirectories of
res/ - Alternative resources provide configuration-specific resource files
- Always include default resources so your app does not depend on specific device configurations
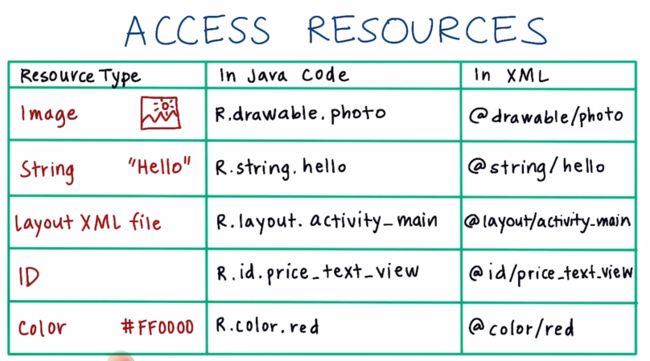
5. Accessing Resources
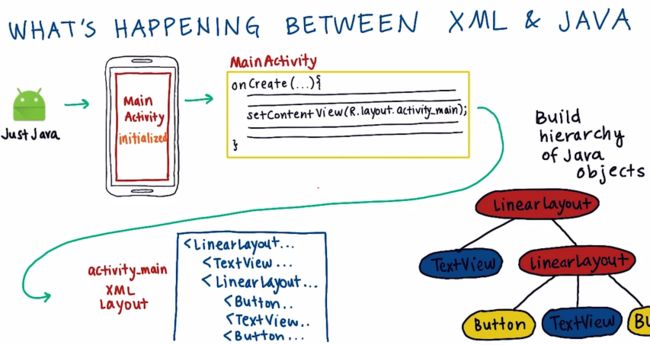
6. From XML to Java
7. Reading and Writing Logs
The Android logging system provides a mechanism for collecting and viewing system debug output. Logcat dumps a log of system messages, which include things such as stack traces when the emulator throws an error and messages that you have written from your application by using the Log class. You can run LogCat through ADB or from DDMS, which allows you to read the messages in real time.
- The
Logclass
Log is a logging class that you can utilize in your code to print out messages to the LogCat. Common logging methods include:- [v(String, String)](http://developer.android.com/reference/android/util/Log.html#v(java.lang.String, java.lang.String)) (verbose)
- [d(String, String)](http://developer.android.com/reference/android/util/Log.html#d(java.lang.String, java.lang.String)) (debug)
- [i(String, String)](http://developer.android.com/reference/android/util/Log.html#i(java.lang.String, java.lang.String)) (information)
- [w(String, String)](http://developer.android.com/reference/android/util/Log.html#w(java.lang.String, java.lang.String)) (warning)
- [e(String, String)](http://developer.android.com/reference/android/util/Log.html#e(java.lang.String, java.lang.String)) (error)
For example:
Log.i("MyActivity", "MyClass.getView() — get item number " + position);
The LogCat will then output something like:
I/MyActivity( 1557): MyClass.getView() — get item number 1
- Filtering Log Output
Every Android log message has a tag and a priority associated with it.- The tag of a log message is a short string indicating the system component from which the message originates (for example, "View" for the view system).
- The priority is one of the following character values, ordered from lowest to highest priority:
-
V— Verbose (lowest priority) -
D— Debug -
I— Info -
W— Warning -
E— Error -
F— Fatal -
S— Silent (highest priority, on which nothing is ever printed)
You can obtain a list of tags used in the system, together with priorities, by running LogCat and observing the first two columns of each message, given as
Here's an example of logcat output that shows that the message relates to priority level "I" and tag "ActivityManager":
I/ActivityManager( 585): Starting activity: Intent {action=android.intent.action...}
Sample Code :
package com.example.android.menu;
import android.os.Bundle;
import android.support.v7.app.AppCompatActivity;
import android.util.Log;
import android.view.View;
import android.widget.TextView;
public class MainActivity extends AppCompatActivity {

    @Override
    protected void onCreate(Bundle savedInstanceState) {
        super.onCreate(savedInstanceState);
        setContentView(R.layout.activity_main);
    }

    public void printToLogs(View view) {
        // Find first menu item TextView and print the text to the logs
        TextView textViewItem1 = (TextView) findViewById(R.id.menu_item_1);
        String menuItem1 = textViewItem1.getText().toString();
        Log.v("MainActivity", menuItem1);

        // Find second menu item TextView and print the text to the logs
        TextView textViewItem2 = (TextView) findViewById(R.id.menu_item_2);
        String menuItem2 = textViewItem2.getText().toString();
        Log.v("MainActivity", menuItem2);

        // Find third menu item TextView and print the text to the logs
        TextView textViewItem3 = (TextView) findViewById(R.id.menu_item_3);
        String menuItem3 = textViewItem3.getText().toString();
        Log.v("MainActivity", menuItem3);
    }
}
Output:
