openGL ES进阶教程(一)之粒子光束
2016AR/VR喊的火热,这些在Android上的实现或多或少与openGL 有关。 OpenGL能做的事情太多了!很多程序也看起来异常复杂。更有可能因为某一步的顺序错误导致最后渲染出错,这是因为,OpenGL和我们现在使用的C++、java这种面向对象的语言不同,OpenGL中的大多数函数使用了一种基于状态的方法。你可以看到Android中的播放器原理,就是API改变播放状态,逻辑性非常强~
本篇我们用openGL ES实现一个炫酷的粒子光束效果(参考自openGL应用实践指南),以实际的例子来学习openGL
当然在看本篇文章之前你必须需要了解openGL ES的一些基本开发知识,这些在网上很容易找到。
还有一些图形学知识你也有必要知道。我这里总结了一些图形学知识,你可以先看一下:
学openGL必知道的图形学知识 :http://blog.csdn.net/king1425/article/details/71425556
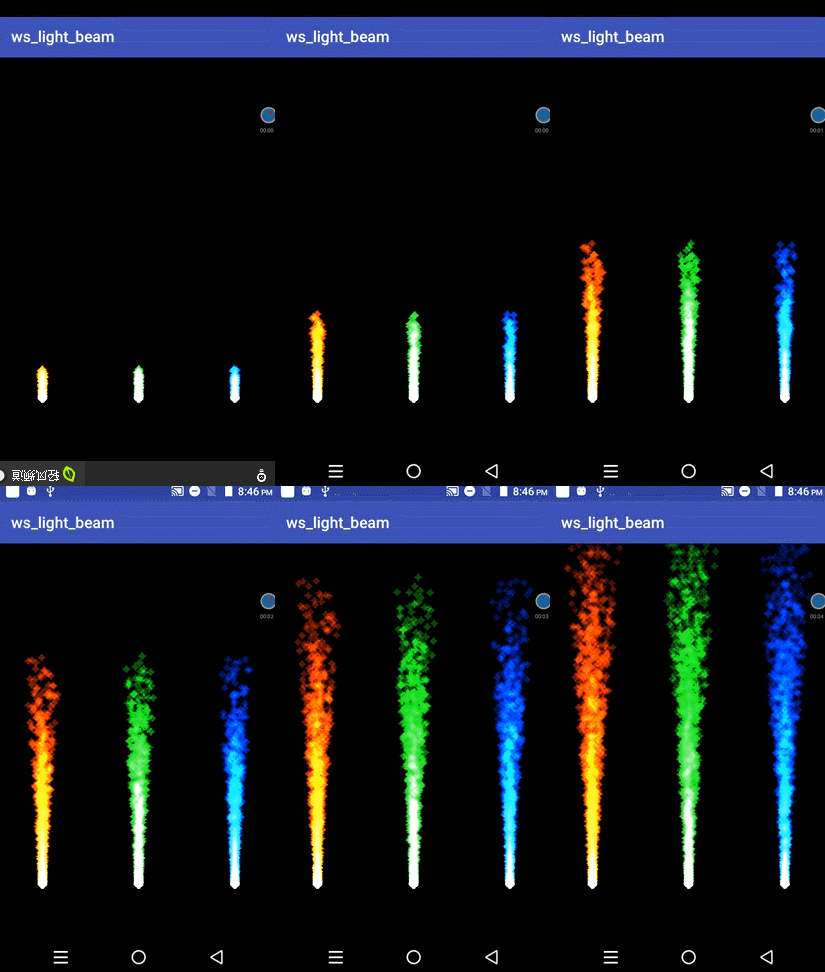
本篇效果如图:
Android支持OpenGL ES API的几个版本:
OpenGL ES 1.0和1.1 -这个API规范支持Android 1.0和更高版本。
OpenGL ES 2.0 -这个API规范支持Android 2.2(API级别8)和更高。
OpenGL ES 3.0 -这个API规范支持Android 4.3(API级别18)和更高。
OpenGL ES 3.1 -这个API规范支持Android 5.0(API级别21)和更高。
OpenGL ES 3.2 -这个API规范支持Android 7.0(API级别24)和更高。
Android中使用OpenGL ES版本
OpenGL ES 3.0:
<uses-feature android:glEsVersion="0x00030000" android:required="true" />OpenGL ES 3.2:
<uses-feature android:glEsVersion="0x00030002" android:required="true" />java代码:
 final ActivityManager activityManager =
                (ActivityManager) getSystemService(Context.ACTIVITY_SERVICE);
        final ConfigurationInfo configurationInfo = activityManager.getDeviceConfigurationInfo();

final boolean supportsEs3 = configurationInfo.reqGlEsVersion >= 0x30000;
    if (supportsEs3) {
      glSurfaceView.setEGLContextClientVersion(3);
Renderer:
//这个函数在Surface被创建的时候调用,每次我们将应用切换到其他地方,再切换回来的时候都有可能被调用,
 // 在这个函数中,我们需要完成一些OpenGL ES相关变量的初始化
    @Override
    public void onSurfaceCreated(GL10 gl10, EGLConfig eglConfig) {

        glClearColor(1.0f, 0.0f, 0.0f, 0.0f);

    }

    //每当屏幕尺寸发生变化时,这个函数会被调用(包括刚打开时以及横屏、竖屏切换),width和height就是绘制区域的宽和高
    @Override
    public void onSurfaceChanged(GL10 gl10, int width, int height) {
        glViewport(0, 0, width, height);
    }


//这个是主要的函数,我们的绘制部分就在这里,每一次绘制时这个函数都会被调用,
// 之前设置了GLSurfaceView.RENDERMODE_CONTINUOUSLY,也就是说按照正常的速度,每秒这个函数会被调用60次.
    @Override
    public void onDrawFrame(GL10 gl10) {
        glClear(GL_COLOR_BUFFER_BIT);
    }
在 onSurfaceCreated 方法中 glClearColor(1.0f, 0.0f, 0.0f, 0.0f);
设置清空屏幕用的颜色,分别对应红色、绿色和蓝色,最后一个为透明度。
在 onSurfaceChanged 方法中 glViewport(0, 0, width, height); 设置了视口尺寸,告诉 OpenGL 可以用来渲染的 surface 的大小。
在 onDrawFrame 方法中 glClear(GL_COLOR_BUFFER_BIT); 会擦除屏幕上的所有颜色,并用 glClearColor 中的颜色填充整个屏幕。
在使用 OpenGL 的方法时候,可能要在前面加入 GLES20. , 为了方便我们可以使用组织导入: import static android.opengl.GLES20.
下面我们就开始实现上图的效果
分析:假定图片上是三个向上发射激光
那么我们需要实现一个个的光束,即粒子。粒子有,位置,颜色,方向,发射时间 属性
1.我们根据粒子属性先来写出着色器。
顶点着色器
uniform mat4 u_Matrix;                 //投影矩阵
uniform float u_Time;                  //当前时间

attribute vec3 a_Position;              //位置
attribute vec3 a_Color;                 //颜色
attribute vec3 a_DirectionVector;       //方向向量
attribute float a_ParticleStartTime;    //创建时间

varying vec3 v_Color;                  //片段着色器需要的 颜色 属性
varying float v_ElapsedTime;           //片段着色器需要的 存在时间 属性

void main()
{
    v_Color = a_Color;
    v_ElapsedTime = u_Time - a_ParticleStartTime;

    vec3 currentPosition = a_Position + (a_DirectionVector * v_ElapsedTime);//当前位置 即方向向量与运行时间的乘积
    gl_Position = u_Matrix * vec4(currentPosition, 1.0);   //把粒子用矩阵进行投影
    gl_PointSize = 25.0;
}
注释的很清楚,就不解释了。
片段着色器:
precision mediump float;
uniform sampler2D u_TextureUnit;   //定义纹理
varying vec3 v_Color;
varying float v_ElapsedTime;
void main()
{

    gl_FragColor = vec4(v_Color / v_ElapsedTime, 1.0)
                 * texture2D(u_TextureUnit, gl_PointCoord);
}
由片段着色器可知,我们是使用纹理实现一个个粒子光束。
2.然后我们用java代码封装一个着色器类,实现一个粒子光束类
着色器类
public class ShaderProgram {//封装的着色器程序

  protected static final String U_MATRIX = "u_Matrix";
  protected static final String U_TEXTURE_UNIT = "u_TextureUnit";
  protected static final String U_TIME = "u_Time";


  protected static final String A_POSITION = "a_Position";
  protected static final String A_COLOR = "a_Color";
  protected static final String A_TEXTURE_COORDINATES = "a_TextureCoordinates";

  protected static final String U_COLOR = "u_Color";

  protected static final String A_DIRECTION_VECTOR = "a_DirectionVector";
  protected static final String A_PARTICLE_START_TIME = "a_ParticleStartTime";

  protected final int program;
//获取到了着色器
  protected ShaderProgram(Context context, int vertexShaderResourceId,
      int fragmentShaderResourceId) {
    program = ShaderHelper.buildProgram(
        TextResourceReader.readTextFileFromResource(context, vertexShaderResourceId),
        TextResourceReader.readTextFileFromResource(context, fragmentShaderResourceId));
  }
  //告诉 OpenGL 在绘制任何东西在屏幕上的时候要使用这里定义的程序。
  public void useProgram() {
    GLES20.glUseProgram(program);
  }
}
把所有着色器属性都列出来,便于后期获取着色器里面属性值的映射。即:
aPositionLocation = glGetAttribLocation(program, A_POSITION);//获取 A_POSITION 在 shader 中的位置然后实现一个具体的粒子着色器类:
 public ParticleShaderProgram(Context context) {
    super(context, R.raw.particle_vertex_shader, R.raw.particle_fragment_shader);

    // 获取着色器里面属性值的映射
    uMatrixLocation = glGetUniformLocation(program, U_MATRIX);
    uTimeLocation = glGetUniformLocation(program, U_TIME);
    uTextureUnitLocation = glGetUniformLocation(program, U_TEXTURE_UNIT);

    aPositionLocation = glGetAttribLocation(program, A_POSITION);//获取 A_POSITION 在 shader 中的位置
    aColorLocation = glGetAttribLocation(program, A_COLOR);
    aDirectionVectorLocation = glGetAttribLocation(program, A_DIRECTION_VECTOR);
    aParticleStartTimeLocation = glGetAttribLocation(program, A_PARTICLE_START_TIME);
  }


  public void setUniforms(float[] matrix, float elapsedTime, int textureId) {
    glUniformMatrix4fv(uMatrixLocation, 1, false, matrix, 0);//传递矩阵给它的 uniform
    glUniform1f(uTimeLocation, elapsedTime);
    glActiveTexture(GL_TEXTURE0);//把活动的纹理单元设置为纹理单元 0
    glBindTexture(GL_TEXTURE_2D, textureId);//把纹理绑定到这个单元
    glUniform1i(uTextureUnitLocation, 0);//把被选定的纹理单元传递给片段着色器中的 u_TextureUnit 。
  }
有了具体的着色器,我们就要实现一个粒子光束类,给着色器赋值。
粒子光束类
主要的功能是给particles赋值,以便着色器读取,渲染,代码如下。
public void addParticle(Geometry.Point position, int color, Geometry.Vector direction,
      float particleStartTime) {
    ...
//存位置
    particles[currentOffset++] = position.x;
    particles[currentOffset++] = position.y;
    particles[currentOffset++] = position.z;

    particles[currentOffset++] = Color.red(color) / 255f;
    particles[currentOffset++] = Color.green(color) / 255f;
    particles[currentOffset++] = Color.blue(color) / 255f;

    particles[currentOffset++] = direction.x;
    particles[currentOffset++] = direction.y;
    particles[currentOffset++] = direction.z;

    particles[currentOffset++] = particleStartTime;


  }
有了数据,openGL还是无法读取的,我们需要把数据复制到本地缓冲区才行。
   floatBuffer = ByteBuffer.allocateDirect(vertexData.length * Constands.BYTES_PER_FLOAT)
        .order(ByteOrder.nativeOrder())
        .asFloatBuffer()
        .put(vertexData);

  floatBuffer.position(particleOffset);
    floatBuffer.put(particles, particleOffset, 3);
    floatBuffer.position(0);
上述的粒子光束类知识一个粒子。大量的粒子需要有一个固定发射方向的发射类。
//粒子发射器
  public ParticleShooter(Geometry.Point position, Geometry.Vector direction, int color,
      float angleVarianceInDegrees, float speedVariance) {
    this.position = position;
    this.direction = direction;
    this.color = color;
    this.angleVariance = angleVarianceInDegrees;
    this.speedVariance = speedVariance;

    directionVector[0] = direction.x;
    directionVector[1] = direction.y;
    directionVector[2] = direction.z;
  }


  //扩撒粒子
  public void addParticles(ParticleSystem particleSystem, float currentTime, int count) {
    for (int i = 0; i < count; i++) {
      //setRotateEulerM 旋转矩阵  随机改变值
      setRotateEulerM(rotationMatrix, 0, (random.nextFloat() - 0.5f) * angleVariance,
          (random.nextFloat() - 0.5f) * angleVariance, (random.nextFloat() - 0.5f) * angleVariance);

      multiplyMV(resultVector, 0, rotationMatrix, 0, directionVector, 0);//矩阵相乘

      float speedAdjustment = 1f + random.nextFloat() * speedVariance;

      Geometry.Vector thisDirection =
          new Geometry.Vector(resultVector[0] * speedAdjustment, resultVector[1] * speedAdjustment,
              resultVector[2] * speedAdjustment);

            /*
            particleSystem.addParticle(position, color, direction, currentTime);
             */
      particleSystem.addParticle(position, color, thisDirection, currentTime);
    }
  }
如代码所示,构造函数决定发射位置方向。而且使用旋转矩阵“setRotateEulerM 旋转矩阵 ”让发散粒子光束。
就是最重要的代码类了。
实现ParticlesRenderer
@Override public void onSurfaceCreated(GL10 gl10, EGLConfig eglConfig) {
    glClearColor(0.0f, 0.0f, 0.0f, 0.0f);


    glEnable(GL_BLEND);
    glBlendFunc(GL_ONE, GL_ONE);

    particleProgram = new ParticleShaderProgram(context);
    particleSystem = new ParticleSystem(10000);
    globalStartTime = System.nanoTime();//获取系统时间  返回的是纳秒
onSurfaceCreated类初始化需要的particleProgram ,particleSystem
混合技术:  输出 = 源因子*源片段 + 目标因子*目标片段
源片段即片段着色器,目标片段即已经在帧缓存区的值。 源因子和目标因子是通过glBlendFunc配置的  即都为GL_ONE

在本篇主要作用是让叠加的粒子光束彰显混合颜色效果。
代码示例如下:
glEnable(GL_BLEND);
glBlendFunc(GL_ONE, GL_ONE);
然后创建三个发射器并加载纹理:
 redParticleShooter =
        new ParticleShooter(new Point(-1f, 0f, 0f), particleDirection, Color.rgb(255, 50, 5),
            angleVarianceInDegrees, speedVariance);

    greenParticleShooter =
        new ParticleShooter(new Point(0f, 0f, 0f), particleDirection, Color.rgb(25, 255, 25),
            angleVarianceInDegrees, speedVariance);

    blueParticleShooter =
        new ParticleShooter(new Point(1f, 0f, 0f), particleDirection, Color.rgb(5, 50, 255),
            angleVarianceInDegrees, speedVariance);

texture = TextureHelper.loadTexture(context, R.drawable.particle_texture);
在onSurfaceChanged中创建一个透视投影矩阵与模型矩阵相乘的矩阵,矩阵主要作用是坐标的转化,是openGL坐标与设备坐标的转化。
@Override public void onSurfaceChanged(GL10 gl10, int width, int height) {
    GLES20.glViewport(0, 0, width, height);
  //自定义的投影矩阵   这会用 45 度的视野创建一个透视投影。这个视锥体从 z 值为-1的位置开始,在z值为-10的位置结束。
    MatrixHelper.perspectiveM(projectionMatrix, 45, (float) width / (float) height, 1f, 10f);//

    setIdentityM(viewMatrix, 0);//创建一个模型矩阵
    translateM(viewMatrix, 0, 0f, -1.5f, -5f);
    multiplyMM(viewProjectionMatrix, 0, projectionMatrix, 0, viewMatrix, 0);//透视投影矩阵与模型矩阵相乘 得出一个矩阵暂存在viewProjectionMatrix中
  }
onDrawFrame开始渲染绘制视图
 @Override public void onDrawFrame(GL10 gl10) {
    GLES20.glClear(GLES20.GL_COLOR_BUFFER_BIT);

    float currentTime = (System.nanoTime() - globalStartTime) / 1000000000f; //转化为秒
//每绘制一次生成5个新粒子
    redParticleShooter.addParticles(particleSystem, currentTime, 5);
    greenParticleShooter.addParticles(particleSystem, currentTime, 5);
    blueParticleShooter.addParticles(particleSystem, currentTime, 5);


    particleProgram.useProgram();

    particleProgram.setUniforms(viewProjectionMatrix, currentTime, texture);
    particleSystem.bindData(particleProgram);
    particleSystem.draw();
  }
}
这里看到 particleSystem.bindData(particleProgram);。
即将粒子与着色器进行绑定,以便着色器可以准确渲染粒子。
bindData方法如下
即:读取之前 floatBuffer put到内存中的数据,绑定赋值给着色器的属性
public void bindData(ParticleShaderProgram particleProgram) {
    int dataOffset = 0;
    vertexArray.setVertexAttribPointer(dataOffset, particleProgram.getPositionAttributeLocation(),
        POSITION_COMPONENT_COUNT, STRIDE);
    dataOffset += POSITION_COMPONENT_COUNT;

    vertexArray.setVertexAttribPointer(dataOffset, particleProgram.getColorAttributeLocation(),
        COLOR_COMPONENT_COUNT, STRIDE);
    dataOffset += COLOR_COMPONENT_COUNT;

    vertexArray.setVertexAttribPointer(dataOffset,
        particleProgram.getDirectionVectorAttributeLocation(), VECTOR_COMPONENT_COUNT, STRIDE);
    dataOffset += VECTOR_COMPONENT_COUNT;

    vertexArray.setVertexAttribPointer(dataOffset,
        particleProgram.getParticleStartTimeAttributeLocation(),
        PARTICLE_START_TIME_COMPONENT_COUNT, STRIDE);
  }
当着色器中有值之后就可以绘制了
particleSystem.draw();
@particleSystem.java
 public void draw() {
    glDrawArrays(GL_POINTS, 0, currentParticleCount);
  }
好了到此已经结束了,下一篇将在这一篇的基础上实现全景效果
