mask-rcnn在detectron平台训练coco数据集
(首先官网是最好的教程,我也是在官网的基础上集合自己训练的过程做的一个总结步骤(我的电脑是Ubuntu16.04),仅供参考。官网链接:detectron官网)。
第一步:安装依赖项:
sudo apt-get update
sudo apt-get install -y --no-install-recommends \
      build-essential \
      cmake \
      git \
      libgoogle-glog-dev \
      libgtest-dev \
      libiomp-dev \
      libleveldb-dev \
      liblmdb-dev \
      libopencv-dev \
      libopenmpi-dev \
      libsnappy-dev \
      libprotobuf-dev \
      openmpi-bin \
      openmpi-doc \
      protobuf-compiler \
      python-dev \
      python-pip
sudo pip install \
      future \
      numpy \
      protobuf
# for Ubuntu 14.04
sudo apt-get install -y --no-install-recommends libgflags2
# for Ubuntu 16.04
sudo apt-get install -y --no-install-recommends libgflags-dev
注:libgflags2是给Ubuntu 14.04的,libgflags-dev是给Ubuntu 16.04的。
如果有GPU,先按照以下教程安装NVIDIA CUDA 8 和cuDNN V5.1或V6.0(如果已存在对应版本,请忽略,继续第二步) 。
首先更新你的显卡驱动程序,否则后面可能会有一些列错误。
For Ubuntu 14.04
sudo apt-get update && sudo apt-get install wget -y --no-install-recommends
wget "http://developer.download.nvidia.com/compute/cuda/repos/ubuntu1404/x86_64/cuda-repo-ubuntu1404_8.0.61-1_amd64.deb"
sudo dpkg -i cuda-repo-ubuntu1404_8.0.61-1_amd64.deb
sudo apt-get update
sudo apt-get install cuda
For Ubuntu 16.04
sudo apt-get update && sudo apt-get install wget -y --no-install-recommends
wget "http://developer.download.nvidia.com/compute/cuda/repos/ubuntu1604/x86_64/cuda-repo-ubuntu1604_8.0.61-1_amd64.deb"
sudo dpkg -i cuda-repo-ubuntu1604_8.0.61-1_amd64.deb
sudo apt-get update
sudo apt-get install cuda
安装cuDNN(针对所以Ubuntu版本)
Version 5.1
CUDNN_URL="http://developer.download.nvidia.com/compute/redist/cudnn/v5.1/cudnn-8.0-linux-x64-v5.1.tgz"
wget ${CUDNN_URL}
sudo tar -xzf cudnn-8.0-linux-x64-v5.1.tgz -C /usr/local
rm cudnn-8.0-linux-x64-v5.1.tgz && sudo ldconfig第二步:detectron平台是基于caffe2的,所以我们要先安装caffe2:
git clone --recursive https://github.com/pytorch/pytorch.git && cd pytorch
git submodule update --init
mkdir build && cd build
cmake ..
sudo make install
测试caffe2是否安装成功:
cd ~ && python -c 'from caffe2.python import core' 2>/dev/null && echo "Success" || echo "Failure"python2 -c 'from caffe2.python import workspace; print(workspace.NumCudaDevices())'
测试结果显示的是GPU个数,结果如下(我的):

注:如果测试有任何问题,可百度,或者加qq:734390853 ,如果我知道,定会详细解答。
第三步:安装cocoapi :
git clone https://github.com/cocodataset/cocoapi.git
cd cocoapi/PythonAPI
make
注:我这里的安装和官网有少许不一样。但,亲测可用。
第四步:安装detectron :
git clone https://github.com/facebookresearch/detectron
pip install -r detectron/requirements.txt
cd detectron && make
测试detectron是否通过:
python2 detectron/detectron/tests/test_spatial_narrow_as_op.py以上是安装部分……………………………………………………………………………………………….以下是训练与测试部分
* *训练* *
第一步:
下载coco数据集:coco数据官网(我下的是2014),在data下新建文件夹命名为coco,把下载的数据移动到coco下:

第二步:
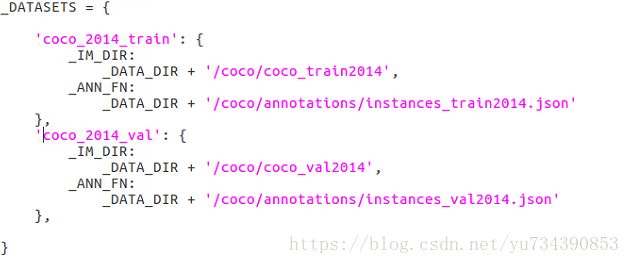
修改dataset_catalog.py文件里的路径(默认的不懂也行),如下:

第三步:
在 $/detectron/configs/getting_started 下新建空白文档(我命名为:tutorial_1gpu_e2e_mask_rcnn_R-50-FPN.yaml),仿照tutorial_1gpu_e2e_faster_rcnn_R-50-FPN.yaml和e2e_mask_rcnn_R-50-FPN_2x.yaml 完成mask_rcnn配置文件。最终我的配置文件如下:https://download.csdn.net/download/yu734390853/10500353
第四步:训练
python2 tools/train_net.py \
    --cfg configs/getting_started/tutorial_1gpu_e2e_mask_rcnn_R-50-FPN.yaml \
    OUTPUT_DIR /tmp/detectron-output
测试:
python2 tools/infer_simple.py \
    --cfg configs/getting_started/tutorial_1gpu_e2e_mask_rcnn_R-50-FPN.yaml \
    --output-dir /tmp/detectron-visualizations \
    --image-ext jpg \
    --wts /home/ymh/detectron/model/model_final.pkl \
    demo
注:其中的model_final.pkl是自己训练时保存的最后一个模型文件。
结束………………………………………………………….
下一步工作就是仿照coco制作自己的数据集,训练和测试自己的数据,敬请期待*****


