从零开始搭二维激光SLAM --- 基于PL-ICP的激光雷达里程计
上篇文章讲了如何用PL-ICP算法做雷达的帧间匹配,知道了每帧雷达数据间的坐标变换,累加起来就可以做成激光雷达里程计。(虽然又是一个失败的里程计…)
实现里程计,就不得不提及TF。所以,我将先简要介绍一下ROS的TF2库。
1 TF2
1.1 坐标系
ROS中有几个十分常用的坐标系,其简介如下:
- map: 地图坐标系,也被称为世界坐标系,是静止不动的
- odom: 里程计坐标系,相对于map来说一般情况下是静止的,有些情况下会变动(定位节点为了修正机器人的位姿从而改变了map->odom间的坐标变换)
- base_link: 代表机器人的旋转中心的坐标系,相对于odom来说base_link是运动的
- laser_link: 激光雷达的坐标系,相对于base_link来说是静止的,因为雷达装在机器人上,雷达不会自己飞起来
可以看到,上边的坐标系,是单方向依赖的, laser_link 依赖于 base_link,base_link 依赖于 odom 。也可以说成是一个坐标系指向下一个坐标系的,连起来的话也成了:
map -> odom -> base_link -> laser_link
在ROS中,将这种能够连接起来的坐标系称为 TF树,是一个由坐标系组成的树。可以通过rqt软件来可视化TF树,也可以通过Rviz的tf显示模块来可视化TF树。
本篇文章对应的TF树为:
1.2 TF2
这些坐标系间的坐标变化是十分复杂的。同时,不同机器人间这些坐标系的计算方式又是相同的,因此,ROS中提供了坐标系管理的库 TF,用来帮助开发人员管理坐标系。
之前,ROS中使用 TF 作为坐标系管理的库,后来,由于种种原因,TF库被弃用了。ROS改用 TF2 作为新的管理坐标系的库。
tf2的wiki主页为:http://wiki.ros.org/tf2
tf2的官方教程为:http://wiki.ros.org/tf2/Tutorials
1.3 TF2常用数据类型与常用函数汇总
官方教程展示了最基本的使用tf2的方法,但是tf2还有很多功能以及更高级的用法 教程里是没有提及的。如TF2提供了很多方便的转换格式的函数等等.
现在网上的资源讲tf2的还比较少,大概有2方面原因:
一是tf第一代还可以用,很多代码还是在用tf第一代。二是使用tf2的开源项目比较少,只有少数几个开源项目使用了。这两个原因导致tf2的教程还比较少。
为此,我特意读了一遍TF2的源码,将其中的 常用数据类型与常用函数 摘出来做了个总结,以便作为写代码的参考,也可以让大家更好的使用TF2 ,文章链接如下:
tf2常用数据类型与常用函数汇总:https://blog.csdn.net/tiancailx/article/details/111312853
关于TF2 更多的介绍这里就不多说了,更详细的说明请去tf2的wiki中查看。
本篇文章将使用 TF2 进行里程计的实现。
2 代码
2.1 获取代码
代码已经提交在github上了,如果不知道github的地址的朋友, 请在我的公众号: 从零开始搭激光SLAM 中回复 开源地址 获得。
推荐使用 git clone 的方式进行下载, 因为代码是正处于更新状态的, git clone 下载的代码可以使用 git pull 很方便地进行更新.
本篇文章对应的代码为 lesson3/include/lesson3/plicp_odometry.h 与 lesson3/src/plicp_odometry.cc。
2.2 代码解析
本次代码比上篇文章多了如下几个函数
void InitParams();
bool GetBaseToLaserTf(const std::string &frame_id);
void GetPrediction(double &prediction_change_x, double &prediction_change_y, double &prediction_change_angle, double dt);
void CreateTfFromXYTheta(double x, double y, double theta, tf2::Transform& t);
void PublishTFAndOdometry();
bool NewKeyframeNeeded(const tf2::Transform &d);
2.2.1 构造函数
注意,private_node_ 初始化为 “~” ,代表私有命名空间,可以用来获取节点内的参数。
ScanMatchPLICP::ScanMatchPLICP() : private_node_("~"), tf_listener_(tfBuffer_)
{

    // \033[1;32m,\033[0m 终端显示成绿色
    ROS_INFO_STREAM("\033[1;32m----> PLICP odometry started.\033[0m");

    laser_scan_subscriber_ = node_handle_.subscribe(
        "laser_scan", 1, &ScanMatchPLICP::ScanCallback, this);

    odom_publisher_ = node_handle_.advertise<nav_msgs::Odometry>("odom_plicp", 50);

    // 参数初始化
    InitParams();

    // 第一帧雷达还未到来
    initialized_ = false;

    base_in_odom_.setIdentity();
    base_in_odom_keyframe_.setIdentity();

    input_.laser[0] = 0.0;
    input_.laser[1] = 0.0;
    input_.laser[2] = 0.0;

    // Initialize output_ vectors as Null for error-checking
    output_.cov_x_m = 0;
    output_.dx_dy1_m = 0;
    output_.dx_dy2_m = 0;
}
2.2.2 InitParams()
使用私有句柄 private_node_ 获取节点内部参数,参数写在配置文件中了,配置文件稍后讲解。
下面的很多参数是为了对 pl-icp 算法 进行参数配置,如最大迭代次数等等。
/*
 * ros与csm的参数初始化
 */
void ScanMatchPLICP::InitParams()
{

    private_node_.param<std::string>("odom_frame", odom_frame_, "odom");
    private_node_.param<std::string>("base_frame", base_frame_, "base_link");
    // **** keyframe params: when to generate the keyframe scan
    // if either is set to 0, reduces to frame-to-frame matching
    private_node_.param<double>("kf_dist_linear", kf_dist_linear_, 0.1);
    private_node_.param<double>("kf_dist_angular", kf_dist_angular_, 5.0 * (M_PI / 180.0));
    kf_dist_linear_sq_ = kf_dist_linear_ * kf_dist_linear_;

    // **** CSM 的参数 - comments copied from algos.h (by Andrea Censi)

    // Maximum angular displacement between scans
    if (!private_node_.getParam("max_angular_correction_deg", input_.max_angular_correction_deg))
        input_.max_angular_correction_deg = 45.0;

    // Maximum translation between scans (m)
    if (!private_node_.getParam("max_linear_correction", input_.max_linear_correction))
        input_.max_linear_correction = 0.50;

    // Maximum ICP cycle iterations
    if (!private_node_.getParam("max_iterations", input_.max_iterations))
        input_.max_iterations = 10;

    // A threshold for stopping (m)
    if (!private_node_.getParam("epsilon_xy", input_.epsilon_xy))
        input_.epsilon_xy = 0.000001;

    // A threshold for stopping (rad)
    if (!private_node_.getParam("epsilon_theta", input_.epsilon_theta))
        input_.epsilon_theta = 0.000001;

    // Maximum distance for a correspondence to be valid
    if (!private_node_.getParam("max_correspondence_dist", input_.max_correspondence_dist))
        input_.max_correspondence_dist = 0.3;

    // Noise in the scan (m)
    if (!private_node_.getParam("sigma", input_.sigma))
        input_.sigma = 0.010;

    // Use smart tricks for finding correspondences.
    if (!private_node_.getParam("use_corr_tricks", input_.use_corr_tricks))
        input_.use_corr_tricks = 1;

    // Restart: Restart if error is over threshold
    if (!private_node_.getParam("restart", input_.restart))
        input_.restart = 0;

    // Restart: Threshold for restarting
    if (!private_node_.getParam("restart_threshold_mean_error", input_.restart_threshold_mean_error))
        input_.restart_threshold_mean_error = 0.01;

    // Restart: displacement for restarting. (m)
    if (!private_node_.getParam("restart_dt", input_.restart_dt))
        input_.restart_dt = 1.0;

    // Restart: displacement for restarting. (rad)
    if (!private_node_.getParam("restart_dtheta", input_.restart_dtheta))
        input_.restart_dtheta = 0.1;

    // Max distance for staying in the same clustering
    if (!private_node_.getParam("clustering_threshold", input_.clustering_threshold))
        input_.clustering_threshold = 0.25;

    // Number of neighbour rays used to estimate the orientation
    if (!private_node_.getParam("orientation_neighbourhood", input_.orientation_neighbourhood))
        input_.orientation_neighbourhood = 20;

    // If 0, it's vanilla ICP
    if (!private_node_.getParam("use_point_to_line_distance", input_.use_point_to_line_distance))
        input_.use_point_to_line_distance = 1;

    // Discard correspondences based on the angles
    if (!private_node_.getParam("do_alpha_test", input_.do_alpha_test))
        input_.do_alpha_test = 0;

    // Discard correspondences based on the angles - threshold angle, in degrees
    if (!private_node_.getParam("do_alpha_test_thresholdDeg", input_.do_alpha_test_thresholdDeg))
        input_.do_alpha_test_thresholdDeg = 20.0;

    // Percentage of correspondences to consider: if 0.9,
    // always discard the top 10% of correspondences with more error
    if (!private_node_.getParam("outliers_maxPerc", input_.outliers_maxPerc))
        input_.outliers_maxPerc = 0.90;

    // Parameters describing a simple adaptive algorithm for discarding.
    //  1) Order the errors.
    //  2) Choose the percentile according to outliers_adaptive_order.
    //     (if it is 0.7, get the 70% percentile)
    //  3) Define an adaptive threshold multiplying outliers_adaptive_mult
    //     with the value of the error at the chosen percentile.
    //  4) Discard correspondences over the threshold.
    //  This is useful to be conservative; yet remove the biggest errors.
    if (!private_node_.getParam("outliers_adaptive_order", input_.outliers_adaptive_order))
        input_.outliers_adaptive_order = 0.7;

    if (!private_node_.getParam("outliers_adaptive_mult", input_.outliers_adaptive_mult))
        input_.outliers_adaptive_mult = 2.0;

    // If you already have a guess of the solution, you can compute the polar angle
    // of the points of one scan in the new position. If the polar angle is not a monotone
    // function of the readings index, it means that the surface is not visible in the
    // next position. If it is not visible, then we don't use it for matching.
    if (!private_node_.getParam("do_visibility_test", input_.do_visibility_test))
        input_.do_visibility_test = 0;

    // no two points in laser_sens can have the same corr.
    if (!private_node_.getParam("outliers_remove_doubles", input_.outliers_remove_doubles))
        input_.outliers_remove_doubles = 1;

    // If 1, computes the covariance of ICP using the method http://purl.org/censi/2006/icpcov
    if (!private_node_.getParam("do_compute_covariance", input_.do_compute_covariance))
        input_.do_compute_covariance = 0;

    // Checks that find_correspondences_tricks gives the right answer
    if (!private_node_.getParam("debug_verify_tricks", input_.debug_verify_tricks))
        input_.debug_verify_tricks = 0;

    // If 1, the field 'true_alpha' (or 'alpha') in the first scan is used to compute the
    // incidence beta, and the factor (1/cos^2(beta)) used to weight the correspondence.");
    if (!private_node_.getParam("use_ml_weights", input_.use_ml_weights))
        input_.use_ml_weights = 0;

    // If 1, the field 'readings_sigma' in the second scan is used to weight the
    // correspondence by 1/sigma^2
    if (!private_node_.getParam("use_sigma_weights", input_.use_sigma_weights))
        input_.use_sigma_weights = 0;
}
2.2.3 GetBaseToLaserTf()
这个函数是在初始化阶段,用来获取机器人坐标系与雷达坐标系间的坐标变换。
/**
 * 获取机器人坐标系与雷达坐标系间的坐标变换
 */
bool ScanMatchPLICP::GetBaseToLaserTf(const std::string &frame_id)
{

    ros::Time t = ros::Time::now();

    geometry_msgs::TransformStamped transformStamped;
    // 获取tf并不是瞬间就能获取到的,要给1秒的缓冲时间让其找到tf
    try
    {

        transformStamped = tfBuffer_.lookupTransform(base_frame_, frame_id,
                                                     t, ros::Duration(1.0));
    }
    catch (tf2::TransformException &ex)
    {

        ROS_WARN("%s", ex.what());
        ros::Duration(1.0).sleep();
        return false;
    }

    // 将获取的tf存到base_to_laser_中
    tf2::fromMsg(transformStamped.transform, base_to_laser_);
    laser_to_base_ = base_to_laser_.inverse();

    return true;
}
2.2.4 ScanMatchWithPLICP()
这个函数的实现较上篇文章中略有增加,增加了 基于匀速模型的位姿预测,位姿累加,发布TF以及odom话题,新建关键帧,这4个功能。
corr_ch_l:指的是当前帧雷达数据到关键帧间的坐标变换,这个变换是在激光雷达坐标系下的,但是算里程计是要累加机器人坐标系下的位姿的,所以要将雷达坐标系下的变换转换成机器人坐标系下的变换.
base_to_laser_:是指 雷达坐标系 在 机器人坐标系 下的位姿,也就是从机器人坐标系到雷达坐标系下的变换.
这个坐标变换挺复杂的,我弄了一周才明白。 雷达与机器人差了一个旋转和平移,如果直接用雷达坐标系下的变换做成base_to_laser_,是错误的,得到的结果将雷达坐标系下的运动加上了机器人坐标系到雷达坐标系的平移。所以需要再右乘一个雷达坐标系到机器人坐标系的变换,得抵消这段平移。你可以自己写一小段代码体验一下。
/**
 * 使用PLICP进行帧间位姿的计算
 */
void ScanMatchPLICP::ScanMatchWithPLICP(LDP &curr_ldp_scan, const ros::Time &time)
{

    // CSM is used in the following way:
    // The scans are always in the laser frame
    // The reference scan (prevLDPcan_) has a pose of [0, 0, 0]
    // The new scan (currLDPScan) has a pose equal to the movement
    // of the laser in the laser frame since the last scan
    // The computed correction is then propagated using the tf machinery

    prev_ldp_scan_->odometry[0] = 0.0;
    prev_ldp_scan_->odometry[1] = 0.0;
    prev_ldp_scan_->odometry[2] = 0.0;

    prev_ldp_scan_->estimate[0] = 0.0;
    prev_ldp_scan_->estimate[1] = 0.0;
    prev_ldp_scan_->estimate[2] = 0.0;

    prev_ldp_scan_->true_pose[0] = 0.0;
    prev_ldp_scan_->true_pose[1] = 0.0;
    prev_ldp_scan_->true_pose[2] = 0.0;

    input_.laser_ref = prev_ldp_scan_;
    input_.laser_sens = curr_ldp_scan;

    // 匀速模型,速度乘以时间,得到预测的odom坐标系下的位姿变换
    double dt = (time - last_icp_time_).toSec();
    double pr_ch_x, pr_ch_y, pr_ch_a;
    GetPrediction(pr_ch_x, pr_ch_y, pr_ch_a, dt);

    tf2::Transform prediction_change;
    CreateTfFromXYTheta(pr_ch_x, pr_ch_y, pr_ch_a, prediction_change);

    // account for the change since the last kf, in the fixed frame
    // 将odom坐标系下的坐标变换 转换成 base_in_odom_keyframe_坐标系下的坐标变换
    prediction_change = prediction_change * (base_in_odom_ * base_in_odom_keyframe_.inverse());

    // the predicted change of the laser's position, in the laser frame
    // 将base_link坐标系下的坐标变换 转换成 雷达坐标系下的坐标变换
    tf2::Transform prediction_change_lidar;
    prediction_change_lidar = laser_to_base_ * base_in_odom_.inverse() * prediction_change * base_in_odom_ * base_to_laser_;

    input_.first_guess[0] = prediction_change_lidar.getOrigin().getX();
    input_.first_guess[1] = prediction_change_lidar.getOrigin().getY();
    input_.first_guess[2] = tf2::getYaw(prediction_change_lidar.getRotation());

    // If they are non-Null, free covariance gsl matrices to avoid leaking memory
    if (output_.cov_x_m)
    {

        gsl_matrix_free(output_.cov_x_m);
        output_.cov_x_m = 0;
    }
    if (output_.dx_dy1_m)
    {

        gsl_matrix_free(output_.dx_dy1_m);
        output_.dx_dy1_m = 0;
    }
    if (output_.dx_dy2_m)
    {

        gsl_matrix_free(output_.dx_dy2_m);
        output_.dx_dy2_m = 0;
    }

    start_time_ = std::chrono::steady_clock::now();
    // 调用csm进行plicp计算
    sm_icp(&input_, &output_);

    end_time_ = std::chrono::steady_clock::now();
    time_used_ = std::chrono::duration_cast<std::chrono::duration<double>>(end_time_ - start_time_);
    // std::cout << "PLICP计算用时: " << time_used_.count() << " 秒。" << std::endl;

    tf2::Transform corr_ch;

    if (output_.valid)
    {

        // 雷达坐标系下的坐标变换
        tf2::Transform corr_ch_l;
        CreateTfFromXYTheta(output_.x[0], output_.x[1], output_.x[2], corr_ch_l);

        // 将雷达坐标系下的坐标变换 转换成 base_link坐标系下的坐标变换
        corr_ch = base_to_laser_ * corr_ch_l * laser_to_base_;

        // 更新 base_link 在 odom 坐标系下 的坐标
        base_in_odom_ = base_in_odom_keyframe_ * corr_ch;

        latest_velocity_.linear.x = corr_ch.getOrigin().getX() / dt;
        latest_velocity_.angular.z = tf2::getYaw(corr_ch.getRotation()) / dt;
    }
    else
    {

        ROS_WARN("not Converged");
    }

    // 发布tf与odom话题
    PublishTFAndOdometry();

    // 检查是否需要更新关键帧坐标
    if (NewKeyframeNeeded(corr_ch))
    {

        // 更新关键帧坐标
        ld_free(prev_ldp_scan_);
        prev_ldp_scan_ = curr_ldp_scan;
        base_in_odom_keyframe_ = base_in_odom_;
    }
    else
    {

        ld_free(curr_ldp_scan);
    }

    last_icp_time_ = time;
}
上一篇代码有人评论说执行一次 sm_icp() 只花了0.5ms,是因为没有进行迭代,执行迭代的用时大概在5ms左右.
所以在调用 sm_icp() 前后加了计算时间的功能,上次代码没有设置迭代次数,用了默认的,不知道它默认的是进行一次还是几次.
这次的代码设置了最大迭代次数10,将打印时间的语句解除注释,将显示如下内容
PLICP计算用时: 0.00638714 秒。
PLICP计算用时: 0.00417142 秒。
PLICP计算用时: 0.00804754 秒。
PLICP计算用时: 0.00697412 秒。
PLICP计算用时: 0.00545498 秒。
PLICP计算用时: 0.00731748 秒。
PLICP计算用时: 0.00811902 秒
可以看到,迭代10次的情况下,平均用时大概在6ms左右.
可见上次评论我的小哥是正确的,我在这里对这位小哥表示感谢.
2.2.5 GetPrediction()
假设机器人在2帧雷达数据间的运动是匀速的,通过速度乘以时间来推测这段时间内的位移.
/**
 * 推测从上次icp的时间到当前时刻间的坐标变换
 * 使用匀速模型,根据当前的速度,乘以时间,得到推测出来的位移
 */
void ScanMatchPLICP::GetPrediction(double &prediction_change_x,
                                   double &prediction_change_y,
                                   double &prediction_change_angle,
                                   double dt)
{

    // 速度小于 1e-6 , 则认为是静止的
    prediction_change_x = latest_velocity_.linear.x < 1e-6 ? 0.0 : dt * latest_velocity_.linear.x;
    prediction_change_y = latest_velocity_.linear.y < 1e-6 ? 0.0 : dt * latest_velocity_.linear.y;
    prediction_change_angle = latest_velocity_.linear.z < 1e-6 ? 0.0 : dt * latest_velocity_.linear.z;

    if (prediction_change_angle >= M_PI)
        prediction_change_angle -= 2.0 * M_PI;
    else if (prediction_change_angle < -M_PI)
        prediction_change_angle += 2.0 * M_PI;
}
2.2.6 CreateTfFromXYTheta()
为 tf2::Transform 赋值
/**
 * 从x,y,theta创建tf
 */
void ScanMatchPLICP::CreateTfFromXYTheta(double x, double y, double theta, tf2::Transform &t)
{

    t.setOrigin(tf2::Vector3(x, y, 0.0));
    tf2::Quaternion q;
    q.setRPY(0.0, 0.0, theta);
    t.setRotation(q);
}
2.2.7 PublishTFAndOdometry()
发布tf与odom话题,其形式如下
/**
 * 发布tf与odom话题
 */
void ScanMatchPLICP::PublishTFAndOdometry()
{

    geometry_msgs::TransformStamped tf_msg;
    tf_msg.header.stamp = current_time_;
    tf_msg.header.frame_id = odom_frame_;
    tf_msg.child_frame_id = base_frame_;
    tf_msg.transform = tf2::toMsg(base_in_odom_);

    // 发布 odom 到 base_link 的 tf
    tf_broadcaster_.sendTransform(tf_msg);

    nav_msgs::Odometry odom_msg;
    odom_msg.header.stamp = current_time_;
    odom_msg.header.frame_id = odom_frame_;
    odom_msg.child_frame_id = base_frame_;
    tf2::toMsg(base_in_odom_, odom_msg.pose.pose);
    odom_msg.twist.twist = latest_velocity_;

    // 发布 odomemtry 话题
    odom_publisher_.publish(odom_msg);
}
2.2.8 NewKeyframeNeeded()
判断是否需要创建一个关键帧,这里的关键帧只是通过距离来进行简单的判断,当平移与角度的变换超过阈值时新添加一个关键帧.
/**
 * 如果平移大于阈值,角度大于阈值,则创新新的关键帧
 * @return 需要创建关键帧返回true, 否则返回false
 */
bool ScanMatchPLICP::NewKeyframeNeeded(const tf2::Transform &d)
{

    if (fabs(tf2::getYaw(d.getRotation())) > kf_dist_angular_)
        return true;

    if (scan_count_++ == kf_scan_count_)
    {

        scan_count_ = 0;
        return true;
    }

    double x = d.getOrigin().getX();
    double y = d.getOrigin().getY();
    if (x * x + y * y > kf_dist_linear_sq_)
        return true;

    return false;
}
3 运行
3.1 生成新bag文件
本篇文章对应的数据包, 请在我的公众号中回复 lesson1 获得。
由于 lesson1 这个数据包中已经有了tf,而本篇文章的代码也要发布TF,为了让流程更加清晰,现在我重新录制一个没有tf的数据包.
通过分别在3个终端中执行如下命令进行新bag的录制.
# 终端1
cd ~/bagfiles
roscore
# 终端2
rosparam set use_sim_time true
cd ~/bagfiles
rosbag play --clock lesson1.bag
# 终端3
cd ~/bagfiles
rosbag record /laser_scan /odom
当bag跑完的时候,在终端3按 ctrl+c ,结束录制。
并将所有终端关闭。
最后,再将生成的bag文件重命名为lesson3.bag,并确认处于 ~/bagfiles/ 文件夹下。
其实也可以不重新录制包,只要将我们代码的TF的odom坐标系,改个名字如odom_plicp,再将Rviz的Fixed Frame设置成odom_plicp也可以.
3.2 launch文件
<launch>


    <arg name="bag_filename" default="/home/lx/bagfiles/lesson3.bag"/>


    <param name="use_sim_time" value="true" />


    <node pkg="tf2_ros" type="static_transform_publisher" name="link_broadcaster"
        args="0 0 0.254 0 0 3.1415926 base_link front_laser_link" />


    <node name="lesson3_plicp_odometry_node"
        pkg="lesson3" type="lesson3_plicp_odometry_node" output="screen" >
        <rosparam file="$(find lesson3)/config/plicp_odometry.yaml" command="load"/>
    node>


    <node name="rviz" pkg="rviz" type="rviz" required="true"
        args="-d $(find lesson3)/config/plicp_odometry.rviz" />


    <node name="playbag" pkg="rosbag" type="play"
        args="--clock $(arg bag_filename)" />

launch>
3.3 静态TF
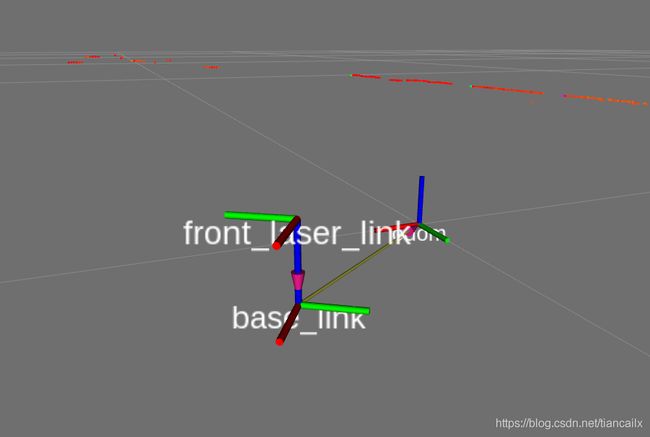
在 launch 中发布了一个从base_link到front_laser_link的静态tf,代表从机器人旋转中心到雷达坐标系间的坐标变换。
其可视化效果如下图所示.
 可见,激光雷达是倒着安装的,并处于base_link的正上方.
3.4 编译与运行
下载代码后,请放入您自己的工作空间中,通过 catkin_make 进行编译.
由于是新增的包,所以需要通过 rospack profile 命令让ros找到这个新的包.
之后, 使用source命令,添加ros与工作空间的地址到当前终端下.
再通过如下命令运行节点.
roslaunch lesson3 plicp_odometry.launch
3.5 配置文件
在启动节点的时候,通过在节点内部使用如下命令加载了配置文件.
<rosparam file="$(find lesson3)/config/plicp_odometry.yaml" command="load"/>
配置文件位于 lesson3/config 的文件夹下,名为 plicp_odometry.yaml.
其内容为:
odom_frame: "odom"
base_frame: "base_link"

kf_dist_linear: 0.1    # m
kf_dist_angular: 0.5   # deg
配置了 odom坐标系的名字,机器人坐标系的名字,设置关键帧的平移阈值与角度阈值.
3.6 运行结果
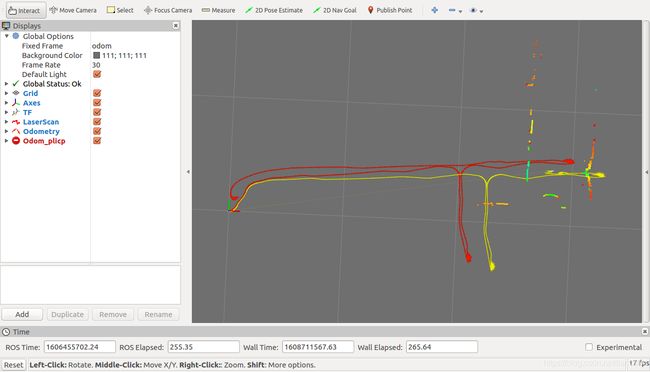
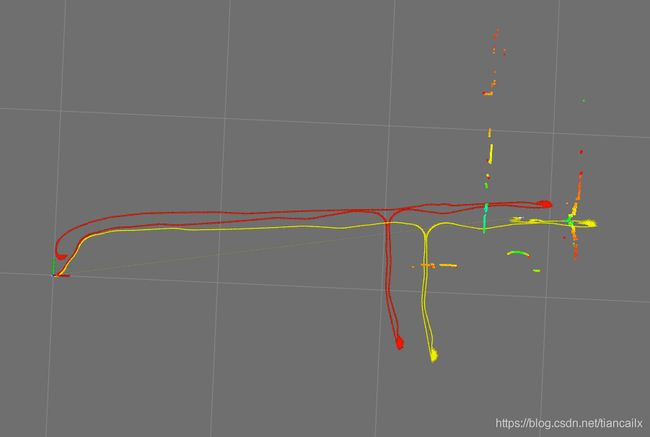
红色轨迹为通过小车自身编码器累加出来的里程计,黄色轨迹为通过PL-ICP算法累加出来的激光雷达里程计。

再来看一个更大的图片,图中细线格子的边长为10米,所以整体轨迹最远处大概走了30米。
由上图可知,当编码器累加出来的轨迹走完一圈并回到差不多原点的位置处,而黄色轨迹还差了半圈没有回来.
这是因为走到走廊尽头处掉头要走第二遍的时候,出现的匹配错误与匹配失败.
在走廊尽头,旋转时发生了匹配错误,机器人始终在前进,但是pl-icp计算出来的位姿并没有,导致黄色里程计不动.
当匹配错误一段时间之后,机器人估计的位姿与实际位姿差别很大,匹配也就不能成功了,所以之后也就再没有动.
当匹配失败的时候终端会出现如下所示内容,前2行为csm的输出,[warn] 为ROS节点的输出,代表匹配失败.
:err: 	: before trimming, only 0 correspondences.
:err: icp: ICP failed for some reason.
[ WARN] [1608712072.514938783, 1606455702.002871441]: not Converged
:err: 	: before trimming, only 0 correspondences.
:err: icp: ICP failed for some reason.
[ WARN] [1608712072.616003034, 1606455702.113580472]: not Converged
:err: 	: before trimming, only 0 correspondences.
:err: icp: ICP failed for some reason.
[ WARN] [1608712072.707236863, 1606455702.204212566]: not Converged
4 结果分析
4.1 现象分析
4.1.1 算出来的里程计比真实距离长
黄色轨迹比红色轨迹(编码器)长,猜测是在长走廊环境下匹配出的位姿产生了漂移.
因为我是用的匀速模型,在机器人减速时就会导致预测时使用的速度比实际速度大,就会导致预测的位移比实际位移大.而在走廊环境下的匹配可能 在机器人的前后两个方向上没有约束,所以导致算出来的里程计边长.只是猜测...
4.1.2 在走到走廊尽头处掉头要走第二遍的时候,出现的匹配错误
这一现象我还不清楚原因,想要知道具体原因就需要去看csm的代码了,之前大致看过一次,只不过后来忘记了...
以为是匹配失败后,导致关键帧与当前scan差距太大,所以后来更改了代码让每5个scan就添加关键帧,但并没有解决这个问题...
4.2 失败原因猜测1: 环境
可以看到这个环境对于雷达来说真是非常苛刻了,基本上只能看到两边的墙,虽然后边也有一点墙,但是还是失败了.这也证明了这个算法还是不够鲁棒.
4.2 失败原因猜测2: 雷达最远距离与雷达射线的强度
这个包是用镭神ls01b的雷达录制的,2000元,最远距离25m,雷达频率为10hz.
失败的原因可能也是因为雷达的距离太短,看不到走廊另一头.
猜测还有个原因是因为雷达射线的强度比较低,在大角度情况下没有返回值,导致有效数量比较少.
4.3 失败原因猜测3: 参数配置问题
参数使用的是 laser_scan_matcher 这个包使用的参数,并没有进行额外的调参,可能这套参数不太适用于长走廊环境.
具体参数的意义就要去看csm的代码了.
我就不再进行深入的调试了,有兴趣的同学可以调调参数感受一下不同参数会导致的结果有何不同.因为接下来还有更多更精彩的操作等着我去实现,所以这个问题先放在这里,等着我以后水平更高的时候再来解决.
5 一些想法
最近加我的硕士好多都说不知道做激光SLAM相关课题还能做啥,都是想着做激光和视觉融合,但是找不到具体的点.
对于上面的长走廊环境,单雷达的效果是非常不好的,而且,这个环境并不是全都是白墙这种没纹理的场景,还存在一些类似门洞一样的结构.
这种场景提取图像的特征点应该还是很鲁棒的,这就是一个结合点啊:有纹理的长走廊环境下雷达与单目视觉的融合.
网上好多人说二维激光SLAM已经很稳定了,我感觉虽然大体上稳定了,但是还是有很多不足的.
例如,现在应该没有任何一套二维激光SLAM可以用一套参数适用于不同场景的,都是针对具体场景做适应性开发.而且,针对具体场景下的建图也不是百分百成功的,建图成功率还和机器人运动速度,旋转速度,运动轨迹相关.
其他的,如长走廊环境的建图,矿场这种特别空旷环境的建图,室内结构相似环境下的回环检测,这些情况只使用激光SLAM基本是不行的,一定要进行多传感器融合,简单的可以融合imu,里程计,更复杂一点的就是激光与视觉做融合.
对于二维激光SLAM来说,大多都是依赖于里程计,还没有使用 IMU的预积分 进行传感器融合的,这也是一个可以写论文的点.
6 Next
计划中还有个NDT的scan-to-scan的方法没有实现,这个算法也是直接调用PCL中的库函数就行,优先级可以先放一放,之后再来对他进行实现。
接下来几篇文章将进行栅格地图的构建,构建地图不像写里程计的代码这样简单,需要好几个文件,估计要通过几篇文章的长度才能构建完。
第一步先实现单纯的栅格地图的构建,之后再与这篇文章的PL-ICP里程计联合到一起,做一个SLAM的前端。
文章将在 公众号: 从零开始搭SLAM 进行同步更新,欢迎大家关注,可以在公众号中添加我的微信,进激光SLAM交流群,大家一起交流SLAM技术。
同时,也希望您将这个公众号推荐给您身边做激光SLAM的人们,大家共同进步。
如果您对我写的文章有什么建议,或者想要看哪方面功能如何实现的,请直接在公众号中回复,我可以收到,并将认真考虑您的建议。
![]()


