一、Python执行外部命令
1、subprocess模块简介
subprocess 模块允许我们启动一个新进程,并连接到它们的输入/输出/错误管道,从而获取返回值。
这个模块用来创建和管理子进程。它提供了高层次的接口,用来替换os.system*()、 os.spawn*()、 os.popen*()、os,popen2.*()和commands.*等模块和函数。
subprocess提供了一个名为Popen的类启动和设置子进程的参数,由于这个类比较复杂, subprocess还提供了若干便利的函数,这些函数都是对Popen类的封装。
2、subprocess模块的遍历函数
linux安装ipython
pip3 install ipython
(1)call函数
call函数的定义如下:
subprocess.ca11(args, *, stdin=None, stdout=None, stderr=None, she11=False)
#运行由args参数提供的命令,等待命令执行结束并返回返回码。args参数由字符串形式提供且有多个命令参数时,需要提供shell=True参数
- args:表示要执行的命令。必须是一个字符串,字符串参数列表。
- stdin、stdout 和 stderr:子进程的标准输入、输出和错误。其值可以是 subprocess.PIPE、subprocess.DEVNULL、一个已经存在的文件描述符、已经打开的文件对象或者 None。subprocess.PIPE 表示为子进程创建新的管道。subprocess.DEVNULL 表示使用 os.devnull。默认使用的是 None,表示什么都不做。另外,stderr 可以合并到 stdout 里一起输出。
- shell:如果该参数为 True,将通过操作系统的 shell 执行指定的命令。
示例代码:
[root@python ~]# ipython      #启动ipython
Python 3.8.1 (default, Mar  9 2020, 12:35:12)
Type 'copyright', 'credits' or 'license' for more information
IPython 7.13.0 -- An enhanced Interactive Python. Type '?' for help.
In [1]: import subprocess                #调用函数

In [2]: subprocess.call(['ls','-l'])
drwxr-xr-x.  2 root root        6 10月 31 23:04 公共
drwxr-xr-x.  2 root root        6 10月 31 23:04 模板
drwxr-xr-x.  2 root root        6 10月 31 23:04 视频
drwxr-xr-x.  2 root root     4096 10月 31 22:40 图片
drwxr-xr-x.  2 root root        6 10月 31 23:04 文档
drwxr-xr-x.  2 root root        6 10月 31 23:04 下载
drwxr-xr-x.  2 root root        6 10月 31 23:04 音乐
drwxr-xr-x.  2 root root        6 10月 31 15:27 桌面
Out[2]: 0

In [3]: subprocess.call('exit 1',shell=True)
Out[3]: 1
(2)check_call函数
check_call函数的作用与call函数类似,区别在于异常情况下返回的形式不同。
对于call函数,工程师通过捕获call命令的返回值判断命令是否执行成功,如果成功则返回0,否则的话返回非0,对于check_call函数,如果执行成功,返回0,如果执行失败,抛出subrocess.CalledProcessError异常。如下所示:
In [5]: subprocess.check_call(['ls','-l'])
drwxr-xr-x.  2 root root        6 10月 31 23:04 公共
drwxr-xr-x.  2 root root        6 10月 31 23:04 模板
drwxr-xr-x.  2 root root        6 10月 31 23:04 视频
drwxr-xr-x.  2 root root     4096 10月 31 22:40 图片
drwxr-xr-x.  2 root root        6 10月 31 23:04 文档
drwxr-xr-x.  2 root root        6 10月 31 23:04 下载
drwxr-xr-x.  2 root root        6 10月 31 23:04 音乐
drwxr-xr-x.  2 root root        6 10月 31 15:27 桌面
Out[5]: 0

In [6]: subprocess.check_call('exit 1',shell=True)
-------------------------------------------------------------
CalledProcessError          Traceback (most recent call last)
 in
----> 1 subprocess.check_call('exit 1',shell=True)

/usr/local/python381/lib/python3.8/subprocess.py in check_call(*popenargs, **kwargs)
    362         if cmd is None:
    363             cmd = popenargs[0]
--> 364         raise CalledProcessError(retcode, cmd)
    365     return 0
    366

CalledProcessError: Command 'exit 1' returned non-zero exit status 1.
(3)check_output
Python3中的subprocess.check_output函数可以执行一条sh命令,并返回命令的输出内容,用法如下:
In [10]: output = subprocess.check_output(['df','-h'])
In [11]: print(output.decode())
文件系统             容量  已用  可用 已用% 挂载点
/dev/mapper/cl-root   17G  5.2G   12G   31% /
devtmpfs             473M     0  473M    0% /dev
tmpfs                489M   92K  489M    1% /dev/shm
tmpfs                489M  7.1M  482M    2% /run
tmpfs                489M     0  489M    0% /sys/fs/cgroup
/dev/sda1           1014M  173M  842M   18% /boot
tmpfs                 98M   16K   98M    1% /run/user/42
tmpfs                 98M     0   98M    0% /run/user/0
In [12]: lines = output.decode().split('\n')
In [13]: lines
Out[13]:
['文件系统             容量  已用  可用 已用% 挂载点',
 '/dev/mapper/cl-root   17G  5.2G   12G   31% /',
 'devtmpfs             473M     0  473M    0% /dev',
 'tmpfs                489M   92K  489M    1% /dev/shm',
 'tmpfs                489M  7.1M  482M    2% /run',
 'tmpfs                489M     0  489M    0% /sys/fs/cgroup',
 '/dev/sda1           1014M  173M  842M   18% /boot',
 'tmpfs                 98M   16K   98M    1% /run/user/42',
 'tmpfs                 98M     0   98M    0% /run/user/0',
 '']

In [14]: for line in lines[1:-1]:
    ...:     if line:
    ...:         print(line.split()[-2])
    ...: #截取挂载点数据
31%
0%
1%
2%
0%
18%
1%
0%
在子进程执行命令,以字符串形式返回执行结果的输出。如果子进程退出码不是0,抛出subprocess.CalledProcessError异常,异常的output字段包含错误输出:
In [19]: try:
...: output = subprocess.check_output(['df','-h']).decode() #正确的
...: except subprocess.CalledProcessError as e:
...: output = e.output
...: code = e.returncode
//正确的没有任何输出In [23]: try:
...: output = subprocess.check_output(['wsd','-h'], stderr=subprocess.STDOUT)
...: .decode() #错误的
...: except subprocess.CalledProcessError as e:
...: output = e.output
...: code = e.returncode
...://前面的错误代码省略
FileNotFoundError: [Errno 2] No such file or directory: 'wsd'
3、subprocess模块的Popen类(PyCharm)
实际上,我们上面的三个函数都是基于Popen()的封装(wrapper)。这些封装的目的在于让我们容易使用子进程。当我们想要更个性化我们的需求的时候,就要转向Popen类,该类生成的对象用来代表子进程。
- subprocess模块中基本的进程创建和管理由Popen类来处理
- subprocess.popen是用来替代os.popen的
- Popen 是 subprocess的核心,子进程的创建和管理都靠它处理。
构造函数:
class subprocess.Popen(args, bufsize=-1, executable=None, stdin=None, stdout=None, stderr=None,
preexec_fn=None, close_fds=True, shell=False, cwd=None, env=None, universal_newlines=False,
startupinfo=None, creationflags=0,restore_signals=True, start_new_session=False, pass_fds=(),
*, encoding=None, errors=None)
(1)常用参数:
args:shell命令,可以是字符串或者序列类型(如:list,元组)
bufsize:缓冲区大小。当创建标准流的管道对象时使用,默认-1。
- 0:不使用缓冲区
- 1:表示行缓冲,仅当universal_newlines=True时可用,也就是文本模式
- 正数:表示缓冲区大小
- 负数:表示使用系统默认的缓冲区大小。
stdin, stdout, stderr:分别表示程序的标准输入、输出、错误句柄
preexec_fn:只在 Unix 平台下有效,用于指定一个可执行对象(callable object),它将在子进程运行之前被调用
shell:如果该参数为 True,将通过操作系统的 shell 执行指定的命令。
cwd:用于设置子进程的当前目录。
env:用于指定子进程的环境变量。如果 env = None,子进程的环境变量将从父进程中继承。
创建一个子进程,然后执行一个简单的命令:
>>> import subprocess
>>> p = subprocess.Popen('ls -l', shell=True)
>>> total 164
-rw-r--r--  1 root root   133 Jul  4 16:25 admin-openrc.sh
-rw-r--r--  1 root root   268 Jul 10 15:55 admin-openrc-v3.sh
...
>>> p.returncode
>>> p.wait()
0
>>> p.returncode
0
这里也可以使用 p = subprocess.Popen(['ls', '-cl']) 来创建子进程。
(2)Popen 对象的属性
<1> p.pid:
子进程的PID。
<2> p.returncode:
该属性表示子进程的返回状态,returncode可能有多重情况:
- None —— 子进程尚未结束;
- ==0 —— 子进程正常退出;
- \> 0—— 子进程异常退出,returncode对应于出错码;
- < 0—— 子进程被信号杀掉了。
<3> p.stdin, p.stdout, p.stderr:
子进程对应的一些初始文件,如果调用Popen()的时候对应的参数是subprocess.PIPE,则这里对应的属性是一个包裹了这个管道的 file 对象。
(3)Popen 对象方法
- poll(): 检查进程是否终止,如果终止返回 returncode,否则返回 None。
- wait(timeout): 等待子进程终止。
- communicate(input,timeout): 和子进程交互,发送和读取数据。
- send_signal(singnal): 发送信号到子进程 。
- terminate(): 停止子进程,也就是发送SIGTERM信号到子进程。
- kill(): 杀死子进程。发送 SIGKILL 信号到子进程。
子进程的PID存储在child.pid
import time
import subprocess

def cmd(command):
    subp = subprocess.Popen(command,shell=True,stdout=subprocess.PIPE,stderr=subprocess.PIPE,encoding="utf-8")
    subp.wait(2)
    if subp.poll() == 0:
        print(subp.communicate()[1])
    else:
        print("失败")

cmd("java -version")
cmd("exit 1")
输出结果如下:
java version "1.8.0_31"
失败
Java(TM) SE Runtime Environment (build 1.8.0_31-b13)
Java HotSpot(TM) 64-Bit Server VM (build 25.31-b07, mixed mode)
(4)子进程的文本流控制
(沿用child子进程) 子进程的标准输入,标准输出和标准错误也可以通过如下属性表示:
- child.stdin
- child.stdout
- child.stderr
我们可以在Popen()建立子进程的时候改变标准输入、标准输出和标准错误,并可以利用subprocess.PIPE将多个子进程的输入和输出连接在一起,构成管道(pipe):
import subprocess
child1 = subprocess.Popen(["ls","-l"], stdout=subprocess.PIPE)
child2 = subprocess.Popen(["wc"], stdin=child1.stdout,stdout=subprocess.PIPE)
out = child2.communicate()
print(out)
执行结果如下:
(b' 2 11 60\n', None)
subprocess.PIPE实际上为文本流提供一个缓存区。child1的stdout将文本输出到缓存区,随后child2的stdin从该PIPE中将文本读取走。child2的输出文本也被存放在PIPE中,直到communicate()方法从PIPE中读取出PIPE中的文本。
要注意的是,communicate()是Popen对象的一个方法,该方法会阻塞父进程,直到子进程完成。
我们还可以利用communicate()方法来使用PIPE给子进程输入:
import subprocess
child = subprocess.Popen(["cat"], stdin=subprocess.PIPE)
child.communicate("vamei".encode())
我们启动子进程之后,cat会等待输入,直到我们用communicate()输入"vamei"。
通过使用subprocess包,我们可以运行外部程序。这极大的拓展了Python的功能。如果你已经了解了操作系统的某些应用,你可以从Python中直接调用该应用(而不是完全依赖Python),并将应用的结果输出给Python,并让Python继续处理。shell的功能(比如利用文本流连接各个应用),就可以在Python中实现。
4、使用python自动安i装并启动mongodb
PyCharm记得连接linux
简易流程
- Python自动化运维 --> 基于shell命令进行封装
- 编写自动化脚本 --> 用Python语法封装shell命令的执行过程
- python执行shell命令 --> python外部命令
- python函数执行shell命令
- os.system(cmd):执行cmd指令
- subprocess模块
subprocess.call(['ls','-l'])
subprocess.call('ll' , shell=True)
运行成功: 返回0
运行失败: 返回非0
subprocess. check_call (['ls',  '-l'])
subprocess. check_call ('ll', shell=True)
运行成功: 返回0
运行失败: 返回CalledProcessError
subprocess. check_ output(['cat', 'apache.log'], stderr= subprocess.STDOUT)
运行成功:返回命令的输出结果
运行失败:自定义错误输出stderr
subprocess模块的Popen类
(1)PyCharm创建文件
# coding=utf-8
import subprocess
import os
import shutil
import tarfile

# 执行外部命令的函数
def execute_cmd(cmd):
    '''执行shell命令'''
    p = subprocess.Popen(cmd, shell=True,
                         stdin=subprocess.PIPE,
                         stdout=subprocess.PIPE,
                         stderr=subprocess.PIPE)
    stdout, stderr = p.communicate()
    if p.returncode != 0:
        return p.returncode, stderr
    return p.returncode, stdout

# 解压
def unpackage_mongo(package, package_dir):
    # 获取MongoDB压缩包的主文件名,也就是解压后的目录名称
    # mongodb-linux-x86_64-rhe170-4.2.3
    unpackage_dir = os.path.splitext(package)[0]
    if os.path.exists(unpackage_dir):
        shutil.rmtree(unpackage_dir)
    if os.path.exists(package_dir):
        shutil.rmtree(package_dir)
    # 解压
    try:
        t = tarfile.open(package, 'r:gz')
        t.extractall('.')
        print('tar is ok.')
    except Exception as e:
        print(e)
    # 重命名
    shutil.move(unpackage_dir, 'mongo')

# 创建mongodata
def create_datadir(data_dir):
    if os.path.exists(data_dir):
        shutil.rmtree(data_dir)
    os.mkdir(data_dir)

# 拼接启动MongoDB
def format_mongod_commamd(package_dir, data_dir, logfile):
    # mongo/bin/mongod
    mongod = os.path.join(package_dir, 'bin', 'mongod')
    # mongo/bin/mongod --fork --logpath mongodata/mongod.log --dbpath mongodata
    mongod_format = """{0} --fork --dbpath {1} --logpath {2}"""
    return mongod_format.format(mongod, data_dir, logfile)

# 启动MongoDB
def start_mongod(cmd):
    returncode, out = execute_cmd(cmd)
    if returncode != 0:
        raise SystemExit('execute {0} error:{1}'.format(cmd, out))
    else:
        print('execute {0} successfuly.'.format(cmd))

#入口函数
def main():
    package = 'mongodb-linux-x86_64-rhel70-4.2.3.tgz'
    cur_dir = os.path.abspath('.')
    package_dir = os.path.join(cur_dir, 'mongo')
    data_dir = os.path.join(cur_dir, 'mongodata')
    logfile = os.path.join(data_dir, 'mongod.log')

    # 判断MongoDB压缩包是否存在
    if not os.path.exists(package):
        raise SystemExit('{0} not found.'.format(package))

    # 解压
    unpackage_mongo(package, package_dir)
    create_datadir(data_dir)

    # 启动mongodb
    start_mongod(format_mongod_commamd(package_dir, data_dir, logfile))

    # 配置环境变量
    os.system('echo "export PATH=./mongo/bin:$PATH" > ~/.bash_profile')
    os.system('source ~/.bash_profile')

    os.system('./mongo/bin/mongo')
main()
- 在这段程序中,我们首先在main函数中定义了几个变量,包括当前目录的路径、MongoDB二进制文件所在的路径、MongoDB数据目录所在的路径,以及MongoDB的日志文件。
- 随后,我们判断MongoDB的安装包是否存在,如果不存在,则通过抛出SystemExit异常的方式结束程序。
- 在unpackage_mongo函数中,我们通过Python程序得到MongoDB安装包解压以后的目录。如果目录已经存在,则删除该目录。随后,我们使用tarfile解MongoDB数据库,解压完成后,将命令重命名为mongo目录。
- 在create_datadir目录中,我们首先判断MongoDB数据库目录是否存在,如果存在,则删除该目录,随后再创建MongoDB数据库目录。
- 在start_mongod函数中, 我们执行MongoDB数据库的启动命令启动MongoDB数据库。为了在Python代码中执行shell命令,我们使用了subprocess库。 我们将subprocess库执行she11命令的逻辑封装成execute_cmd函数,在执行shell命令时,直接调用该函数即可。
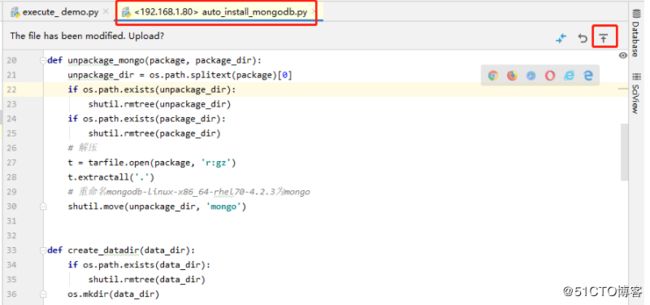
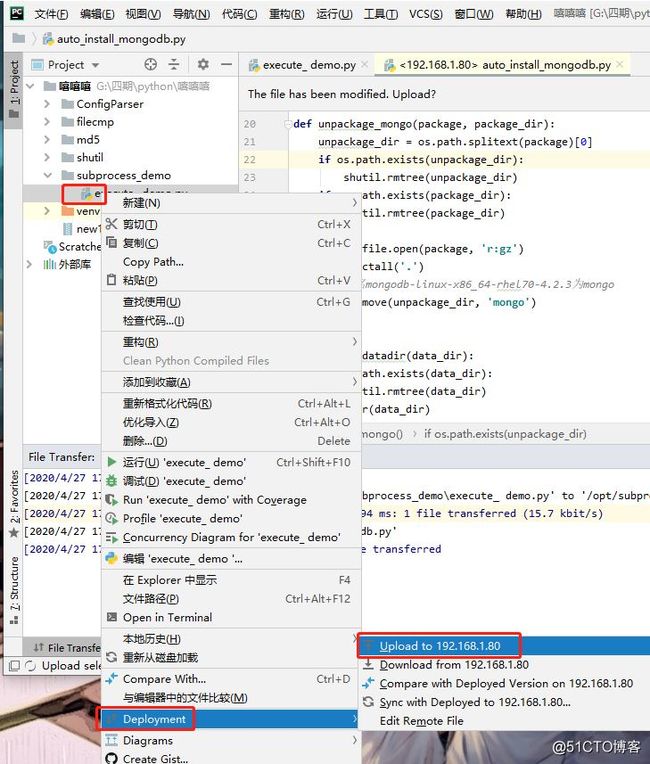
(2)将PyCharm中的文件上传到Linux
如果,是直接调用Linux中文件可用:
如果是本地创建:
(3)Linux执行脚本,并测试
记得进入PyCharm与linux连接的目录(目前是/opt)
[root@python opt]# python auto_install_mongodb.py   #执行提前编写好的脚本
tar is ok.
execute /opt/mongo/bin/mongod --fork --dbpath /opt/mongodata --logpath /opt/mongodata/mongod.log successfuly.
[root@python opt]# netstat -anpt | grep mongo       #查看mongo是否启动
tcp        0      0 127.0.0.1:27017         0.0.0.0:*               LISTEN      4616mongod
[root@python opt]# ls                               #查看是否生成mongo目录
01find_cmd.py            bb.bmp     mongodb-linux-x86_64-rhel70-4.2.3.tgz
aaa.jpg                  cc.png     rh
adc.txt                  mongo      subprocess_demo
auto_install_mongodb.py  mongodata
[root@python opt]# cd mongo
[root@python mongo]# cd bin/
[root@python bin]# ./mongo                          #进入mongo
MongoDB shell version v4.2.3
connecting to: mongodb://127.0.0.1:27017/?compressors=disabled&gssapiServiceName=mongodb
Implicit session: session { "id" : UUID("c302ff50-7e27-40b7-8046-8441af8cb965") }
MongoDB server version: 4.2.3

> show databases;                                  #查看数据库
admin   0.000GB
config  0.000GB
local   0.000GB
到此这篇关于Python实现subprocess执行外部命令的文章就介绍到这了,更多相关Python 执行外部命令内容请搜索脚本之家以前的文章或继续浏览下面的相关文章希望大家以后多多支持脚本之家!

