概述
为了提高表面细节,最直观的方法就是制作复杂的网格,但是这样做会明显增加大量的耗费,因此更多是使用以下4种常见的技术:
- 凹凸贴图(Bump Mapping):根据高度图计算法线
- 法线贴图(Normal Mapping):直接在贴图中存放法线
- 视差贴图(Parallax Mapping):根据高度图偏移UV
- 带偏移限制的视差贴图(Parallax Mapping with offset limiting)
- 陡峭视差贴图(Steep Parallax Mapping)
- 浮雕视差贴图(Relief Parallax Mapping)
- 视差遮蔽贴图(Parallax Occlusion Mapping (POM))
- 偏置贴图(Displacement Mapping):根据高度图偏移顶点(通常与曲面细分一起用)
下面将逐一介绍这些技术。
凹凸贴图 (Bump Mapping)
给定一张高度图(灰度图,与图像纹理具有相同的分辨率),通过计算相邻像素的高度差值来改变表面法向量。
求解过程
问题:计算(x, y, h(x,y))处的表面法线数据
解答:
知道4个邻接点(x+1, y), (x-1, y), (x, y+1), (x, y-1)
可以求得偏导数为:


因此可得x, y两个方向的切向量为:

求叉积可得:

标准化后即可得单位法向量。
代码如下:
float3 CalculateNormal(float2 uv)
{
    float2 du = float2(_DepthMap_TexelSize.x * 0.5, 0);
    float u1 = tex2D(_DepthMap, uv - du);
    float u2 = tex2D(_DepthMap, uv + du);
    float3 tu = float3(1, 0, (u2 - u1) * _Scale);

    float2 dv = float2(0, _DepthMap_TexelSize.y * 0.5);
    float v1 = tex2D(_DepthMap, uv - dv);
    float v2 = tex2D(_DepthMap, uv + dv);
    float3 tv = float3(0, 1, (v2 - v1) * _Scale);

    return normalize(-cross(tv, tu)); //这里加不加负号可以放到高度图的a通道来决定
}
完整代码点这里

法线贴图 (Normal Mapping)
法线贴图直接存储了上面凹凸贴图计算出来的法线向量(TBN切空间中)。
这里的法线是(0,0,1)扰动后的结果,因此x,y分量通常小于z分量,所以贴图的颜色通常会偏蓝。
代码如下:
//float3 normal = tex2D(normalMap, uv).rgb; //从法线贴图读取[0,1]范围的法线
//normal = normalize(normal * 2.0 - 1.0);   //将[0,1]转成[-1,1]
float3 normal = UnpackNormal(packedNormal); //注意法线贴图的Texture Type要设置为Normal Map
完整代码点这里

视差贴图 (Parallax Mapping)
根据视线方向与高度图(深度图)的交点来找到新的UV。
如下图所示:

因为想要准确求出交点的计算量太大,因此更多是使用以下这些近似方案。
1. 视差贴图简单版
直接根据当前UV对应的高度,然后将该高度值乘以视线向量(需要是单位向量),从而得到新的UV值。
如下图所示,我们根据当前的(u,v)得到深度值为d,然后将深度值乘以视线方向,能得到新的(u1,v1),可以看见该结果还是离准确的结果(黄色)比较近的。

实现代码如下:
float2 ParallaxMapping(float2 uv, float3 viewDir_tangent)
{
    float3 viewDir = normalize(viewDir_tangent);
    float height = tex2D(_DepthMap, uv).r;
    //因为viewDir是在切线空间的(xy与uv对齐),所以只用xy偏移就行了
    float2 p = viewDir.xy / viewDir.z * (height * _HeightScale); //_HeightScale用来调整高度(深度)
    return uv - p;
}
完整代码点这里

(效果并不十分明显,最好和上面的法线贴图做对比。)
从上面的效果图可以看到边缘处并没有凹进去,此时可以在计算处新的UV后对超界的部分剔除掉:
float2 uv = ParallaxMapping(i.uv, viewDir);
if(uv.x > 1.0 || uv.y > 1.0 || uv.x < 0.0 || uv.y < 0.0) //去掉边上的一些古怪的失真,在平面上工作得挺好的,这条语句根据实际情况决定加不加
    discard;

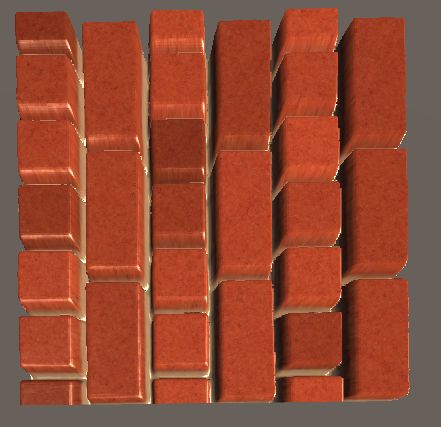
可以看见该简单版的实现很简单,但是效果并不十分好,只能用在平缓的凹凸面上,但表面凹凸很明显时,会有明显的失真:

通过分析下面这张图就能知道为什么凹凸明显时会失真:

2. 带偏移量限制的视差贴图 (Parallax Mapping with offset limiting)
为了减轻视线与平面十分持平时(V.z很小导致偏移量过大)产生的怪异效果,可以去掉除以V.z这一步。
float2 ParallaxMapping(float2 uv, float3 viewDir_tangent)
{
    float3 viewDir = normalize(viewDir_tangent);
    float height = tex2D(_DepthMap, uv).r;
    float2 p = viewDir.xy * (height * _HeightScale);
    return uv - p;
}
完整代码点这里

3. 陡峭视差贴图 (Steep Parallax Mapping)
将[0,1]这个深度范围均分成一定数量,然后从上到下遍历,找到第一个层深度在高度场以下的点。
这种方法就是分多个样本,然后不断取样直到样本在交点之后。

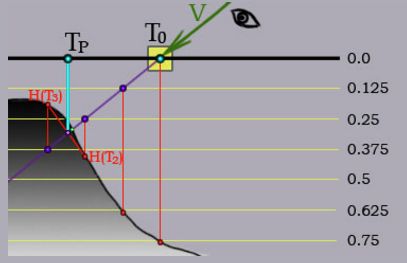
步骤
- 找到视线V与第0层的交点T0,层深度是0.0,对应高度场值为0.75,因为该点在高度场上,所以找下一个点。
- 找到视线V与第1层的交点T1,层深度是0.125,对应高度场值为0.625,因为该点在高度场上,所以找下一个点。
- 找到视线V与第2层的交点T2,层深度是0.25,对应高度场值为0.4,因为该点在高度场上,所以找下一个点。
- 找到视线V与第3层的交点T3,层深度是0.375,对应高度场值为0.2,因为该点在高度场下,所以这就是我们要找的点。
代码如下:
float2 ParallaxMapping(float2 uv, float3 viewDir_tangent)
{
    float3 viewDir = normalize(viewDir_tangent);

    float layerNum = lerp(_MaxLayerNum, _MinLayerNum, abs(dot(float3(0,0,1), viewDir)));//一点优化:根据视角来决定分层数
    float layerDepth = 1.0 / layerNum;
    float currentLayerDepth = 0.0;
    float2 deltaTexCoords = viewDir.xy / viewDir.z / layerNum * _HeightScale;

    float2 currentTexCoords = uv;
    float currentDepthMapValue = tex2D(_DepthMap, currentTexCoords).w;

    //unable to unroll loop, loop does not appear to terminate in a timely manner
    //上面这个错误是在循环内使用tex2D导致的,需要加上unroll来限制循环次数或者改用tex2Dlod
    // [unroll(100)]
    while(currentLayerDepth < currentDepthMapValue)
    {
        currentTexCoords -= deltaTexCoords;
        // currentDepthMapValue = tex2D(_DepthMap, currentTexCoords).r;
        currentDepthMapValue = tex2Dlod(_DepthMap, float4(currentTexCoords, 0, 0)).r;
        currentLayerDepth += layerDepth;
    }

    return currentTexCoords;
}
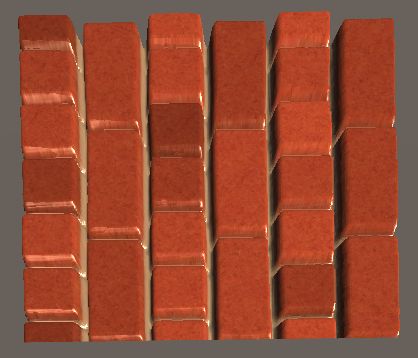
可以看见此时效果已经十分出众了,甚至里面的细节已经能够相互遮蔽了。但是该方法也是有缺点的,当分层过多会降低性能,而分层过少会有断层锯齿的现象,如下:

4. 浮雕视差贴图 (Relief Parallax Mapping)
该方法是对陡峭视差贴图的进一步优化。在陡峭视差贴图的基础上,利用二分查找来细化结果。
如下图,假设我们利用陡峭视差贴图找到了T3,而T是准确的交点,二分查找的次数为3。
- 取T2-T3的中点P1,因为P1在下面,因此用P1取代T3
- 取T2-P1的中点P2,因为P2在上面,因此用P2取代T2
- 取P2-P1的中点P3,因为P3在下面,因此用P3取代P1
- 到达二分查找次数上限,结果为P3。

代码如下:
float2 ParallaxMapping(float2 uv, float3 viewDir_tangent)
{
    float layerNum = lerp(_MinLayerNum, _MaxLayerNum, abs(dot(float3(0,0,1), viewDir_tangent)));
    float layerDepth = 1.0 / layerNum;
    float currentLayerDepth = 0.0;
    float2 deltaUV = viewDir_tangent.xy / viewDir_tangent.z * _HeightScale / layerNum;

    float2 currentTexCoords = uv;
    float currentDepthMapValue = tex2D(_DepthMap, currentTexCoords).r;

    //unable to unroll loop, loop does not appear to terminate in a timely manner
    //上面这个错误是在循环内使用tex2D导致的,需要加上unroll来限制循环次数或者改用tex2Dlod
    // [unroll(100)]
    while(currentLayerDepth < currentDepthMapValue)
    {
        currentTexCoords -= deltaUV;
        // currentDepthMapValue = tex2D(_DepthMap, currentTexCoords).r;
        currentDepthMapValue = tex2Dlod(_DepthMap, float4(currentTexCoords, 0, 0)).r;
        currentLayerDepth += layerDepth;
    }

    //二分查找
    float2 halfDeltaUV = deltaUV / 2;
    float halfLayerDepth = layerDepth / 2;

    currentTexCoords += halfDeltaUV;
    currentLayerDepth += halfLayerDepth;

    int numSearches = 5;
    for(int i = 0; i < numSearches; i++)
    {
        halfDeltaUV  = halfDeltaUV / 2;
        halfLayerDepth = halfLayerDepth / 2;

        currentDepthMapValue = tex2Dlod(_DepthMap, float4(currentTexCoords, 0, 0)).r;

        if(currentDepthMapValue > currentLayerDepth)
        {
            currentTexCoords -= halfDeltaUV;
            currentLayerDepth += halfLayerDepth;
        }
        else
        {
            currentTexCoords += halfDeltaUV;
            currentLayerDepth -= halfLayerDepth;
        }
    }

    return currentTexCoords;
}
完整代码点这里

该方法的效果比陡峭视差贴图更好,但是相应的性能消耗也更高。
5. 视差遮挡贴图 (Parallax Occlusion Mapping, POM)
也是一种陡峭视差贴图的优化。在陡峭视差贴图的基础上进行插值。
利用陡峭视差贴图得到最靠近交点的T2和T3后,根据这两者的深度与对应层深度的差值作为比例进行插值。
代码如下:
float2 ParallaxMapping(float2 uv, float3 viewDir_tangent)
{
    float layerNum = lerp(_MaxLayerNum, _MinLayerNum, abs(dot(float3(0,0,1), viewDir_tangent))); //垂直时用更少的样本
    float layerDepth = 1.0 / layerNum;
    float currentLayerDepth = 0.0;
    float2 deltaTexCoords = viewDir_tangent.xy / viewDir_tangent.z * _HeightScale / layerNum;

    float2 currentTexCoords = uv;
    float currentDepthMapValue = tex2D(_DepthMap, currentTexCoords).r;

    //unable to unroll loop, loop does not appear to terminate in a timely manner
    //上面这个错误是在循环内使用tex2D导致的,需要加上unroll来限制循环次数或者改用tex2Dlod
    // [unroll(100)]
    while(currentLayerDepth < currentDepthMapValue)
    {
        currentTexCoords -= deltaTexCoords;
        // currentDepthMapValue = tex2D(_DepthMap, currentTexCoords).r;
        currentDepthMapValue = tex2Dlod(_DepthMap, float4(currentTexCoords, 0, 0)).r;
        currentLayerDepth += layerDepth;
    }

    float2 prevTexCoords = currentTexCoords + deltaTexCoords;
    float prevLayerDepth = currentLayerDepth - layerDepth;

    float afterDepth = currentDepthMapValue - currentLayerDepth;
    float beforeDepth = tex2D(_DepthMap, prevTexCoords).r - prevLayerDepth;
    float weight = afterDepth / (afterDepth - beforeDepth);
    float2 finalTexCoords = prevTexCoords * weight + currentTexCoords * (1.0 - weight);

    return finalTexCoords;
}
完整代码点这里
该方法的效果和性能都介于Steep Parallax Mapping和Relief Parallax Mapping之间。
6. 带自阴影的视差贴图
上面的几种视差贴图都没有考虑自阴影(即凸起部分能向其他部分投影)。要实现自阴影也不难,和制作深度图一样,此时沿着光线方向指向我们利用视差贴图找到的交点,然后判断该交点是否被其他部分遮蔽了。
实际上大部分操作和视差贴图类似,只是把操作的向量从视线向量改为光线向量而已。

代码如下:
float ParallaxShadow(float3 lightDir_tangent, float2 initialUV, float initialHeight)
{
    float3 lightDir = normalize(lightDir_tangent);

    float shadowMultiplier = 1;

    const float minLayers = 15;
    const float maxLayers = 30;

    //只算正对阳光的面
    if(dot(float3(0, 0, 1), lightDir) > 0)
    {
        float numSamplesUnderSurface = 0;
        float numLayers = lerp(maxLayers, minLayers, abs(dot(float3(0, 0, 1), lightDir))); //根据光线方向决定层数
        float layerHeight = 1 / numLayers;
        float2 texStep = _HeightScale * lightDir.xy / lightDir.z / numLayers;

        float currentLayerHeight = initialHeight - layerHeight;
        float2 currentTexCoords = initialUV + texStep;
        float heightFromTexture = tex2D(_DepthMap, currentTexCoords).r;

        while(currentLayerHeight > 0)
        {
            if(heightFromTexture <= currentLayerHeight)
            numSamplesUnderSurface += 1; //统计被遮挡的层数

            currentLayerHeight -= layerHeight;
            currentTexCoords += texStep;
            heightFromTexture = tex2Dlod(_DepthMap, float4(currentTexCoords, 0, 0)).r;
        }

        shadowMultiplier = 1 - numSamplesUnderSurface / numLayers; //根据被遮挡的层数来决定阴影深浅
    }

    return shadowMultiplier;
}
完整代码点这里

为了让阴影更好看点,可以进行部分柔化:
while(currentLayerHeight > 0)
{
    if(heightFromTexture < currentLayerHeight)
    {
        numSamplesUnderSurface += 1;
        float newShadowMultiplier = (currentLayerHeight - heightFromTexture) * (1.0 - stepIndex / numLayers);
        shadowMultiplier = max(shadowMultiplier, newShadowMultiplier);
    }

    stepIndex += 1;
    currentLayerHeight -= layerHeight;
    currentTexCoords += texStep;
    heightFromTexture = tex2Dlod(_DepthMap, float4(currentTexCoords, 0, 0)).r;
}

if(numSamplesUnderSurface < 1)
{
    shadowMultiplier = 1;
}
else
{
    shadowMultiplier = 1.0 - shadowMultiplier;
}
完整代码点这里

偏置贴图 (Displacement Mapping)
直接根据高度图(或深度图)来偏移顶点,通常还需要曲面细分(Tessellation)来增加网格密度。
首先是偏移顶点:
float d = tex2Dlod(_DisplacementTex, float4(v.texcoord.xy, 0, 0)).r * _Displacement;
v.vertex.xyz -= v.normal * d;
完整代码点这里
如果不使用曲面细分而直接在低密度网格中偏移顶点,效果并不好:

因此通常需要加上曲面细分:
#pragma surface surf BlinnPhong addshadow fullforwardshadows vertex:vert tessellate:tessFixed

float4 tessFixed()
{
    return _Tess;
}
完整代码点这里
这时候即使是低密度网格,效果也是无话可说:

毫无疑问Displacement Mapping是这几种技术中效果最好的,但是任何东西都是有利有弊的,该技术也是最耗费性能的。
参考
Unity渲染教程(六):凹凸度
Parallax Mapping - LearnOpenGL
Parallax Occlusion Mapping in GLSL:极为优秀而全面的视差贴图文章
Surface Shaders with DX11 / OpenGL Core Tessellation
《计算机图形学—基于3D图形开发技术》