sklearn中的xgboost_XGBoost从原理到调参
承接上文
挂枝儿:再从GBDT到XGBoost!zhuanlan.zhihu.com理解了原理,那么接下来就要开始学习怎么调参了,之前做模型的时候用xgboost比较简单粗暴跟着教程一顿乱fit,但最近比较完整的过了下原理之后,找了个sampledata过来想练个手却感觉完全懵逼了,这篇文章就相当于给自己之后把玩xgboost当个baseline guide吧.
对了,虽然这篇文章是写调参的,但我个人还是觉得
想要靠调参去极大的改善结果是很难的(还是特征工程重要啊!)
另外kaggle上已经有一些更好的调参方式,比如hyperopt基于贝叶斯优化的方式,所以这篇文章里的方式肯定还是不够炫酷的,所以就当做一个熟悉参数和建模思路的note吧.
这篇分为三个部分:
1. XGboost的优势 2. 常用参数列表 3. 调参示例
1. XGBoost的优势
之前从原理层面去理解,那么剥离出学习的场景,xgboost究竟相对与其他算法有什么优势呢?
- 正则化
- 普通的梯度提升算法是没有正则项来防止过拟合的,但xgboost有
- 并行处理
- xgboost并行处理数据的速度要比普通提升树算法更快.
- 不过这个并不是指xgboost可以并行的训练 ,这部肯定还是串行的,但我们在训练梯度,一棵树上寻找切分点的时候是可以并行的.
- 自动处理确实数据(不做切分点,但会把缺失值放进左右子树看效果)
- 剪枝策略
- 普通的提升 采用的是贪心算法,只有在不再有增益时才会停止分裂
- 自带的交叉验证
- xgboost自带的xgboost.cv允许我们在每新增一棵树的时候都进行交叉验证,这样能够很方便的在既有参数的框架下找到最优number of tree,这个功能和sklearn的graid_search必须给定nestimator不一样.
- 可以在目前树模型上继续迭代
- xgboost可以在一整天训练中使用不同的迭代策略(1-10颗树用params1,10~20用param2来训练
2.XGBoost的参数类型
总体来说,xgboost有三种参数类型
- General Parameters(通用): 指导总体的建模方向
- Booster Parameters(集成参数): 指导每一棵树(分类or回归)的在每次迭代时的生长方式
- Learning Task Parameters(任务参数): 指导在目前框架下的模型优化方式,大小权重。
2.1 通用参数
- booster [default=gbtree]
- gbtree 和 gblinear
- silent [default=0]
- 0表示输出信息, 1表示安静模式
- nthread
- 跑xgboost的线程数,默认最大线程数
2.2 集成参数
- eta [default=0.3, 可以视作学习率]
- 为了防止过拟合,更新过程中用到的收缩步长。在每次提升计算之后,算法会直接获得新特征的权重。 eta通过缩减特征的权重使提升计算过程更加保守。缺省值为0.3
- 取值范围为:[0,1]
- gamma [default=0, alias: min_split_loss]
- 为了对树的叶子节点做进一步的分割而必须设置的损失减少的最小值,该值越大,算法越保守
- range: [0,∞]
- max_depth [default=6]
- 用于设置树的最大深度
- range: [1,∞]
- min_child_weight [default=1]
- 表示子树观测权重之和的最小值,如果树的生长时的某一步所生成的叶子结点,其观测权重之和小于min_child_weight,那么可以放弃该步生长,在线性回归模式中,这仅仅与每个结点所需的最小观测数相对应。该值越大,算法越保守
- range: [0,∞]
- max_delta_step [default=0]
- 如果该值为0,就是没有限制;如果设为一个正数,可以使每一步更新更加保守通常情况下这一参数是不需要设置的,但是在logistic回归的训练集中类极端不平衡的情况下,将这一参数的设置很有用,将该参数设为1-10可以控制每一步更新
- range: [0,∞]
- subsample [default=1]
- 表示观测的子样本的比率,将其设置为0.5意味着xgboost将随机抽取一半观测用于数的生长,这将有助于防止过拟合现象
- range: (0,1]
- colsample_bytree [default=1]
- 表示用于构造每棵树时变量的子样本比率
- range: (0,1]
- colsample_bylevel [default=1]
- 用来控制树的每一级的每一次分裂,对列数的采样的占比。一般不太用这个参数,因为subsample参数和colsample_bytree参数可以起到相同的作用。
- range: (0,1]
- lambda [default=1, alias: reg_lambda]
- L2 权重的L2正则化项
- alpha [default=0, alias: reg_alpha]
- L1 权重的L1正则化项
- scale_pos_weight, [default=1]
- 在各类别样本十分不平衡时,把这个参数设定为一个正值,可以使算法更快收敛
- 一个可以考虑的值: sum(negative cases) / sum(positive cases) see Higgs Kaggle
2.3 任务参数
- objective [ default=reg:linear ]
- 这个参数定义需要被最小化的损失函数。最常用的值有
- "reg:linear" --线性回归
- "reg:logistic" --逻辑回归
- "binary:logistic" --二分类的逻辑回归,返回预测的概率(不是类别)
- "binary:logitraw" --输出归一化前的得分
- "count:poisson" --poisson regression for count data, output mean of poisson distribution
- max_delta_step is set to 0.7 by default in poisson regression (used to safeguard optimization)
- "multi:softmax" --设定XGBoost做多分类,你需要同时设定num_class(类别数)的值
- "multi:softprob" --输出维度为ndata * nclass的概率矩阵
- "rank:pairwise" --设定XGBoost去完成排序问题(最小化pairwise loss)
- "reg:gamma" --gamma regression with log-link. Output is a mean of gamma distribution. It might be useful, e.g., for modeling insurance claims severity, or for any outcome that might be gamma-distributed
- "reg:tweedie" --Tweedie regression with log-link. It might be useful, e.g., for modeling total loss in insurance, or for any outcome that might be Tweedie-distributed.
- base_score [ default=0.5 ]
- the initial prediction score of all instances, global bias
- for sufficient number of iterations, changing this value will not have too much effect.
- eval_metric [ 默认是根据 损失函数/目标函数 自动选定的 ]
- 有如下的选择:
- "rmse": 均方误差
- "mae": 绝对平均误差
- "logloss": negative log损失
- "error": 二分类的错误率
- "error@t": 通过提供t为阈值(而不是0.5),计算错误率
- "merror": 多分类的错误类,计算公式为#(wrong cases)/#(all cases).
- "mlogloss": 多类log损失
- "auc": ROC曲线下方的面积 for ranking evaluation.
- "ndcg":Normalized Discounted Cumulative Gain
- "map":平均准确率
- 有如下的选择:
- seed [ default=0 ]
- random number seed.
3. 调参示例
使用数据集
https://datahack.analyticsvidhya.com/contest/data-hackathon-3x/datahack.analyticsvidhya.com首先导入数据
#Import libraries:
import pandas as pd
import numpy as np
import xgboost as xgb
from xgboost.sklearn import XGBClassifier
from sklearn import cross_validation, metrics   #Additional scklearn functions
from sklearn.grid_search import GridSearchCV   #Perforing grid search

import matplotlib.pylab as plt
%matplotlib inline
from matplotlib.pylab import rcParams
rcParams['figure.figsize'] = 12, 4

train = pd.read_csv('train_modified.csv')
target = 'Disbursed'
IDcol = 'ID'- 注意有2种导入xgboost的方式
- xgb: 这是直接的方式,可以从这里调用cv方法
- XGBClassifier: 这是sklearn包装后的xgboost,几乎兼容一起其他xgboost模型
接下来制定一个建模和交叉验证的函数
def modelfit(alg, dtrain, predictors,useTrainCV=True, cv_folds=5, early_stopping_rounds=50):

    if useTrainCV:
        xgb_param = alg.get_xgb_params()
        xgtrain = xgb.DMatrix(dtrain[predictors].values, label=dtrain[target].values)
        cvresult = xgb.cv(xgb_param, xgtrain, num_boost_round=alg.get_params()['n_estimators'], nfold=cv_folds,
            metrics='auc', early_stopping_rounds=early_stopping_rounds, show_progress=False)
        alg.set_params(n_estimators=cvresult.shape[0])

    #Fit the algorithm on the data
    alg.fit(dtrain[predictors], dtrain['Disbursed'],eval_metric='auc')

    #Predict training set:
    dtrain_predictions = alg.predict(dtrain[predictors])
    dtrain_predprob = alg.predict_proba(dtrain[predictors])[:,1]

    #Print model report:
    print "nModel Report"
    print "Accuracy : %.4g" % metrics.accuracy_score(dtrain['Disbursed'].values, dtrain_predictions)
    print "AUC Score (Train): %f" % metrics.roc_auc_score(dtrain['Disbursed'], dtrain_predprob)

    feat_imp = pd.Series(alg.booster().get_fscore()).sort_values(ascending=False)
    feat_imp.plot(kind='bar', title='Feature Importances')
    plt.ylabel('Feature Importance Score')
3.1总体的调参思路
- 首先选一个相对较高的learning rate,一般是0.1,范围在
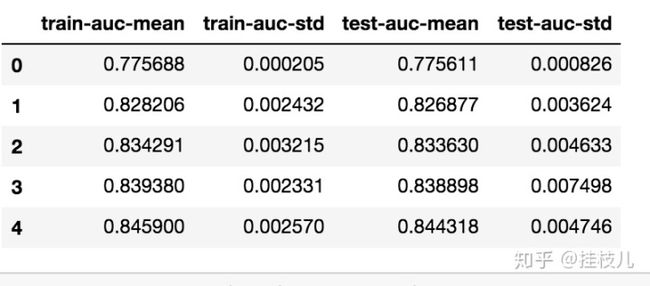
0.05~0.3都可以。接下来确定在这个学习率下最优的树的数量. 在这里就可以使用xgboost的cv功能,可以在每一次树的迭代中都进行交叉验证,确定最优树的数量(cv结果我跑了下是长这样的,功能真的很夯啊)
dtrain = xgb.DMatrix(xtrain,ytrain)
dtest = xgb.DMatrix(xtest,ytest)

params = {

    'obj':'binary:logistic',
    'max_depth':3,
    'eta':0.2,
    'silent':False,
    'eta':0.2,
    'colsample_bytree':0.9
}
cvresult = xgb.cv(params, dtrain, num_boost_round=250, nfold=5,
       metrics={
      'auc'}, seed=0)
2. 调整树结果相关的参数
max_depth, min_child_weight, gamma, subsample, colsample_bytree
3. 调整正则化项
lambda,alpha
4. 调低学习率,确认最佳参数组合
让我们一步步的来看以上的步骤
确认学习率,调整树的数量
predictors = [x for x in train.columns if x not in [target, IDcol]]
xgb1 = XGBClassifier(
 learning_rate =0.1,
 n_estimators=1000,
 max_depth=5,
 min_child_weight=1,
 gamma=0,
 subsample=0.8,
 colsample_bytree=0.8,
 objective= 'binary:logistic',
 nthread=4,
 scale_pos_weight=1,
 seed=27)
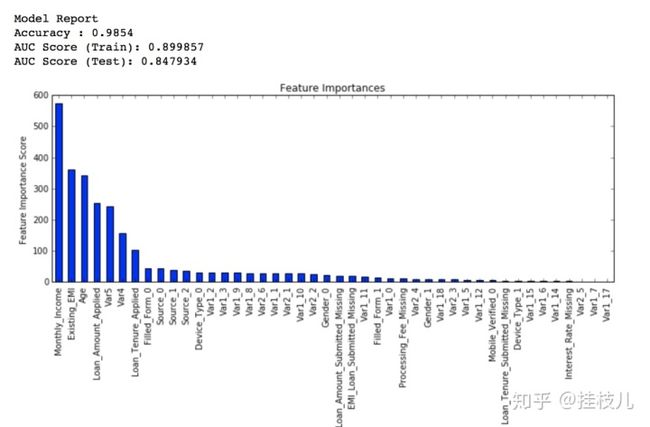
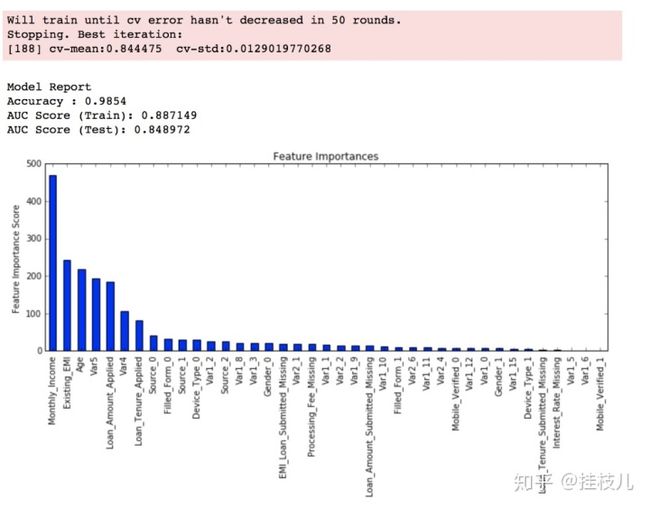
modelfit(xgb1, train, predictors)
可以看到在140颗树的时候我们使用0.1的学习率达到最优
第二步:调整树结构
可以使用交叉验证来验证
param_test1 = {

 'max_depth':range(3,10,2),
 'min_child_weight':range(1,6,2)
}
gsearch1 = GridSearchCV(estimator = XGBClassifier( learning_rate =0.1, n_estimators=140, max_depth=5,
 min_child_weight=1, gamma=0, subsample=0.8, colsample_bytree=0.8,
 objective= 'binary:logistic', nthread=4, scale_pos_weight=1, seed=27),
 param_grid = param_test1, scoring='roc_auc',n_jobs=4,iid=False, cv=5)
gsearch1.fit(train[predictors],train[target])
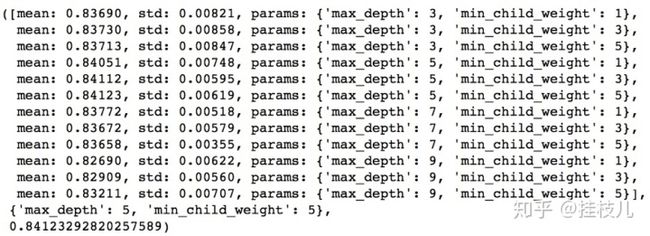
gsearch1.grid_scores_, gsearch1.best_params_, gsearch1.best_score_
在上式我们一共跑了12组交叉验证,可以看到最优解是 maxdepth=5,minchildweight=5,原文中为了找到更优的解,会减小搜索空间进一步进行网格搜索.
第三步,调整gamma参数
param_test3 = {

 'gamma':[i/10.0 for i in range(0,5)]
}
gsearch3 = GridSearchCV(estimator = XGBClassifier( learning_rate =0.1, n_estimators=140, max_depth=4,
 min_child_weight=6, gamma=0, subsample=0.8, colsample_bytree=0.8,
 objective= 'binary:logistic', nthread=4, scale_pos_weight=1,seed=27),
 param_grid = param_test3, scoring='roc_auc',n_jobs=4,iid=False, cv=5)
gsearch3.fit(train[predictors],train[target])
gsearch3.grid_scores_, gsearch3.best_params_, gsearch3.best_score_
第四部:调整列采样和行采样的比例(增加随机性降低过拟合)
param_test4 = {

 'subsample':[i/10.0 for i in range(6,10)],
 'colsample_bytree':[i/10.0 for i in range(6,10)]
}
gsearch4 = GridSearchCV(estimator = XGBClassifier( learning_rate =0.1, n_estimators=177, max_depth=4,
 min_child_weight=6, gamma=0, subsample=0.8, colsample_bytree=0.8,
 objective= 'binary:logistic', nthread=4, scale_pos_weight=1,seed=27),
 param_grid = param_test4, scoring='roc_auc',n_jobs=4,iid=False, cv=5)
gsearch4.fit(train[predictors],train[target])
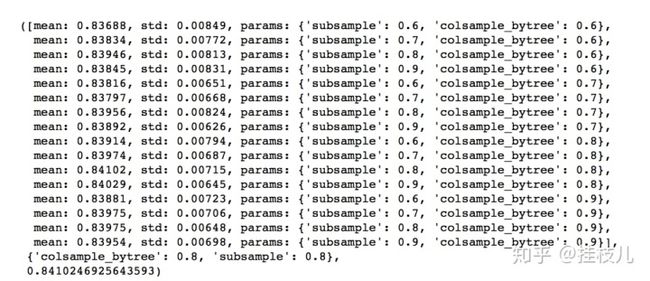
gsearch4.grid_scores_, gsearch4.best_params_, gsearch4.best_score_
第五步 调整正则项
这一步在我目前的建模方式中很少用到,一般控制好树的结构相关参数我觉得已经够了
param_test6 = {

 'reg_alpha':[1e-5, 1e-2, 0.1, 1, 100]
}
gsearch6 = GridSearchCV(estimator = XGBClassifier( learning_rate =0.1, n_estimators=177, max_depth=4,
 min_child_weight=6, gamma=0.1, subsample=0.8, colsample_bytree=0.8,
 objective= 'binary:logistic', nthread=4, scale_pos_weight=1,seed=27),
 param_grid = param_test6, scoring='roc_auc',n_jobs=4,iid=False, cv=5)
gsearch6.fit(train[predictors],train[target])
gsearch6.grid_scores_, gsearch6.best_params_, gsearch6.best_score_我们可以发现cv分数比之前低了,再试试最优解0.01附近的参数
param_test7 = {

 'reg_alpha':[0, 0.001, 0.005, 0.01, 0.05]
}
gsearch7 = GridSearchCV(estimator = XGBClassifier( learning_rate =0.1, n_estimators=177, max_depth=4,
 min_child_weight=6, gamma=0.1, subsample=0.8, colsample_bytree=0.8,
 objective= 'binary:logistic', nthread=4, scale_pos_weight=1,seed=27),
 param_grid = param_test7, scoring='roc_auc',n_jobs=4,iid=False, cv=5)
gsearch7.fit(train[predictors],train[target])
gsearch7.grid_scores_, gsearch7.best_params_, gsearch7.best_score_
最后,我们把目前找到的最优参数组合糊进模型
xgb3 = XGBClassifier(
 learning_rate =0.1,
 n_estimators=1000,
 max_depth=4,
 min_child_weight=6,
 gamma=0,
 subsample=0.8,
 colsample_bytree=0.8,
 reg_alpha=0.005,
 objective= 'binary:logistic',
 nthread=4,
 scale_pos_weight=1,
 seed=27)
modelfit(xgb3, train, predictors)
第六步:降低学习率
最后,我们尝试降低学习率,并进一步增加更多的树.
xgb4 = XGBClassifier(
 learning_rate =0.01,
 n_estimators=5000,
 max_depth=4,
 min_child_weight=6,
 gamma=0,
 subsample=0.8,
 colsample_bytree=0.8,
 reg_alpha=0.005,
 objective= 'binary:logistic',
 nthread=4,
 scale_pos_weight=1,
 seed=27)
modelfit(xgb4, train, predictors)

