用yolov5训练kitti数据集
一、KITTI数据集介绍
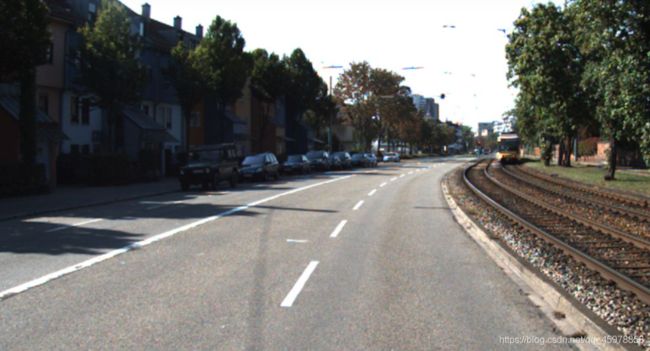
KITTI数据集是一个用于自动驾驶场景下的计算机视觉算法测评数据集,由德国卡尔斯鲁厄理工学院(KIT)和丰田工业大学芝加哥分校(TTIC)共同创立。

包含场景:市区、乡村和高速公路
在这里,我们只用到它的部分与行人,车辆有关的内容
下载可以转到官网
http://www.cvlibs.net/download.php?file=data_object_image_2.zip
http://www.cvlibs.net/download.php?file=data_object_label_2.zip
得到我们的图片和标签
我们再yolov5/dataset下创建文件夹kitti
再kiiti中放入我们的数据
|——kitti
├── imgages
│   ├── val
│   │   └── 000000.png
        ├── .......

│   └── train
│   │   └── 000000.png
        ├── .......
│
└── labels
    └── train
注意此时先不要把标签数据放入,我们需要对标签转换一下
二、KITTI数据集转换
我们打开标签中的一个内容
比如000000.txt
Pedestrian 0.00 0 -0.20 712.40 143.00 810.73 307.92 1.89 0.48 1.20 1.84 1.47 8.41 0.01
这里是kitty独有的数据格式,不适用于我们的yolov5网络,所以我们得转换一下
首先我们把类别归一一下,因为我们只需要用到三个类(代码中的路径自行修改)
# modify_annotations_txt.py
#将原来的8类物体转换为我们现在需要的3类:Car,Pedestrian,Cyclist。
#我们把原来的Car、Van、Truck,Tram合并为Car类,把原来的Pedestrian,Person(sit-ting)合并为现在的Pedestrian,原来的Cyclist这一类保持不变。
import glob
import string
txt_list = glob.glob('你下载的标签文件夹的标签路径/*.txt')
def show_category(txt_list):
    category_list= []
    for item in txt_list:
        try:
            with open(item) as tdf:
                for each_line in tdf:
                    labeldata = each_line.strip().split(' ') # 去掉前后多余的字符并把其分开
                    category_list.append(labeldata[0]) # 只要第一个字段,即类别
        except IOError as ioerr:
            print('File error:'+str(ioerr))
    print(set(category_list)) # 输出集合
def merge(line):
    each_line=''
    for i in range(len(line)):
        if i!= (len(line)-1):
            each_line=each_line+line[i]+' '
        else:
            each_line=each_line+line[i] # 最后一条字段后面不加空格
    each_line=each_line+'\n'
    return (each_line)
print('before modify categories are:\n')
show_category(txt_list)
for item in txt_list:
    new_txt=[]
    try:
        with open(item, 'r') as r_tdf:
            for each_line in r_tdf:
                labeldata = each_line.strip().split(' ')
                if labeldata[0] in ['Truck','Van','Tram']: # 合并汽车类
                    labeldata[0] = labeldata[0].replace(labeldata[0],'Car')
                if labeldata[0] == 'Person_sitting': # 合并行人类
                    labeldata[0] = labeldata[0].replace(labeldata[0],'Pedestrian')
                if labeldata[0] == 'DontCare': # 忽略Dontcare类
                    continue
                if labeldata[0] == 'Misc': # 忽略Misc类
                    continue
                new_txt.append(merge(labeldata)) # 重新写入新的txt文件
        with open(item,'w+') as w_tdf: # w+是打开原文件将内容删除,另写新内容进去
            for temp in new_txt:
                w_tdf.write(temp)
    except IOError as ioerr:
        print('File error:'+str(ioerr))
print('\nafter modify categories are:\n')
show_category(txt_list)
然后我们再把它转换为xml文件
创建一个Annotations文件夹用于存放xml
# kitti_txt_to_xml.py
# encoding:utf-8
# 根据一个给定的XML Schema,使用DOM树的形式从空白文件生成一个XML
from xml.dom.minidom import Document
import cv2
import os
def generate_xml(name,split_lines,img_size,class_ind):
    doc = Document() # 创建DOM文档对象
    annotation = doc.createElement('annotation')
    doc.appendChild(annotation)
    title = doc.createElement('folder')
    title_text = doc.createTextNode('KITTI')
    title.appendChild(title_text)
    annotation.appendChild(title)
    img_name=name+'.png'
    title = doc.createElement('filename')
    title_text = doc.createTextNode(img_name)
    title.appendChild(title_text)
    annotation.appendChild(title)
    source = doc.createElement('source')
    annotation.appendChild(source)
    title = doc.createElement('database')
    title_text = doc.createTextNode('The KITTI Database')
    title.appendChild(title_text)
    source.appendChild(title)
    title = doc.createElement('annotation')
    title_text = doc.createTextNode('KITTI')
    title.appendChild(title_text)
    source.appendChild(title)
    size = doc.createElement('size')
    annotation.appendChild(size)
    title = doc.createElement('width')
    title_text = doc.createTextNode(str(img_size[1]))
    title.appendChild(title_text)
    size.appendChild(title)
    title = doc.createElement('height')
    title_text = doc.createTextNode(str(img_size[0]))
    title.appendChild(title_text)
    size.appendChild(title)
    title = doc.createElement('depth')
    title_text = doc.createTextNode(str(img_size[2]))
    title.appendChild(title_text)
    size.appendChild(title)
    for split_line in split_lines:
        line=split_line.strip().split()
        if line[0] in class_ind:
            object = doc.createElement('object')
            annotation.appendChild(object)
            title = doc.createElement('name')
            title_text = doc.createTextNode(line[0])
            title.appendChild(title_text)
            object.appendChild(title)
            bndbox = doc.createElement('bndbox')
            object.appendChild(bndbox)
            title = doc.createElement('xmin')
            title_text = doc.createTextNode(str(int(float(line[4]))))
            title.appendChild(title_text)
            bndbox.appendChild(title)
            title = doc.createElement('ymin')
            title_text = doc.createTextNode(str(int(float(line[5]))))
            title.appendChild(title_text)
            bndbox.appendChild(title)
            title = doc.createElement('xmax')
            title_text = doc.createTextNode(str(int(float(line[6]))))
            title.appendChild(title_text)
            bndbox.appendChild(title)
            title = doc.createElement('ymax')
            title_text = doc.createTextNode(str(int(float(line[7]))))
            title.appendChild(title_text)
            bndbox.appendChild(title)
    # 将DOM对象doc写入文件
    f = open('Annotations/trian'+name+'.xml','w')
    f.write(doc.toprettyxml(indent = ''))
    f.close()
if __name__ == '__main__':
    class_ind=('Pedestrian', 'Car', 'Cyclist')
    cur_dir=os.getcwd()
    labels_dir=os.path.join(cur_dir,'Labels')
    for parent, dirnames, filenames in os.walk(labels_dir): # 分别得到根目录,子目录和根目录下文件
        for file_name in filenames:
            full_path=os.path.join(parent, file_name) # 获取文件全路径
            f=open(full_path)
            split_lines = f.readlines()
            name= file_name[:-4] # 后四位是扩展名.txt,只取前面的文件名
            img_name=name+'.png'
            img_path=os.path.join('./JPEGImages/trian',img_name) # 路径需要自行修改
            img_size=cv2.imread(img_path).shape
            generate_xml(name,split_lines,img_size,class_ind)
print('all txts has converted into xmls')
这个时候我们已经将.txt转化为.xml并存放在Annotations下了
最后我们再把.xml转化为适合于yolo训练的标签模式
也就是darknet的txt格式
例如:
0 0.9074074074074074 0.7413333333333333 0.09178743961352658 0.256
0 0.3635265700483092 0.6386666666666667 0.0785024154589372 0.14533333333333334
2 0.6996779388083736 0.5066666666666667 0.008051529790660225 0.08266666666666667
0 0.7024959742351047 0.572 0.0430756843800322 0.09733333333333333
0 0.6755233494363929 0.544 0.03140096618357488 0.06933333333333333
0 0.48027375201288247 0.5453333333333333 0.030998389694041867 0.068
0 0.5032206119162641 0.528 0.021739130434782608 0.05333333333333334
0 0.6533816425120773 0.5306666666666666 0.02214170692431562 0.056
0 0.5515297906602254 0.5053333333333333 0.017713365539452495 0.03866666666666667
# xml_to_yolo_txt.py
# 此代码和VOC_KITTI文件夹同目录
import glob
import xml.etree.ElementTree as ET
# 这里的类名为我们xml里面的类名,顺序现在不需要考虑
class_names = ['Car', 'Cyclist', 'Pedestrian']
# xml文件路径
path = './Annotations/'
# 转换一个xml文件为txt
def single_xml_to_txt(xml_file):
    tree = ET.parse(xml_file)
    root = tree.getroot()
    # 保存的txt文件路径
    txt_file = xml_file.split('.')[0]+'.'+xml_file.split('.')[1]+'.txt'
    with open(txt_file, 'w') as txt_file:
        for member in root.findall('object'):
            #filename = root.find('filename').text
            picture_width = int(root.find('size')[0].text)
            picture_height = int(root.find('size')[1].text)
            class_name = member[0].text
            # 类名对应的index
            class_num = class_names.index(class_name)

            box_x_min = int(member[1][0].text) # 左上角横坐标
            box_y_min = int(member[1][1].text) # 左上角纵坐标
            box_x_max = int(member[1][2].text) # 右下角横坐标
            box_y_max = int(member[1][3].text) # 右下角纵坐标
            print(box_x_max,box_x_min,box_y_max,box_y_min)
            # 转成相对位置和宽高
            x_center = float(box_x_min + box_x_max) / (2 * picture_width)
            y_center = float(box_y_min + box_y_max) / (2 * picture_height)
            width = float(box_x_max - box_x_min) /  picture_width
            height = float(box_y_max - box_y_min) /  picture_height
            print(class_num, x_center, y_center, width, height)
            txt_file.write(str(class_num) + ' ' + str(x_center) + ' ' + str(y_center) + ' ' + str(width) + ' ' + str(height) + '\n')
# 转换文件夹下的所有xml文件为txt
def dir_xml_to_txt(path):
    for xml_file in glob.glob(path + '*.xml'):
        single_xml_to_txt(xml_file)
dir_xml_to_txt(path)
最后我们将得到的Annotations/下的所有txt文件放入我们之前的dataset/labels中
|——kitti
├── imgages
│   ├── val
│   │   └── 000000.png
        ├── .......

│   └── train
│   │   └── 000000.png
        ├── .......
│
└── labels
    └── train
        └── 000000.txt
        ├── .......
这样我们的数据集就准备好了
接下来我们可以训练了,跟我上一篇的教程一样,你们可以先了解怎么训练yolov5的步骤
https://blog.csdn.net/qq_45978858/article/details/119686255?spm=1001.2014.3001.5501
三、KITTI数据集训练
这里我们直接开始
1.在data文件夹中复制一份coco.yaml然后改名kitti.yaml修改内容
train: ../yolov5-kitty/dataset/kitti/images/train  # train images (relative to 'path') 118287 images
val: ../yolov5-kitty/dataset/kitti/images/train  # train images (relative to 'path') 5000 images

# Classes
nc: 3  # number of classes
names: ['Car','Pedestrian','Cyclist']
2.在models文件夹修改yolov5s.yaml内容
# Parameters
nc: 3  # number of classes
depth_multiple: 0.33  # model depth multiple
width_multiple: 0.50  # layer channel multiple
anchors:
  - [10,13, 16,30, 33,23]  # P3/8
  - [30,61, 62,45, 59,119]  # P4/16
  - [116,90, 156,198, 373,326]  # P5/32

# YOLOv5 backbone
backbone:
  # [from, number, module, args]
  [[-1, 1, Focus, [64, 3]],  # 0-P1/2
   [-1, 1, Conv, [128, 3, 2]],  # 1-P2/4
   [-1, 3, C3, [128]],
   [-1, 1, Conv, [256, 3, 2]],  # 3-P3/8
   [-1, 9, C3, [256]],
   [-1, 1, Conv, [512, 3, 2]],  # 5-P4/16
   [-1, 9, C3, [512]],
   [-1, 1, Conv, [1024, 3, 2]],  # 7-P5/32
   [-1, 1, SPP, [1024, [5, 9, 13]]],
   [-1, 3, C3, [1024, False]],  # 9
  ]

# YOLOv5 head
head:
  [[-1, 1, Conv, [512, 1, 1]],
   [-1, 1, nn.Upsample, [None, 2, 'nearest']],
   [[-1, 6], 1, Concat, [1]],  # cat backbone P4
   [-1, 3, C3, [512, False]],  # 13

   [-1, 1, Conv, [256, 1, 1]],
   [-1, 1, nn.Upsample, [None, 2, 'nearest']],
   [[-1, 4], 1, Concat, [1]],  # cat backbone P3
   [-1, 3, C3, [256, False]],  # 17 (P3/8-small)

   [-1, 1, Conv, [256, 3, 2]],
   [[-1, 14], 1, Concat, [1]],  # cat head P4
   [-1, 3, C3, [512, False]],  # 20 (P4/16-medium)

   [-1, 1, Conv, [512, 3, 2]],
   [[-1, 10], 1, Concat, [1]],  # cat head P5
   [-1, 3, C3, [1024, False]],  # 23 (P5/32-large)

   [[17, 20, 23], 1, Detect, [nc, anchors]],  # Detect(P3, P4, P5)
  ]
当然你也要有个一yolo5s.pt权重文件放在yolov5文件夹中,在我的前面的博客也有下载地址
3.开始训练
不用空行,空格间隔就可以
python train.py --img 640 --batch-size 16
                --epochs 10 --data data/kitti.yaml
                --cfg models/yolov5s.yaml --weights yolov5s.pt

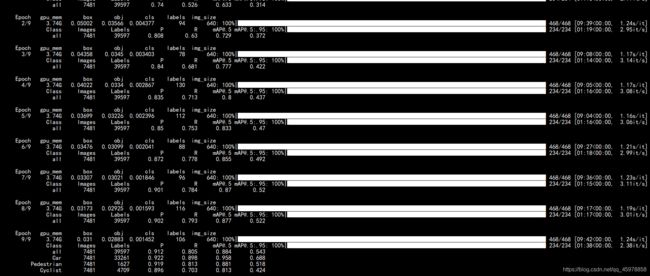
我这里虽然只训练了十个周期,但是还是花了一个多小时,准确率也非常不错,达到了0.9以上
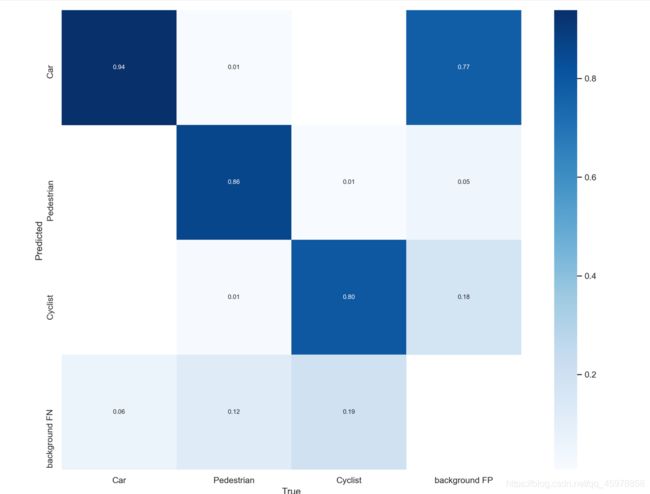
现在我们在runs/train/exp下可以看到我们的训练的结果

准确率都可以
我们可以拿着训练完的最好的权重试一试
python detect.py --weights runs/train/exp/weights/best.pt
				 --source Road_traffic_video2.mp4 这里可以是图片 也可以是视频 也可以是0(摄像头)
				 --device 0
可以看到效果还是可以的,我这只训练了10个epoch,条件好的可以训练300个甚至更久