截图自:https://developer.chrome.com/...
本文作者:原草
前言
云音乐 app 内有很多使用 react native 开发的应用,例如云贝中心、云音乐商城、会员中心等。为了更好地提升开发效率,改善调试体验,团队决定开发 react native 调试工具,通过为 react native debugger 增加一些扩展功能,实现业务信息的展示和调试能力,例如:跨端通信信息展示、网络信息展示等。
因为云音乐 react native 应用的网络请求都是通过客户端发送,因此想把客户端网络信息通过 chrome devtools protocol 展示在 network 里。经过尝试后,期间遇到了一些问题和做出的尝试记录如下。
chrome devtools 介绍
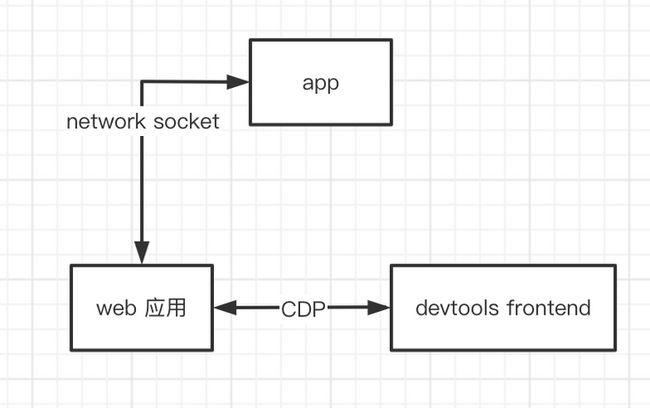
chrome devtools 是前端常用的调试工具,集成在 chrome 里。web 应用通过 chrome devtools protocol 与 devtools frontend (平时打开 f12 调试面板的页面,也是个前端项目,下面用 frontend 表示)建立连接,将被调试应用信息传递到 frontend 上展示。
ChromeDevTools/devtools-frontend 是 chrome devtools frontend 的项目代码。也可以作为单独的项目使用,用于自定义调试功能。项目内使用的 devtools frontend 是 3964 版本,新版的 frontend 对打包方式、代码结构都做了调整。
devtools frontend 模块加载
通过配置远程调试端口 --remote-debugging-port=9222 启动 chrome,http://localhost:9222/ 可以看得到调试链接,例如:http://localhost:9222/devtools/inspector.html?ws=localhost:9222/devtools/page/7B2421304FE8EF659B264D4F476083DA 是一个 inspector 的地址,从 inspector.html 入手看下项目如何启动。
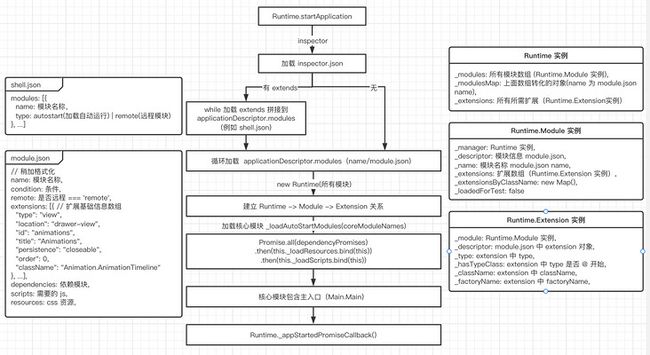
inspector.html 加载 Runtime.js 和 inspector.js,inspector.js 只做了一件事
Runtime.startApplication('inspector');模块经过加载解析过程后,启动应用:
- 前端应用通过读取 module.json 获得模块信息;
- 实例化 new Runtime,建立 Runtime -> Module -> Extension 依赖关系;
- 加载核心模块资源(script 和 css 资源);
- 启动核心模块入口(Main.Main)。
到此是模块的加载过程。
inspector 启动方式
查看 inspector.json 内容
{
  "modules" : [
    { "name": "screencast", "type": "autostart" }
  ],
  "extends": "devtools_app",
  "has_html": true
}
inspector 应用继承自 devtools_app。只比 devtools_app 多了一个模块 screencast 页面快照,可以用于实时查看页面变化,。
devtools_app 应用就是常用的 devtools 工具,可以用于 web 应用调试,devtools_app.json 依赖的模块内容如下:
{
  "modules" : [
    { "name": "emulation", "type": "autostart" },
    { "name": "inspector_main", "type": "autostart" },
    { "name": "browser_debugger" },
    { "name": "elements" },
    { "name": "network" },
    ...
  ],
  "extends": "shell",
  "has_html": true
}
devtools_app.json 继承自 shell.json,应该就是 devtools 依赖的核心模块。shell.json 依赖的模块内容如下:
{
  "modules" : [
    { "name": "bindings", "type": "autostart" },
    { "name": "common", "type": "autostart" },
    { "name": "components", "type": "autostart"},
    { "name": "extensions", "type": "autostart" },
    { "name": "host", "type": "autostart" },
    { "name": "main", "type": "autostart" },
    { "name": "protocol", "type": "autostart" },
    { "name": "ui", "type": "autostart" },
    ...
  ]
}
devtools_app 包含的 inspector_main 模块,将通过链接参数中传入的 ws 参数建立 socket 连接用于获取监听后端 protocol 信息。
SDK._createMainConnection = function() {
  const wsParam = Runtime.queryParam('ws');
  const wssParam = Runtime.queryParam('wss');
  if (wsParam || wssParam) {
    const ws = wsParam ? `ws://${wsParam}` : `wss://${wssParam}`;
    SDK._mainConnection = new SDK.WebSocketConnection(ws, SDK._websocketConnectionLost);
  } else if (InspectorFrontendHost.isHostedMode()) {
    SDK._mainConnection = new SDK.StubConnection();
  } else {
    SDK._mainConnection = new SDK.MainConnection();
  }
  return SDK._mainConnection;
};
自此建立与被调试项目连接,想了解其他模块的内容,也可以按照上面的思路查看。
react native debugger 调试过程
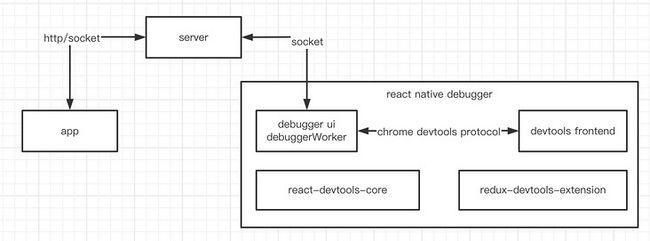
react native debugger 是一个用于调试 react native 应用程序的 electron 独立程序,基于官方远程调试功能,增加了 react-devtools-core 和 redux-devtools-extension 作为扩展支持。
react native 在 app 上并不是 web 页面,react native dedug 过程 在打开 debug remote 后:
- app 发送 /launch-js-devtools 请求给 server 打开调试 tab,并建立 socket 连接;
- tab 加载 debugger-ui 页面, 与 server 建立 socket 连接(/debugger-proxy?role=debugger&name=Chrome);
- tab 打开 debugger-ui 同时,启动了 worker 运行 debuggerWorker.js 脚本,用来运行 bundle 代码;
- 最后通过 inspect worker 的方式来达到对 react native 应用的调试。

react native 中如果使用 fetch 或是 XMLHttpRequest 发送的网络请求,是可以在 frontend 调试过程中得到的。云音乐 app 内的 react native 应用的网络请求都是通过客户端发送,那么客户端网络信息通过 chrome devtools protocol 展示在 network 里,要怎么做呢?
chrome devtools inspector 扩展
chrome devtools protocol
增加 network 开始想到最直接的方式,就是通过 web 和 frontend 之间的 socket 链路。
chrome devtools protocol(简称 CDP) 是 devtools 和 web 应用间传递的调试器协议。基于 websocket 建立 devtools 和浏览器内核的快速数据通道,chrome devtools protocol 也允许第三方对 web 应用进行调试。
CDP 协议按域 Domain 划分能力,每个域下有 Method、Event 和 Types。
Method 对应 socket 通信的请求/响应模式,Events 对应 socket 通信的发布/订阅模式,Types 为交互中使用到的实体。
- Method: 包含 request/response,如同异步调用,通过请求信息,获取相应返回结果,通讯需要有 message id
request: {"id":1,"method":"Page.canScreencast"}
response: {"id":1,"result":{"result":false}}
Event:发生的事件信息,用于发送通知信息。
{"method":"Network.loadingFinished","params:{"requestId":"14307.143","timestamp":1424097364.31611,"encodedDataLength":0}}Types:交互实体
Network.BlockedReason
Network.ConnectionType
Network.Cookie
...
在 chrome 中可以使用 "Protocol Monitor" 发送 Method。
在 electron 内,可以通过 app.commandLine.appendSwitch 添加 chrome 的启动参数 remote-debugging-port 开启 chrome 调试端口 9222。
const CHROME_REMOTE_DEBUG_PORT = 9222; // devtools frontend 调试端口
app.commandLine.appendSwitch('remote-debugging-port', `${CHROME_REMOTE_DEBUG_PORT}`);
通过 http://localhost:9222/json 接口请求找到当前页面 React Native Debugger 的调试地址 webSocketDebuggerUrl。
[ {
   "description": "",
   "devtoolsFrontendUrl": "/devtools/inspector.html?ws=localhost:9222/devtools/page/ADC97007929236D82B4613E4E6B36C4B",
   "id": "ADC97007929236D82B4613E4E6B36C4B",
   "title": "React Native Debugger - Waiting for client connection (port 8081)",
   "type": "page",
   "url": "file:///Users/jarry/netease/react-native-debugger/electron/app.html",
   "webSocketDebuggerUrl": "ws://localhost:9222/devtools/page/ADC97007929236D82B4613E4E6B36C4B"
} ]
然后建立一个 socket 通道给 app。
尝试发现 nework 信息并没有展示,app 通过 socket 连接发送的信息给到浏览器内核,但浏览器内核并没有将信息转发给 frontend,这里理所当然的把 web 应用作为调试信息处理对象。
采用 proxy 方式
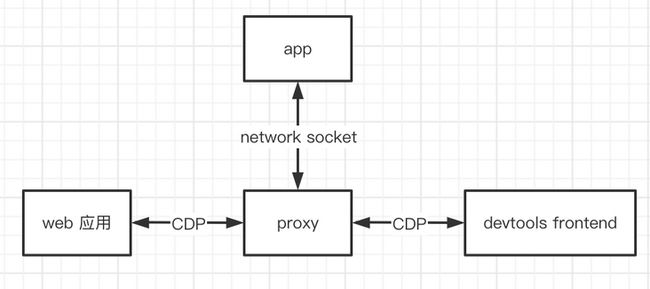
web 应用和 frontend 在同一网段,可以使用上面的调试方式,如果两部分不在一个内网,就需要用到远程调试方式。在 web 应用和 frontend 之间创建 proxy 服务,实现 CDP 消息转发,以达到跨域调试目标。
受启发于跨域调试方式,proxy 在 web 和 frontend 之间做转发的同时,也可以转发其他的 CDP 消息。
- 启动 ws 用作 proxy 服务
proxy.js 示例代码:
const WS_PROXY_PORT = 9233; // proxy ws 端口
const CHROME_REMOTE_DEBUG_PORT = 9222; // devtools frontend 调试端口

const proxyStart = async () => {
  // 创建 proxy server

  const server = http.createServer((request, response) => {
    response.writeHead(404);
    response.end();
  });
  server.listen(WS_PROXY_PORT);

  const wss = new WebSocket.Server({ server });

  wss.on('connection', (ws, request, client) => {
    // 处理来自 remote-debug 的请求
    if (request.headers['sec-websocket-protocol'] === 'remote-debug') {
      axios.get(`http://127.0.0.1:${CHROME_REMOTE_DEBUG_PORT}/json`).then(res => {
        // 查询被调试页 webSocketDebuggerUrl
        const { data } = res;
        if (data && data.length > 0) {
          for (let i = 0; i < data.length; i++) {
            const page = data[i];
            if (page.title.indexOf('React Native Debugger') === 0) {
              debugConnection = new WebSocket(page.webSocketDebuggerUrl);
              });
              // 把被调试页面的数据全部转发给调试器前端
              debugConnection.on('message', (message) => {
                if (frontendConnection) {
                  if (debugMessageArr.length) {
                    debugMessageArr.forEach(item => {
                      frontendConnection.send(item);
                    });
                    debugMessageArr = [];
                  }
                  frontendConnection.send(message);
                } else {
                  debugMessageArr.push(message);
                  console.log('无法转发给 frontend, 没有建立连接\n');
                }
              });
              break;
            }
          }
        }
      }).catch(error => {
        console.log(error);
      });
    }

    // 处理来自 frontend 的请求
    if (request.url === '/frontend') {
      frontendConnection = ws;
      frontendConnection.on('message', (message) => {
        // 把调试器前端的请求直接转发给被调试页面
        if (debugConnection) {
          if (frontendMessageArr.length) {
            frontendMessageArr.forEach(item => {
              debugConnection.send(item);
            });
            frontendMessageArr = [];
          }
          debugConnection.send(message);
        } else {
          frontendMessageArr.push(message);
          console.log('调试器后端未准备好, 先打开被调试的页面');
        }
      });
    }

    // 处理来自客户端请求
    if (request.url === '/app') {
      appConnection = ws;
      appConnection.on('message', (message) => {
        // 把客户端的请求直接转发给前端调试器
        if (frontendConnection) {
          if (debugMessageArr.length) {
            debugMessageArr.forEach(item => {
              frontendConnection.send(item);
            });
            debugMessageArr = [];
          }
          frontendConnection.send(message);
        } else {
          debugMessageArr.push(message);
          console.log('无法转发给frontend,没有建立连接\n');
        }
      });
    }
  });
};
这里处理了三方面的数据
- remote-debug:被调试页面数据。通过查找
http://127.0.0.1:${CHROME_REMOTE_DEBUG_PORT}/json获取 webSocketDebuggerUrl,建立 debugConnection 连接,被调试信息从此来,发送给 frontend; - frontend:调试器数据。转发此数据给 debugConnection。
- app:客户端数据,转发此数据给 debugConnection。
- remote-debug 建连
remote-debug 跑在 web,是为了通知 proxy 建立连接的,因为我的 proxy 跑在 electron,和 remote debug 同域,所以从 proxy 直接获取 webSocketDebuggerUrl。也可以在 remote-debug 内获取 webSocketDebuggerUrl 用通知的方式告诉 proxy。
const ws = new WebSocket('ws://localhost:9233', 'remote-debug');- frontend 建连
frontend 由于要更换 ws 地址,因此这里没有采用 chrome 自带的 devtools,而是本地启动的 frontend 服务,更换 ws 连接为 proxy frontend 连接。有关 frontend web 服务会在下一节介绍。
http://localhost:8090/front_end/devtools_app.html?ws=localhost:9233/frontend- app 侧
app 端会在 okhttp 框架里添加拦截器,拦截所有请求数据然后通过 ws 发送给 proxy。
自此就实现了 inspector 扩展 network 信息的功能。
frontend 本地服务
因为要自定义开发,devtools frontend 版本是跟随 chrome 版本发布的,最好采用和 chrome 版本一致的 frontend,比如我这里通过 process.versions.chrome 拿到 electron 内 chrome 版本号是 78.0.3904.130,对应的 devtools 版本号就是 3904,但能获得到最早的版本就是 3964了,使用 3964 暂时也没遇到其他问题。
devtools-fronend->scripts->server.js
启动本服务就可以得到一个运行在 8090 的 frontend 服务。
总结
本文从 chrome devtools inspector 扩展为出发点,介绍了 devtools frontend 调试原理及模块加载方式,react native debugger 调试原理,跨域调试方案,最终实现 devtools inspector 的调试扩展。文内涉及各调试工具知识较多,大多做了概括,技术细节也都留了文档链接可以自行获取,希望对做 chrome 调试工具的同学有所启发和帮助。欢迎对文中相关问题批评指正。
参考链接
- https://github.com/jhen0409/r...
- https://segmentfault.com/a/11...
- https://github.com/ChromeDevT...
- https://memoryza.gitbook.io/c...
- https://zhaomenghuan.js.org/b...
本文发布自网易云音乐技术团队,文章未经授权禁止任何形式的转载。我们常年招收各类技术岗位,如果你准备换工作,又恰好喜欢云音乐,那就加入我们 grp.music-fe(at)corp.netease.com!


