Pytorch FCN 全卷积神经网络
Pytorch FCN 全卷积网络
0. 环境介绍
环境使用 Kaggle 里免费建立的 Notebook
教程使用李沐老师的 动手学深度学习 网站和 视频讲解
小技巧:当遇到函数看不懂的时候可以按 Shift+Tab 查看函数详解。
1. FCN 全卷积神经网络
- FCN 是用深度神经网络来做语义分割的奠基性工作。
- 他用转置卷积层来替换 CNN 最后的全连接层,从而可以实现每个像素的预测。

i n p u t ( 3 × 224 × 224 ) → f e a t u r e m a p ( 7 × 7 ) → r e s u l t ( k × 224 × 224 ) , k input(3 \times 224 \times 224) \to feature \space map(7 \times 7) \to result(k \times 224 \times 224),k input(3×224×224)→feature map(7×7)→result(k×224×224),k 表示类别数。
语义分割是对图像中的每个像素分类。 全卷积网络(fully convolutional network,FCN)采用卷积神经网络实现了从图像像素到像素类别的变换。
全卷积网络将中间层特征图的高和宽需要通过转置卷积变换回输入图像的尺寸。
输出的类别预测与输入图像在像素级别上具有一一对应关系:通道维的输出即该位置对应像素的类别预测。
FCN 论文地址:Fully Convolutional Networks for Semantic Segmentation
2. 代码
2.0 导包
!pip install -U d2l
%matplotlib inline
import torch
import torchvision
from torch import nn
from torch.nn import functional as F
from d2l import torch as d2l
2.1 使用在 ImageNet 数据集上预训练的 ResNet-18 模型来提取图像特征
pretrained_net = torchvision.models.resnet18(pretrained=True)
# 输出最后三层
list(pretrained_net.children())[-3:]
2.2 创建一个全卷积网络实例 net
最后两层(平均池化层和线性层)是不需要的。
net = nn.Sequential(*list(pretrained_net.children())[:-2])
给定高度为 224 224 224 和宽度为 224 224 224 的输入,net 的前向传播将输入的高和宽减小至原来的(1/32),即 7 7 7 和 7 7 7。
X = torch.rand(size=(1, 3, 224, 224))
net(X).shape
![]()
2.3 fine-tune
使用 ( 1 × 1 ) (1\times 1) (1×1) 卷积层将输出通道数转换为 Pascal VOC2012 数据集的类数( 21 21 21 类)。将特征图的高和宽增加 32 倍:
num_classes = 21
net.add_module('final_conv', nn.Conv2d(512, num_classes, kernel_size=1))
net.add_module('transpose_conv', nn.ConvTranspose2d(num_classes, num_classes,
                                    kernel_size=64, padding=16, stride=32))
net(X).shape
![]()
2.4 初始化转置卷积层
使用双线性插值方法初始化转置卷积:
def bilinear_kernel(in_channels, out_channels, kernel_size):
    factor = (kernel_size + 1) // 2
    if kernel_size % 2 == 1:
        center = factor - 1
    else:
        center = factor - 0.5
    og = (torch.arange(kernel_size).reshape(-1, 1),
          torch.arange(kernel_size).reshape(1, -1))
    filt = (1 - torch.abs(og[0] - center) / factor) * \
           (1 - torch.abs(og[1] - center) / factor)
    weight = torch.zeros((in_channels, out_channels,
                          kernel_size, kernel_size))
    weight[range(in_channels), range(out_channels), :, :] = filt
    return weight
W = bilinear_kernel(num_classes, num_classes, 64)
net.transpose_conv.weight.data.copy_(W);
2.5 读取数据集
指定随机裁剪的输出图像的形状为 ( 320 × 480 ) (320\times 480) (320×480):高和宽都可以被 32 32 32 整除。
batch_size, crop_size = 32, (320, 480)
train_iter, test_iter = d2l.load_data_voc(batch_size, crop_size)
2.6 训练
def loss(inputs, targets):
    return F.cross_entropy(inputs, targets, reduction='none').mean(1).mean(1)

num_epochs, lr, wd, devices = 5, 0.001, 1e-3, d2l.try_all_gpus()
trainer = torch.optim.SGD(net.parameters(), lr=lr, weight_decay=wd)
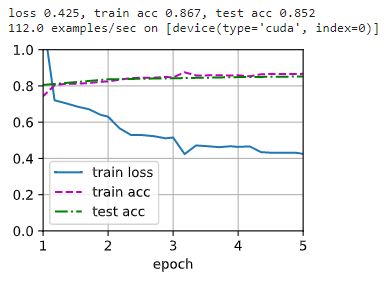
d2l.train_ch13(net, train_iter, test_iter, loss, trainer, num_epochs, devices)
2.7 预测
def predict(img):
    X = test_iter.dataset.normalize_image(img).unsqueeze(0)
    pred = net(X.to(devices[0])).argmax(dim=1)
    return pred.reshape(pred.shape[1], pred.shape[2])
def label2image(pred):
    colormap = torch.tensor(d2l.VOC_COLORMAP, device=devices[0])
    X = pred.long()
    return colormap[X, :]
voc_dir = d2l.download_extract('voc2012', 'VOCdevkit/VOC2012')
test_images, test_labels = d2l.read_voc_images(voc_dir, False)
n, imgs = 4, []
for i in range(n):
    crop_rect = (0, 0, 320, 480)
    X = torchvision.transforms.functional.crop(test_images[i], *crop_rect)
    pred = label2image(predict(X))
    imgs += [X.permute(1,2,0), pred.cpu(),
             torchvision.transforms.functional.crop(
                 test_labels[i], *crop_rect).permute(1,2,0)]
d2l.show_images(imgs[::3] + imgs[1::3] + imgs[2::3], 3, n, scale=2);


