点云深度学习——PCDet 代码复现及问题梳理
PCDet (PointCloudDet3D) 代码复现
几个小时前刚开源的3D目标识别代码,本人也一直在关注PointNet PointRCNN等识别方法,等到了这个代码的开源。
本博客仅记录代码复现过程,以自己个人经历帮助更多菜鸟尽快熟悉
代码链接: https://github.com/sshaoshuai/PointCloudDet3D
论文原文链接: https://arxiv.org/abs/1907.03670
环境配置
我的电脑环境: CUDA10.0+CUDNN 7.5+Python 3.6.8(Anaconda)+Ubuntu16.08+Pytorch1.1+torchvision0.4.0
git clone代码
git clone https://github.com/sshaoshuai/PointCloudDet3D.git
接下来按照requirement.txt 安装相应包
别的都可以用pip3 或者 conda解决,中间spconv安装时有点小问题
git clone https://github.com/traveller59/spconv --recursive
不要直接下载,会导致Cmakelist 找不到的情况出现
接下来安装Cmake
wget http://www.cmake.org/files/v.3.13/cmake-3.13.2.tar.gz
tar xvf cmake-3.13.2.tar.gz
cd  cmake-3.13.2
./configure
make && make install
要记得将Cmake 放置到环境下,防止出现Cmake的问题
sudo gedit ~/.bashrc
export PATH=$PATH:/your path/cmake-3.13.2/bin
source ~/.bashrc
之后安装boost
sudo apt-get install libboost-all-dev
进入下载好的代码文件夹spconv进行编译
python3 setup.py bdist_wheel
如果中间出现如下所示的问题,应当是Pytorch版本不匹配
error: expected primary-expression before ‘(’ token
   return tv::TensorView<T>(tensor.data_ptr<std::remove_const_t<T>>(), shape);
我将原来的pytorch 1.0 更新成pytorch 1.1,同时更新相应的torchvision
链接:https://pytorch.org/get-started/previous-versions/
 之后进入文件夹进行安装即可
cd  ./dist
pip3  install  spconv-xxx-xxx.whl
如果还是没办法编译成功的话, 可以直接安装我编译好的spconv 1.0版本
提取码:bs4z
接下来转到下载后的Det3D代码文件夹,安装pcdet
python3 setup.py develop
将KITTI数据集放入,并将文件列成如下格式
PointCloudDet3D
├── data
│   ├── kitti
│   │   │──ImageSets
│   │   │──training
│   │   │   ├──calib & velodyne & label_2 & image_2 & (optional: planes)
│   │   │──testing
│   │   │   ├──calib & velodyne & image_2
├── pcdet
├── tools
如果有需要的话博主网盘里有下载好的KITTI数据集
提取码:gjuy
里面的就是全部了
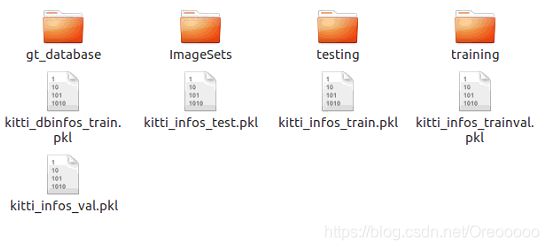
进入**‘pcdet/datasets/kitti’**运行
python3 kitti_dataset.py create_kitti_infos
这步如果出错一般是spconv版本不对,缺少相应的Python库等问题
得到如下文件们:

检验预训练模型(可以从github获取)使用如下语句
python3 test.py --cfg_file cfgs/pointpillar.yaml --batch_size 1 --ckpt cfgs/pointpillar.pth --save_to_file
基于预训练模型进行训练使用如下语句
python3 train.py --cfg_file cfgs/pointpillar.yaml --batch_size 1 --ckpt cfgs/pointpillar.pth
注意要将“./pcdet/datasets/dataset.py”部分替换成:
 def prepare_data(self, input_dict, has_label=True):
        """
        :param input_dict:
            sample_idx: string
            calib: object, calibration related
            points: (N, 3 + C1)
            gt_boxes_lidar: optional, (N, 7) [x, y, z, w, l, h, rz] in LiDAR coordinate, z is the bottom center
            gt_names: optional, (N), string
        :param has_label: bool
        :return:
            voxels: (N, max_points_of_each_voxel, 3 + C2), float
            num_points: (N), int
            coordinates: (N, 3), [idx_z, idx_y, idx_x]
            num_voxels: (N)
            voxel_centers: (N, 3)
            calib: object
            gt_boxes: (N, 8), [x, y, z, w, l, h, rz, gt_classes] in LiDAR coordinate, z is the bottom center
            points: (M, 3 + C)
        """
        sample_idx = input_dict['sample_idx']
        points = input_dict['points']
        calib = input_dict['calib']

        if has_label:
            gt_boxes = input_dict['gt_boxes_lidar'].copy()
            gt_names = input_dict['gt_names'].copy()

        if self.training:
            selected = common_utils.drop_arrays_by_name(gt_names, ['DontCare', 'Sign'])
            gt_boxes = gt_boxes[selected]
            gt_names = gt_names[selected]
            gt_boxes_mask = np.array([n in self.class_names for n in gt_names], dtype=np.bool_)

            if self.db_sampler is not None:
#                road_planes = self.get_road_plane(sample_idx) \
#                    if cfg.DATA_CONFIG.AUGMENTATION.DB_SAMPLER.USE_ROAD_PLANE else None
                sampled_dict = self.db_sampler.sample_all(
                    self.root_path, gt_boxes, gt_names, #road_planes=road_planes,
                    num_point_features=cfg.DATA_CONFIG.NUM_POINT_FEATURES['total'], calib=calib
                )
至此模型训练与检验结束,放张可视化的图:
至于检测速度方面,博主PC端检测是15Hz,Xaiver上10Hz左右。
欢迎同行小伙伴交流