PyTorch实现yolov3代码详细解密(二)
我们把darknet的框架搭建完成了,但是还缺少网络的前向传播,那么这一章我们来完成前向传播代码的细节分析。
我们记得上一届我们定义的darknet是个空框架,里面并没有forward,下面我们主要通过覆写 nn.Module 类别的 forward 方法来实现最终的网络结构。
实现该网络的前向传播
forward主要目的就是配合网络结构序列计算输出,让前后层的feature maps能够进行串联(保证维度)
    def forward(self, x, CUDA):
        detections = []
        modules = self.blocks[1:]
        outputs = {}   #We cache the outputs for the route layer
outputs是用来存储各层输出的,因为我们yolov3是多尺度检测,它最终的输出来自于不同深度的特征图,所以为了方便route层融合特征,我们将各层的输出存储起来,关键在于层的索引,且值对应特征图。具体如何融合,我们后面会详细讲解。
我们迭代 self.block[1:] 而不是 self.blocks,因为 self.blocks 的第一个元素是一个 net 块,它不属于前向传播。
write = 0
        for i in range(len(modules)):

            module_type = (modules[i]["type"])
我们在之前通过create_module 函数获得module_list,它里面包含了网络结构的module,因为module_list是根据cfg配置文件相同循序添加的,所以我们只需要在每个module后面添加相应的forward就可以了。
write这个flag是用于获取prediction的,我们后面会讲到。
            if module_type == "convolutional" or module_type == "upsample" or module_type == "maxpool":

                x = self.module_list[i](x)
                outputs[i] = x
当module对应的是卷积层或上采样层,那么前向传播就按如下方式工作,这里我们知道,在module_list添加conv和上采样层是函数内部就包括了相应的forward,self.module_list在这里的返回值可以直接赋值给x,索引i对应着层数,并将该层输出存储与outputs中。
路由层/捷径层
            elif module_type == "route":
                layers = modules[i]["layers"]
                layers = [int(a) for a in layers]

                if (layers[0]) > 0:
                    layers[0] = layers[0] - i

                if len(layers) == 1:
                    x = outputs[i + (layers[0])]

                else:
                    if (layers[1]) > 0:
                        layers[1] = layers[1] - i

                    map1 = outputs[i + layers[0]]
                    map2 = outputs[i + layers[1]]


                    x = torch.cat((map1, map2), 1)
                outputs[i] = x

            elif  module_type == "shortcut":
                from_ = int(modules[i]["from"])
                x = outputs[i-1] + outputs[i+from_]
                outputs[i] = x
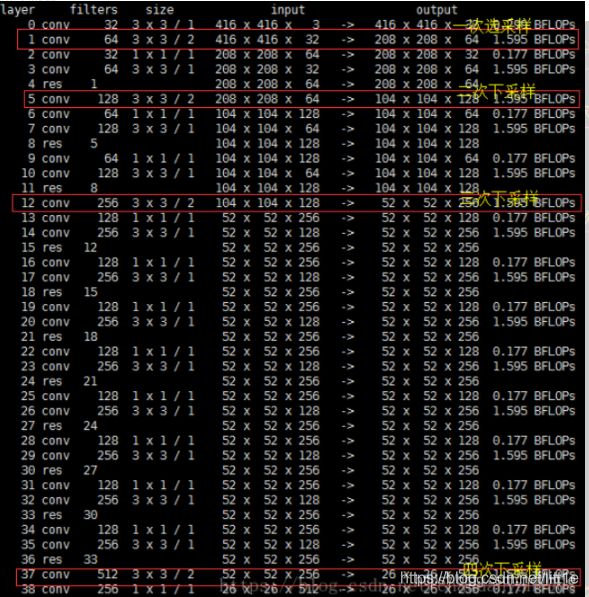
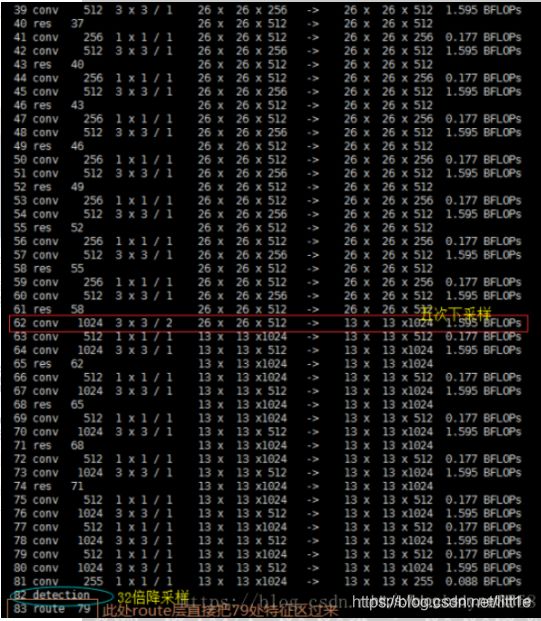
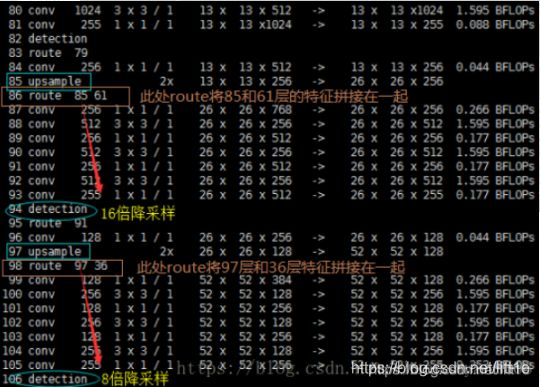
我们从cfg中可以看到route一共有4层layers = -4,layers = -1, 61,layers = -4,layers = -1, 36。下面看几张图就能清楚的明白它在做什么操作。


我们知道,yolov3是多尺度,由三个13,26,52尺度的feature map共同协作来提高小物体检测性能,网络结构中的两次上采样和4次route就是为了这三次prediction做准备,具体如何做prediction我们继续看。
yolo(检测层)
            elif module_type == 'yolo':

                anchors = self.module_list[i][0].anchors
                #Get the input dimensions
                inp_dim = int (self.net_info["height"])  #416

                #Get the number of classes
                num_classes = int (modules[i]["classes"])#80

                #Output the result
                x = x.data  #第一次yolo层,x为13*13*255,
                            # anchormask= [6, 7, 8] anchors= [(116, 90), (156, 198), (373, 326)]
                            #第二次yolo层,x为26*26*255,
                            #  mask= [3, 4, 5] anchors= [(30, 61), (62, 45), (59, 119)]
                            # 第三次yolo层,x为52*52*255,
                            #  mask= [0, 1, 2] anchors= [(10, 13), (16, 30), (33, 23)]
                x = predict_transform(x, inp_dim, anchors, num_classes, CUDA)

                if type(x) == int:
                    continue


                if not write:
                    detections = x
                    write = 1

                else:
                    detections = torch.cat((detections, x), 1)

                outputs[i] = outputs[i-1]
大家知道yolov3中有三个prediction即三个尺度的输出(13,26,52),每个尺度都用k-means聚类的方法求出了最合适的anchors(mask与anchors的信息都标注在上面的代码中),很好理解13×13是经过多次降采样得到的输出,它的感受野是最大的(stride=32),所以它的anchor表示的面积就最大。因为cfg里面放置了3个yolo层,对应论文中的三个尺度,它们的维度各不相同,为了方便处理,我们希望能够将三个尺度的信息结合在一个张量进行计算,并且我们知道每个anchor里都有85个属性(4个坐标信息,objectscore,80个类别),需要有一个合适的结构去对信息进行操作(阈值处理、添加对中心的网格偏移、应用锚点等)所以这里我们引入predict_transform函数,很重要的函数。
变换输出
函数 predict_transform 在文件 util.py 中,我们在 Darknet 类别的 forward 中使用该函数时,将导入该函数。
def predict_transform(prediction, inp_dim, anchors, num_classes, CUDA = True):
predict_transform 使用 5 个参数:prediction(我们的输出)、inp_dim(输入图像的维度416)、anchors、num_classes(类别=80)、CUDA flag(如果为True则选择gpu来进行forward)。
    batch_size = prediction.size(0)
    stride =  inp_dim // prediction.size(2)#416//13=32  416//26=16
    grid_size = inp_dim // stride#13 26
    bbox_attrs = 5 + num_classes#bbox的attributions=85
    num_anchors = len(anchors)#3

    anchors = [(a[0]/stride, a[1]/stride) for a in anchors]
#[(3.625, 2.8125), (4.875, 6.1875), (11.65625, 10.1875)]
#[(1.875, 3.8125), (3.875, 2.8125), (3.6875, 7.4375)]
#[(1.25, 1.625), (2.0, 3.75), (4.125, 2.875)]


    prediction = prediction.view(batch_size, bbox_attrs*num_anchors, grid_size*grid_size)
    prediction = prediction.transpose(1,2).contiguous()
    prediction = prediction.view(batch_size, grid_size*grid_size*num_anchors, bbox_attrs)
上面的参数我都做了注释,这里看到anchors = [(a[0]/stride, a[1]/stride) for a in anchors],传入进来的anchors是416×416的(针对输入图像),为了匹配prediction(13×13),我们需要将anchors除以stride。通过矩阵变形把predition的维度变成1×(13×13×3)×85。因为有三个yolo层,我们会调用三次并生成predition:1×(26×26×3)×85,1×(52×52×3)×85。最后返回之前函数进行torch.cat得到最终的predition:1×10647×85,这就对应我们论文中所说的10647个anchors了。
 #Sigmoid the  centre_X, centre_Y. and object confidencce
    prediction[:,:,0] = torch.sigmoid(prediction[:,:,0])
    prediction[:,:,1] = torch.sigmoid(prediction[:,:,1])
    prediction[:,:,4] = torch.sigmoid(prediction[:,:,4])
论文中提到对中心坐标(x,y)以及objectscore进行sigmoid,代码中得到体现。
#Add the center offsets
    grid_len = np.arange(grid_size)
    a,b = np.meshgrid(grid_len, grid_len)#生成网格点坐标矩阵

    x_offset = torch.FloatTensor(a).view(-1,1)
    y_offset = torch.FloatTensor(b).view(-1,1)

    if CUDA:
        x_offset = x_offset.cuda()
        y_offset = y_offset.cuda()

    x_y_offset = torch.cat((x_offset, y_offset), 1).repeat(1,num_anchors).view(-1,2).unsqueeze(0)
    prediction = prediction.cuda()#原来没有,加了之后才能使用gpu加速
    prediction[:,:,:2] += x_y_offset   #将网格偏移添加到中心坐标预测中:
生成13×13的网格,来提取网格点坐标矩阵,网格坐标就是每个网格对于左上角的偏移量,将网格偏移添加到中心坐标预测中得到最终的坐标信息(x,y)。prediction = prediction.cuda()是我后来自己加的,没有这句话运行不了CUDA=True。
    if CUDA:
        anchors = anchors.cuda()

    anchors = anchors.repeat(grid_size*grid_size, 1).unsqueeze(0)
    prediction[:,:,2:4] = torch.exp(prediction[:,:,2:4])*anchors
将锚点应用到边界框维度中,大家知道anchors其实就是一个矩形,提供宽和高,论文中将其指数化后得到最终的宽和高。
#Softmax the class scores
    prediction[:,:,5: 5 + num_classes] = torch.sigmoid((prediction[:,:, 5 : 5 + num_classes]))
yolov3摒弃了yolo之前的softmax,而采用分别对每一类进行sigmoid,是因为数据集标签中存在复合类型,即能够匹配多个标签,softmax必须保证标签两两互斥。
prediction[:,:,:4] *= stride
最后,我们要将检测图的大小调整到与输入图像大小一致。边界框属性根据特征图的大小而定(如 13 x 13)。如果输入图像大小是 416 x 416,那么我们将属性乘 32,或乘 stride 变量。
loop 部分到这里就大致结束了。
重新访问的检测层
我们已经变换了输出张量,现在可以将三个不同尺度的检测图级联成一个大的张量。注意这必须在变换之后进行,因为你无法级联不同空间维度的特征图。变换之后,我们的输出张量把边界框表格呈现为行,级联就比较可行了。
write这个flag就是为了让我们能够将一张图的三个尺度融合为一个张量,而不会乱序。
测试前向传播
dn = Darknet('cfg/yolov3.cfg')
#print(dn.forward())
#dn.load_weights("yolov3.weights")
inp = get_test_input()
print(dn(inp,CUDA=1))
#a, interms = dn(inp)
#dn.eval()
#a_i, interms_i = dn(inp)

![]()
最终prediction与我们所想的一样。多尝试理解代码,你会发现更多精彩,你会收获更多快乐。下面我们会继续分析yolov3剩下的部分。