【深度学习实验】前馈神经网络(二):使用PyTorch实现不同激活函数(logistic、tanh、relu、leaky_relu)
目录
一、实验介绍
二、实验环境
1. 配置虚拟环境
2. 库版本介绍
三、实验内容
0. 导入必要的工具包
1. 定义激活函数
logistic(z)
tanh(z)
relu(z)
leaky_relu(z, gamma=0.1)
2. 定义输入、权重、偏置
3. 计算净活性值
4. 绘制激活函数的图像
5. 应用激活函数并打印输出结果
6. 代码整合
一、实验介绍
本实验展示了使用PyTorch实现不同激活函数。
- 计算净活性值,并将其应用于Sigmoid、双曲正切、ReLU和带泄漏的修正线性单元函数。
- 绘制这些激活函数的图像、打印输出结果,展示了它们在不同输入范围内的行为和输出结果。
二、实验环境
本系列实验使用了PyTorch深度学习框架,相关操作如下:
1. 配置虚拟环境
conda create -n DL python=3.7 conda activate DLpip install torch==1.8.1+cu102 torchvision==0.9.1+cu102 torchaudio==0.8.1 -f https://download.pytorch.org/whl/torch_stable.html
conda install matplotlib conda install scikit-learn2. 库版本介绍
| 软件包 | 本实验版本 | 目前最新版 |
| matplotlib | 3.5.3 | 3.8.0 |
| numpy | 1.21.6 | 1.26.0 |
| python | 3.7.16 | |
| scikit-learn | 0.22.1 | 1.3.0 |
| torch | 1.8.1+cu102 | 2.0.1 |
| torchaudio | 0.8.1 | 2.0.2 |
| torchvision | 0.9.1+cu102 | 0.15.2 |
三、实验内容
ChatGPT:
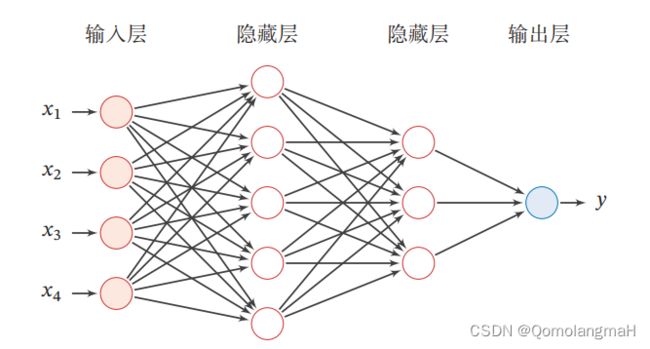
前馈神经网络(Feedforward Neural Network)是一种常见的人工神经网络模型,也被称为多层感知器(Multilayer Perceptron,MLP)。它是一种基于前向传播的模型,主要用于解决分类和回归问题。
前馈神经网络由多个层组成,包括输入层、隐藏层和输出层。它的名称"前馈"源于信号在网络中只能向前流动,即从输入层经过隐藏层最终到达输出层,没有反馈连接。
以下是前馈神经网络的一般工作原理:
输入层:接收原始数据或特征向量作为网络的输入,每个输入被表示为网络的一个神经元。每个神经元将输入加权并通过激活函数进行转换,产生一个输出信号。
隐藏层:前馈神经网络可以包含一个或多个隐藏层,每个隐藏层由多个神经元组成。隐藏层的神经元接收来自上一层的输入,并将加权和经过激活函数转换后的信号传递给下一层。
输出层:最后一个隐藏层的输出被传递到输出层,输出层通常由一个或多个神经元组成。输出层的神经元根据要解决的问题类型(分类或回归)使用适当的激活函数(如Sigmoid、Softmax等)将最终结果输出。
前向传播:信号从输入层通过隐藏层传递到输出层的过程称为前向传播。在前向传播过程中,每个神经元将前一层的输出乘以相应的权重,并将结果传递给下一层。这样的计算通过网络中的每一层逐层进行,直到产生最终的输出。
损失函数和训练:前馈神经网络的训练过程通常涉及定义一个损失函数,用于衡量模型预测输出与真实标签之间的差异。常见的损失函数包括均方误差(Mean Squared Error)和交叉熵(Cross-Entropy)。通过使用反向传播算法(Backpropagation)和优化算法(如梯度下降),网络根据损失函数的梯度进行参数调整,以最小化损失函数的值。
前馈神经网络的优点包括能够处理复杂的非线性关系,适用于各种问题类型,并且能够通过训练来自动学习特征表示。然而,它也存在一些挑战,如容易过拟合、对大规模数据和高维数据的处理较困难等。为了应对这些挑战,一些改进的网络结构和训练技术被提出,如卷积神经网络(Convolutional Neural Networks)和循环神经网络(Recurrent Neural Networks)等。
本系列为实验内容,对理论知识不进行详细阐释
(咳咳,其实是没时间整理,待有缘之时,回来填坑)
0. 导入必要的工具包
torch:PyTorch深度学习框架的主要包。matplotlib.pyplot:用于绘制图形的Python库。
# 导入必要的工具包
import torch
# 绘画时使用的工具包
import matplotlib.pyplot as plt
1. 定义激活函数
-
logistic(z)- 实现逻辑斯蒂(Logistic)函数,将输入张量z应用于逻辑斯蒂函数的公式,并返回结果。
def logistic(z):
return 1.0 / (1.0 + torch.exp(-z))-
tanh(z)- 实现双曲正切(Tanh)函数,将输入张量z应用于双曲正切函数的公式,并返回结果。
def tanh(z):
    return (torch.exp(z) - torch.exp(-z)) / (torch.exp(z) + torch.exp(-z))
-
relu(z)- 实现修正线性单元(ReLU)函数,将输入张量z应用于ReLU函数的公式,并返回结果。
def relu(z):
return torch.max(z, torch.zeros_like(z))-
leaky_relu(z, gamma=0.1)- 实现带泄漏的修正线性单元(Leaky ReLU)函数,将输入张量z应用于Leaky ReLU函数的公式,并返回结果。
def leaky_relu(z, gamma=0.1):
    positive = torch.max(z, torch.zeros_like(z))
    negative = torch.min(z, torch.zeros_like(z))
    return positive + gamma * negative
2. 定义输入、权重、偏置
x:一个形状为(2, 5)的张量,代表两个样本,每个样本有5个特征。w:一个形状为(5, 1)的张量,代表权重向量,其中每个权重与一个特征相对应。b:一个形状为(1, 1)的张量,代表偏置项。
# x 表示两个含有5个特征的样本,x是一个二维的tensor
x = torch.randn((2, 5))
# w 表示含有5个参数的权重向量,w是一个二维的tensor
w = torch.randn((5, 1))
# 偏置项,b是一个二维的tensor,但b只有一个数值
b = torch.randn((1, 1))
3. 计算净活性值
z:通过将输入张量x与权重张量w相乘,并加上偏置项b得到的张量。
# 矩阵乘法,请注意 x 和 w 的顺序,与 b 相加时使用了广播机制
z = torch.matmul(x, w) + b
4. 绘制激活函数的图像
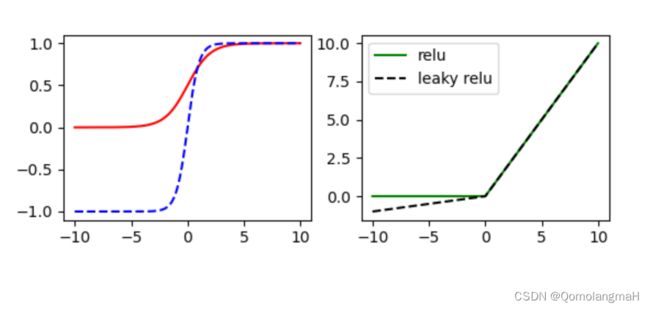
- 创建一个图像窗口,并绘制四个子图。
- 在第一个子图中绘制Sigmoid型激活函数和双曲正切函数的图像。
- 在第二个子图中绘制ReLU型激活函数和带泄漏的修正线性单元函数的图像。
- 添加图例,并显示图像。
# 从-10 到 10 每间隔0.01 取一个数
a = torch.arange(-10, 10, 0.01)
plt.figure()
# 在第一个子图中绘制Sigmoid型激活函数
plt.subplot(2, 2, 1)
plt.plot(a.tolist(), logistic(a).tolist(), color='red', label='logistic')
plt.plot(a.tolist(), tanh(a).tolist(), color='blue', linestyle='--', label='tanh')
# 在第二个子图中绘制ReLU型激活函数
plt.subplot(222)
plt.plot(a.tolist(), relu(a).tolist(), color='g', label='relu')
plt.plot(a.tolist(), leaky_relu(a).tolist(), color='black', linestyle='--', label='leaky relu')

plt.legend()
plt.show()
5. 应用激活函数并打印输出结果
sig_output:将净活性值z应用于Sigmoid函数,得到激活后的输出。tan_output:将净活性值z应用于双曲正切函数,得到激活后的输出。relu_output:将净活性值z应用于ReLU函数,得到激活后的输出。- 打印输出结果。
# z为前面计算的净活性值
sig_output = torch.sigmoid(z)
tan_output = torch.tanh(z)
relu_output = torch.relu(z)
# 打印输出结果
print('sigmoid:', sig_output)
print('tanh:', tan_output)
print('ReLU:', relu_output)
6. 代码整合
# 导入必要的工具包
import torch
# 绘画时使用的工具包
import matplotlib.pyplot as plt


# Logistic 函数
def logistic(z):
    return 1.0 / (1.0 + torch.exp(-z))


# Tanh函数
def tanh(z):
    return (torch.exp(z) - torch.exp(-z)) / (torch.exp(z) + torch.exp(-z))


# ReLU函数
def relu(z):
    return torch.max(z, torch.zeros_like(z))


# leakyReLU函数
def leaky_relu(z, gamma=0.1):
    positive = torch.max(z, torch.zeros_like(z))
    negative = torch.min(z, torch.zeros_like(z))
    return positive + gamma * negative

# x 表示两个含有5个特征的样本,x是一个二维的tensor
x = torch.randn((2, 5))
# w 表示含有5个参数的权重向量,w是一个二维的tensor
w = torch.randn((5, 1))
# 偏置项,b是一个二维的tensor,但b只有一个数值
b = torch.randn((1, 1))
# 矩阵乘法,请注意 x 和 w 的顺序,与 b 相加时使用了广播机制
z = torch.matmul(x, w) + b
# 画出激活函数的图像
# 从-10 到 10 每间隔0.01 取一个数
a = torch.arange(-10, 10, 0.01)
plt.figure()
# 在第一个子图中绘制Sigmoid型激活函数
plt.subplot(2, 2, 1)
plt.plot(a.tolist(), logistic(a).tolist(), color='red', label='logistic')
plt.plot(a.tolist(), tanh(a).tolist(), color='blue', linestyle='--', label='tanh')
# 在第二个子图中绘制ReLU型激活函数
plt.subplot(222)
plt.plot(a.tolist(), relu(a).tolist(), color='g', label='relu')
plt.plot(a.tolist(), leaky_relu(a).tolist(), color='black', linestyle='--', label='leaky relu')

plt.legend()
plt.show()

# z为前面计算的净活性值
sig_output = torch.sigmoid(z)
tan_output = torch.tanh(z)
relu_output = torch.relu(z)
# 打印输出结果
print('sigmoid:', sig_output)
print('tanh:', tan_output)
print('ReLU:', relu_output)


