WWDC2016,Apple发布了ios10,每次版本发布,都会带来新的接口,新的机会,也能间接的看到Apple的未来发展方向。
这里就不讨论iphone7、MacBook Pro、Apple Watch、Apple TV以及AirPods了。
下面回顾一下,Apple今年为我们带来了什么
一,一些限制
IPV6
HTTPS
1.IPV6
由于IPv4最大的问题在于网络地址资源有限,严重制约了互联网的应用和发展。IPv6的使用,不仅能解决网络地址资源数量的问题,而且也解决了多种接入设备连入互联网的障碍
6月1号以后提交新版本需要支持IPV6-Only的网络
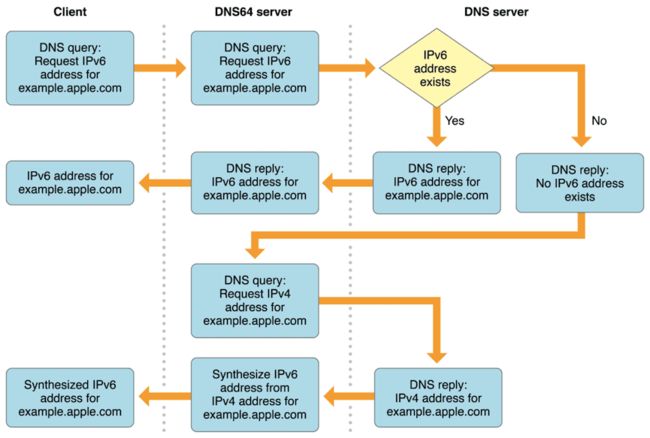
与IPv4地址空间需要扩充迫在眉睫,越来越多的企业和移动电话运营商部署IPv6 DNS64和NAT64网络。DNS64 / NAT64网络是一种能使ipv6网络。取决于应用程序的性质,过渡有不同的含义:如果您正在编写一个客户端应用程序使用高级网络api,如NSURLSession和CFNetwork框架,你应该不需要改变任何东西为您的应用程序使用IPv6地址。如果项目中用了老的AFNetworking或ASIHTTPRequest等第三方网络请求框架则可能需要做一下适配。因为,苹果审核是不会让你过得。
客户端向服务器端请求域名解析,首先通过DNS64 Server查询IPv6的地址,如果查询不到,再向DNS Server查询IPv4地址,通过DNS64 Server合成一个IPV6的地址,最终将一个IPV6的地址返回给客户端
关于IPV6的详细介绍请见:
IPV6
2.HTTPS
前面一个大神已经详细得介绍了HTTPS的相关知识,讲得非常详细,大家想看的话可以回顾一下。我在这也就不做过多赘述了。
HTTPS
- 2017年1月1日起,苹果App Store中的所有App都必须启用 App Transport Security(ATS)安全功能。(但延期了)
"应用传输安全协议是与iOS9和OS X 10.11一同发布的,该协议需要应用程序通过HTTPS使用安全的网络连接,以提高用户的数据和隐私安全。
在2016年WWDC上我们宣布在今年年底之前,提交到App Store的应用程序必须支持应用传输安全协议。为了给你们充裕的时间去准备,这个截止日期已被延长,当新的截止日期确定的时候,我们将及时提供相关信息。"
- App Transport Security(应用程序安全传输),简称 ATS,是苹果在 iOS 9 中首次推出的一项隐私安全保护功能,启用ATS后,它会屏蔽明文HTTP资源加载,强制App通过HTTPS连接网络服务,通过传输加密保障用户数据安全。
- ATS要求服务器必须支持传输层安全(TLS)协议1.2以上版本;证书必须使用SHA256或更高的哈希算法签名;必须使用2048位以上RSA密钥或256位以上ECC算法等等,不满足条件的证书,ATS都会拒绝连接。强制开启ATS体现了苹果一贯的隐私保护态度。 开发者需要HTTPS证书。
二,ios10
IMessage
SiriKit
Speech Recognition
User Notifications
Others
1.IMessage
IMessage获得重大更新,提供消息气泡框效果,手写信息。同时内置的emoji表情也得到优化,除了图片变大3倍外,还能将文字直接转化成emoji表情。苹果还特别为IMessage开辟了应用专区,所以你也可以做IMessage App了。
使用Messages framework创建两种类型的app extensions:
Sticker packs
IMessage apps
第一种方式仅仅提供静态的贴纸,贴纸包图片,用户可以发送内联消息附加到消息气泡中。贴纸包不需要任何代码。你添加标签图像文件拖到贴纸包文件夹内的贴纸资源目录。有效的图像文件必须符合以下规格:
- 图片必须是png、apng、gif、jpeg中的一种
- 图片必须小于500k
- 为了效果好,图像不应少于100×100pt,或超过206×206pt
如果你想做这些事的时候你就要用到第二种方式了
Use iMessage apps to:
- Present a custom user interface inside the Messages app; see MSMessagesAppViewController.
- Create a custom or dynamic sticker browser; see MSStickerBrowserViewController.
- Insert text, stickers, or media files into the Messages app’s input field; see MSConversation.
- Create interactive messages that carry app-specific data; see MSMessage.
- Update interactive messages (for example, to create games or collaborative apps); see MSSession.
//example1作为一个贴纸浏览器

class MessagesViewController: MSMessagesAppViewController, MSStickerBrowserViewDataSource {
var stickers = [MSSticker]()
func loadStickers() {
for i in 1...2 {
if let url = Bundle.main.url(forResource: "Sticker \(i)", withExtension: "png"){
 do {
    let sticker = try MSSticker(contentsOfFileURL: url, localizedDescription: "")
    stickers.append(sticker)
    } catch {
    print(error)
    }
   }
 }
}
func createStickerBrowser() {
    let controller = MSStickerBrowserViewController(stickerSize: .large)

    addChildViewController(controller)
    view.addSubview(controller.view)

    controller.stickerBrowserView.backgroundColor = UIColor.purple
    controller.stickerBrowserView.dataSource = self

    view.topAnchor.constraint(equalTo: controller.view.topAnchor).isActive = true
    view.bottomAnchor.constraint(equalTo: controller.view.bottomAnchor).isActive = true
    view.leftAnchor.constraint(equalTo: controller.view.leftAnchor).isActive = true
    view.rightAnchor.constraint(equalTo: controller.view.rightAnchor).isActive = true
}

func numberOfStickers(in stickerBrowserView: MSStickerBrowserView) -> Int {
  return stickers.count
}

func stickerBrowserView(_ stickerBrowserView: MSStickerBrowserView, stickerAt index: Int) -> MSSticker {
  return stickers[index]
}

override func viewDidLoad() {
    super.viewDidLoad()
    loadStickers()
    createStickerBrowser()
}

override func didReceiveMemoryWarning() {
    super.didReceiveMemoryWarning()
}

// MARK: - Conversation Handling
    override func willBecomeActive(with conversation: MSConversation) {
    }
    override func didResignActive(with conversation: MSConversation) {
    }
    override func didReceive(_ message: MSMessage, conversation: MSConversation) {
    }
    override func didStartSending(_ message: MSMessage, conversation: MSConversation) {
    }
    override func didCancelSending(_ message: MSMessage, conversation: MSConversation) {
    }
    override func willTransition(to presentationStyle: MSMessagesAppPresentationStyle) {
    }
    override func didTransition(to presentationStyle: MSMessagesAppPresentationStyle) {
    }
}
example2(交互式)

class MessagesViewController: MSMessagesAppViewController {

@IBOutlet weak var stepper: UIStepper!

@IBAction func didPress(button sender: AnyObject) {
if let image = createImageForMessage(), let conversation = activeConversation {
    let layout = MSMessageTemplateLayout()
    layout.image = image
    layout.caption = "云莱坞"

    let message = MSMessage()
    message.layout = layout
    message.url = URL(string: "http://www.yunlaiwu.com/")

    conversation.insert(message, completionHandler: { (error) in
      print(error ?? "no error")
    })
   }
}

func createImageForMessage() -> UIImage? {
    let background = UIView(frame: CGRect(x: 0, y: 0, width: 300, height: 300))
    background.backgroundColor = UIColor.white

    let label = UILabel(frame: CGRect(x: 75, y: 75, width: 150, height: 150))
    label.font = UIFont.systemFont(ofSize: 56.0)
    label.backgroundColor = UIColor.red
    label.textColor = UIColor.white
    label.text = "\(Int(stepper.value))"
    label.textAlignment = .center
    label.layer.cornerRadius = label.frame.size.width/2.0
    label.clipsToBounds = true

    let imageView = UIImageView(frame: CGRect(x: 0, y: 200, width: 300, height: 100))
    imageView.image = UIImage(named:"Sticker 2")
    background.addSubview(label)
    background.addSubview(imageView)

    background.frame.origin = CGPoint(x: view.frame.size.width, y: view.frame.size.height)
    view.addSubview(background)

    UIGraphicsBeginImageContextWithOptions(background.frame.size, false, UIScreen.main.scale)
    background.drawHierarchy(in: background.bounds, afterScreenUpdates: true)
    let image = UIGraphicsGetImageFromCurrentImageContext()
    UIGraphicsEndImageContext()

    background.removeFromSuperview()

    return image
}
2.SiriKit
Apple 为我们开放了两个framework让我们更好的接入Siri
Intents、IntentsUI
Intents框架是必须支持的,支持基本应用程序和系统之间的通信。
IntentsUI框架是可选的,他提供了任务成功操作后的自定义UI接口。
它所包括的领域:
- VoIP calling
- Messaging
- Payments
- Photo
- Workouts
- Ride booking
- CarPlay (automotive vendors only)
- Restaurant reservations (requires additional support from Apple)
接入siri的注意事项:
- 证书支持
-
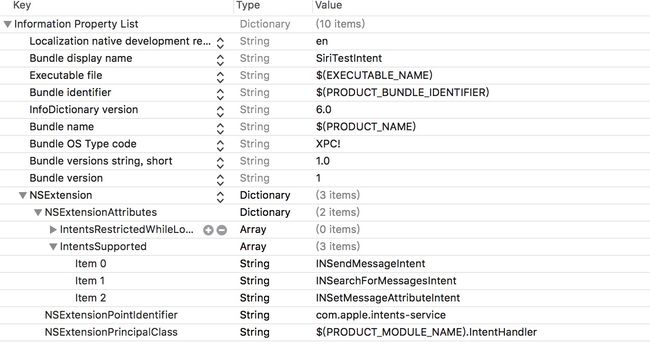
plist文件支持你所要的操作事件
import Intents

// As an example, this class is set up to handle Message intents.
// You will want to replace this or add other intents as appropriate.
// The intents you wish to handle must be declared in the extension's Info.plist.

// You can test your example integration by saying things to Siri like:
// "Send a message using "
// " John saying hello"
// "Search for messages in "

class IntentHandler: INExtension, INSendMessageIntentHandling, INSearchForMessagesIntentHandling, INSetMessageAttributeIntentHandling {

override func handler(for intent: INIntent) -> Any {
    // This is the default implementation.  If you want different objects to handle different intents,
    // you can override this and return the handler you want for that particular intent.
    return self
}

// MARK: - INSendMessageIntentHandling

// Implement resolution methods to provide additional information about your intent (optional).
func resolveRecipients(forSendMessage intent: INSendMessageIntent, with completion: @escaping ([INPersonResolutionResult]) -> Void) {
    if let recipients = intent.recipients {

    // If no recipients were provided we'll need to prompt for a value.
    if recipients.count == 0 {
    completion([INPersonResolutionResult.needsValue()])
    return
}

var resolutionResults = [INPersonResolutionResult]()
for recipient in recipients {
    let matchingContacts = [recipient] // Implement your contact matching logic here to create an array of matching contacts
    switch matchingContacts.count {
    case 2  ... Int.max:
    // We need Siri's help to ask user to pick one from the matches.
    resolutionResults += [INPersonResolutionResult.disambiguation(with: matchingContacts)]

    case 1:
    // We have exactly one matching contact
    resolutionResults += [INPersonResolutionResult.success(with: recipient)]

    case 0:
    // We have no contacts matching the description provided
    resolutionResults += [INPersonResolutionResult.unsupported()]

    default:
    break

    }
}
    completion(resolutionResults)
    }
}

func resolveContent(forSendMessage intent: INSendMessageIntent, with completion: @escaping (INStringResolutionResult) -> Void) {
        if let text = intent.content, !text.isEmpty {
        completion(INStringResolutionResult.success(with: text))
    } else {
        completion(INStringResolutionResult.needsValue())
    }
}

// Once resolution is completed, perform validation on the intent and provide confirmation (optional).

func confirm(sendMessage intent: INSendMessageIntent, completion: @escaping (INSendMessageIntentResponse) -> Void) {
    // Verify user is authenticated and your app is ready to send a message.

    let userActivity = NSUserActivity(activityType: NSStringFromClass(INSendMessageIntent.self))
    let response = INSendMessageIntentResponse(code: .ready, userActivity: userActivity)
    completion(response)
}

// Handle the completed intent (required).

func handle(sendMessage intent: INSendMessageIntent, completion: @escaping (INSendMessageIntentResponse) -> Void) {
    // Implement your application logic to send a message here.

    let userActivity = NSUserActivity(activityType: NSStringFromClass(INSendMessageIntent.self))
    let response = INSendMessageIntentResponse(code: .success, userActivity: userActivity)
    completion(response)
}

// Implement handlers for each intent you wish to handle.  As an example for messages, you may wish to also handle searchForMessages and setMessageAttributes.

// MARK: - INSearchForMessagesIntentHandling

func handle(searchForMessages intent: INSearchForMessagesIntent, completion: @escaping (INSearchForMessagesIntentResponse) -> Void) {
    // Implement your application logic to find a message that matches the information in the intent.

    let userActivity = NSUserActivity(activityType: NSStringFromClass(INSearchForMessagesIntent.self))
    let response = INSearchForMessagesIntentResponse(code: .success, userActivity: userActivity)
    // Initialize with found message's attributes
    response.messages = [INMessage(
    identifier: "identifier",
    content: "I am so excited about SiriKit!",
    dateSent: Date(),
    sender: INPerson(personHandle: INPersonHandle(value: "[email protected]", type: .emailAddress), nameComponents: nil, displayName: "Sarah", image: nil,  contactIdentifier: nil, customIdentifier: nil),
    recipients: [INPerson(personHandle: INPersonHandle(value: "+1-415-555-5555", type: .phoneNumber), nameComponents: nil, displayName: "John", image: nil,  contactIdentifier: nil, customIdentifier: nil)]
    )]
    completion(response)
}

// MARK: - INSetMessageAttributeIntentHandling

func handle(setMessageAttribute intent: INSetMessageAttributeIntent, completion: @escaping (INSetMessageAttributeIntentResponse) -> Void) {
    // Implement your application logic to set the message attribute here.

    let userActivity = NSUserActivity(activityType: NSStringFromClass(INSetMessageAttributeIntent.self))
    let response = INSetMessageAttributeIntentResponse(code: .success, userActivity: userActivity)
    completion(response)
}
}
3.Speech Recognition
语音识别技术原理
iOS 10引入了一个新的API,支持连续语音识别,可以将识别语音转录成文本。可以执行语音实时转录和记录音频。
SpeechFramework框架中的重要类
SFSpeechRecognizer:这个类是语音识别的操作类,用于语音识别用户权限的申请,语言环境的设置,语音模式的设置以及向Apple服务发送语音识别的请求。
SFSpeechRecognitionTask:这个类是语音识别服务请求任务类,每一个语音识别请求都可以抽象为一个SFSpeechRecognitionTask实例,其中SFSpeechRecognitionTaskDelegate协议中约定了许多请求任务过程中的监听方法。
SFSpeechRecognitionRequest:语音识别请求类,需要通过其子类来进行实例化。
SFSpeechURLRecognitionRequest:通过音频URL来创建语音识别请求。
SFSpeechAudioBufferRecognitionRequest:通过音频流来创建语音识别请求。
SFSpeechRecognitionResult:语音识别请求结果类。
SFTranscription:语音转换后的信息类。
当然,首先为了安全你得到plist文件中加权限
SFSpeechRecognizer.requestAuthorization { authStatus in
    if authStatus == SFSpeechRecognizerAuthorizationStatus.authorized {
        if let path = Bundle.main.url(forResource: "PPAP", withExtension: ".mp3") {
            let recognizer = SFSpeechRecognizer()
                let request = SFSpeechURLRecognitionRequest(url: path)
                    recognizer?.recognitionTask(with: request, resultHandler: { (result, error) in
                if let error = error {
                   print("There was an error: \(error)")
                } else {
                   print(result?.bestTranscription.formattedString)
                }
            })
        }
    }
}
4.User Notifications
支持了很多用户定义的通知,并且可以捕捉到各个通知状态的回调。以往的通知是大家想接收的都提前做好准备,然后一下全量分发,没收到也不管了,也不关心发送者。现在用户通知做成了和网络请求有点像,一个request,response的流程,也支持了error处理,可以在各个状态的方法中做一些额外操作,并且也能取到一些字段,如发送者等。
更为重要的是,新增了UserNotificationsUI.framework框架,在收到通知的时候,可自定义通知UI样式
let center = UNUserNotificationCenter.current()
center.requestAuthorization(options: [.alert,.badge,.sound]) { (granted, error) in
    if granted {
        print("授权成功")
    }else{
        print("授权失败")
    }
}

let content = UNMutableNotificationContent()
content.title = "云莱坞 PPAP"
content.body = "I have a pen I have an apple"
content.subtitle = "have a pineapple"
content.sound = UNNotificationSound.default()

let trigger1 = UNTimeIntervalNotificationTrigger(timeInterval: 61, repeats: true)

let request = UNNotificationRequest(identifier: "notificationTest", content: content, trigger:trigger1)

UNUserNotificationCenter.current().add(request) { (error) in
    if (error != nil) {
        print(error?.localizedDescription)
    }
}
5.Others
- CallKit 集成了VoIP及信息标识,还有了黑名单功能,当然不是云莱坞的黑名单
//开始请求的方法,在打开设置-电话-来电阻止与身份识别开关时,系统自动调用
- (void)beginRequestWithExtensionContext:(CXCallDirectoryExtensionContext *)context;
//添加黑名单:根据生产的模板,只需要修改CXCallDirectoryPhoneNumber数组,数组内号码要按升序排列
- (BOOL)addBlockingPhoneNumbersToContext:(CXCallDirectoryExtensionContext *)context;
// 添加信息标识:需要修改CXCallDirectoryPhoneNumber数组和对应的标识数组;CXCallDirectoryPhoneNumber数组存放的号码和标识数组存放的标识要一一对应,CXCallDirectoryPhoneNumber数组内的号码要按升序排列
- (BOOL)addIdentificationPhoneNumbersToContext:(CXCallDirectoryExtensionContext *)context;
- Wide Color 宽域颜色
@available(iOS 10.0, *)
public init(displayP3Red: CGFloat, green: CGFloat, blue: CGFloat, alpha: CGFloat)
- Adapting to the True Tone Display 真彩色显示
UIWhitePointAdaptivityStyle
共有五种选择:
UIWhitePointAdaptivityStyleStandard 标准
UIWhitePointAdaptivityStyleReading 阅读
UIWhitePointAdaptivityStylePhoto 图片
UIWhitePointAdaptivityStyleVideo 视频
UIWhitePointAdaptivityStyleGame 游戏
App Search Enhancements 应用搜索增强
Widget Enhancements 锁屏部件增强
News Publisher Enhancements 新闻出版商增强
Apple Pay Enhancements 支付增强
Security and Privacy Enhancements 安全和保密性增强
三,swift3.0
1.去除了swift2系列弃用得特性
2.语法精简,更加哲理性(这词用得好啊)
3.响应式,函数式,面向协议等语言现代化。
let queue = dispatch_queue_create("this is Swift 2.2", nil)
dispatch_async(queue) {
    print("Swift 2.2 queue")
}
Swift 3 取消了这种冗余的写法,而采用了更为面向对象的方式:
let queue = DispatchQueue(label: "this is Swift 3.0")
queue.async {
    print("Swift 3 queue")
}
当然,问题还很多,但4.0就快来了
四,watchOS3.0,tvOS,AppStore,macOS Sierra...
1.watchOS3.0
- 新增智能回覆与 Scribble 功能,可在表面手写文字用以回覆讯息。
- 新增 SOS 功能,其支持全球的语言与紧急电话,危急时刻可立即通话或发出讯息。
- 新增的《Breathe》App 能提醒用户休息片刻、多做深呼吸。
- 《活动记录》App 加入 Activity Sharing 功能,能将您个人的活动量分享给亲朋好友或健身教练,与他人运动竞争或帮助维持健康。《活动记录》更针对乘坐轮椅的残障用户优化设计,提醒何时该稍做休息。
2.tvOS
整合 Siri,用以加强语音搜索功能。此外,tvOS 将新增 Single Sign-on 功能,仅需登入一次即可浏览所有付费电视频道。
当然,国内是被墙的
3.AppStore
AppStore 2.0 变革:更改拆帐比例、置入搜索广告、缩短审查时间
4.macOS Sierra
- 新增 Auto Unlock 功能,当用户戴着配对认证的 Apple Watch 开启 Mac 电脑立即自动登入,无须输入密码。
- 新增 Universal Clipboard 功能,使用 iCloud 可跨苹果设备复制与贴上文字、照片、影片等。
- 使用 iCloud Drive,将允许多部 Mac 电脑共用桌面,而且 iPhone、iPad 也能存取桌面上的档案。
- 新增 Optimized Storage 功能,当 Mac 电脑容量不足,自动将不常用的档案上传 iCloud,提醒用户清空垃圾桶。
- 线上付款将支持 Apple Pay,搭配 iPhone 或 Apple Watch 快速且安全地完成网购的付款动作。
- 包括《地图》、《邮件》、《Pages》、《Numbers》、《Keynote》甚至第三方 Apps 将支持分页功能。
- Safari 与 iTunes 新增 Picture in Picture 功能,以子母画面的方式观赏影片。
- 加入 Siri 功能,可在 macOS Sierra 当中语音搜索讯息、文件、照片、网页等,甚至语音建立备忘录或开启 FaceTime 视讯。登陆 macOS Sierra 之后,Siri 终能跨苹果四大平台使用。

