MTCNN学习笔记
MTCNN学习笔记
本人最近学习了MTCNN,跑了GitHub某大神的code,现在对该code的结构做一个小结,同时我所理解的MTCNN整理成笔记,并且对该大神的code中生成positive,negative,part样本python代码做了完整注释,同时对该code中用的NMS/IOU code部分做了注释。
项目地址:https://github.com/dlunion/mtcnn,>同时参考了几位大神的笔记:https://blog.csdn.net/qq_36782182/article/details/83624357,https://blog.csdn.net/u014380165/article/details/78906898
文章目录
- MTCNN学习笔记
- @[toc]
- MTCNN
- 前言
- 代码架构
- mtcnn.core.utils代码注释
- gen_Pnet_train_data.py注释
- 运行环境
- 运行结果
文章目录
- MTCNN学习笔记
- @[toc]
- MTCNN
- 前言
- 代码架构
- mtcnn.core.utils代码注释
- gen_Pnet_train_data.py注释
- 运行环境
- 运行结果
MTCNN
前言
代码架构
首先将数据下载并放入指定目录(具体是看readme)
因为数据集的训练标签是MATLAB格式的,所以先利用python ./anno_store/tool/format/transform.py 转换成txt
然后再利用python ./anno_store/tool/format/change.py 得到图像的原始边框
-
生成P-Net训练数据(positive、negative、part)
-
run > python mtcnn/data_preprocessing/gen_Pnet_train_data.py
-
run > python mtcnn/data_preprocessing/assemble_pnet_imglist.py
-
训练 P-Net
-
run > python mtcnn/train_net/train_p_net.py
-
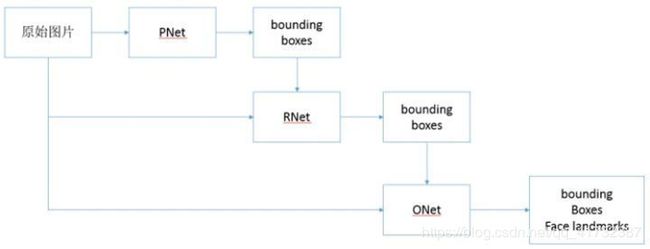
PNET全称为Proposal Network,其基本的构造是一个全连接网络。对上一步构建完成的图像金字塔,通过一个FCN进行初步特征提取与标定边框,并进行Bounding-Box Regression调整窗口与NMS进行大部分窗口的过滤。
全卷积网络(FCN)就是去除了传统卷积网络的全连接层,然后对最后一个卷积层(或者其他合适的卷积层)的feature map进行上采样,使其恢复到原有图像的尺寸(或者其他),并对得到的图像上的每个像素点都可以进行一个类别的预测,同时保留了原有图像的空间信息。
Bounding-Box regression:
当IOU小于某个值时,一种做法是直接将其对应的预测结果丢弃,而Bounding-Box regression的目的是对此预测窗口进行微调,使其接近真实值。具体逻辑在图像检测里面,子窗口一般使用四维向量(x,y,w,h)表示,代表着子窗口中心所对应的母图像坐标与自身宽高,目标是在前一步预测窗口对于真实窗口偏差过大的情况下,使得预测窗口经过某种变换得到更接近与真实值的窗口。在实际使用之中,变换的输入输出按照具体算法给出的已经经过变换的结果和最终适合的结的变换,可以理解为一个损失函数的线性回归。 -
生成R-Net训练数据(positive、negative、part)
-
run > python mtcnn/data_preprocessing/gen_Rnet_train_data.py (可能你需要修改代码中已经训练好的P-Net模型路径,默认的是原来的模型)
-
run > python mtcnn/data_preprocessing/assemble_rnet_imglist.py
-
训练 R-Net
-
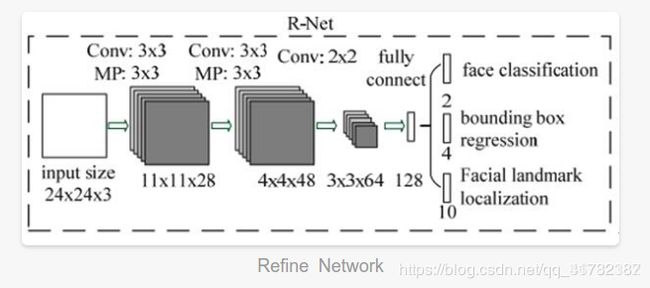
R-NET全称为Refine Network,其基本的构造是一个卷积神经网络,相对于第一层的P-Net来说,增加了一个全连接层,因此对于输入数据的筛选会更加严格。在图片经过P-Net后,会留下许多预测窗口,我们将所有的预测窗口送入R-Net,这个网络会滤除大量效果比较差的候选框,最后对选定的候选框进行Bounding-Box Regression和NMS进一步优化预测结果。
-
生成O-Net训练数据(positive、negative、part)
-run > python mtcnn/data_preprocessing/gen_Onet_train_data.py -
run > python mtcnn/data_preprocessing/gen_landmark_48.py #得到的实际人体面部特征点 数据下载看readme
-
训练 O-Net
-
run > python mtcnn/train_net/train_o_net.py
-
O-Net全称为Output Network,基本结构是一个较为复杂的卷积神经网络,相对于R-Net来说多了一个卷积层。O-Net的效果与R-Net的区别在于这一层结构会通过更多的监督来识别面部的区域,而且会对人的面部特征点进行回归,最终输出五个人脸面部特征点。
-
P-Net主要用来生成一些候选框(bounding box)。在训练的时候该网络的顶部有3条支路用来分别做人脸分类、人脸框的回归和人脸关键点定位;在测试的时候这一步的输出只有N个bounding box的4个坐标信息和score,当然这4个坐标信息已经用回归支路的输出进行修正了,score可以看做是分类的输出(是人脸的概率),具体可以看代码。
R-Net主要用来去除大量的非人脸框。这一步的输入是前面P-Net生成的bounding box,每个bounding box的大小都是2424,可以通过resize操作得到。同样在测试的时候这一步的输出只有M个bounding box的4个坐标信息和score,4个坐标信息也用回归支路的输出进行修正了
O-Net和R-Net有点像,只不过这一步还增加了landmark(人体面部特征)位置的回归。输入大小调整为4848,输出包含P个bounding box的4个坐标信息、score和关键点信息。
整体框架
mtcnn.core.utils代码注释
def IoU(box, boxes):
    """Compute IoU between detect box and gt boxes

    Parameters:
    ----------
    box: numpy array , shape (5, ): x1, y1, x2, y2, score
        input box
    boxes: numpy array, shape (n, 4): x1, y1, x2, y2
        input ground truth boxes

    Returns:
    -------
    ovr: numpy.array, shape (n, )
        IoU
    """
    # 计算原始真实框的面积
    box_area = (box[2] - box[0] + 1) * (box[3] - box[1] + 1)
    # 计算移动后的框的面积,这里计算的是矩阵
    area = (boxes[:, 2] - boxes[:, 0] + 1) * (boxes[:, 3] - boxes[:, 1] + 1)
    # 找到两个框的内部点计算交集
    xx1 = np.maximum(box[0], boxes[:, 0])
    yy1 = np.maximum(box[1], boxes[:, 1])
    xx2 = np.minimum(box[2], boxes[:, 2])
    yy2 = np.minimum(box[3], boxes[:, 3])

    # 然后找到交集区域的长和宽,有的框没有交集那么相差可能为负,所以需要使用0来规整数据
    w = np.maximum(0, xx2 - xx1 + 1)
    h = np.maximum(0, yy2 - yy1 + 1)

    # 两种计算方法:1是交并比等于交集除以并集,2是交集除以最小的面积 本文采用的是第一种
    inter = w * h
    ovr = np.true_divide(inter,(box_area + area - inter))
    #ovr = inter / (box_area + area - inter)
    return ovr
#这个的意思就是网络输入size限定的,工具的作用就是在每个网络输入的时候就是图片纠正,
# 将图片改变成一个正方形的size,便于网络训练,作用其实很简单,因为在网络训练时一般
# 输入的是1212/2424/48*48这种类型的,但是进行我们训练难免会变形为矩形什么的,
# 所以我们就要进行矩形纠正。

def convert_to_square(bbox):
    """Convert bbox to square

    Parameters:
    ----------
    bbox: numpy array , shape n x 5
        input bbox

    Returns:
    -------
    square bbox
    """
    square_bbox = bbox.copy()

    h = bbox[:, 3] - bbox[:, 1] + 1
    w = bbox[:, 2] - bbox[:, 0] + 1
    max_side = np.maximum(h,w)
    square_bbox[:, 0] = bbox[:, 0] + w*0.5 - max_side*0.5
    square_bbox[:, 1] = bbox[:, 1] + h*0.5 - max_side*0.5
    square_bbox[:, 2] = square_bbox[:, 0] + max_side - 1
    square_bbox[:, 3] = square_bbox[:, 1] + max_side - 1
    return square_bbox
# 定义非极大值抑制(NMS),筛选符合标准的线框
def nms(dets, thresh, mode="Union"):
    """
    greedily select boxes with high confidence
    keep boxes overlap <= thresh
    rule out overlap > thresh
    :param dets: [[x1, y1, x2, y2 score]]
    :param thresh: retain overlap <= thresh
    :return: indexes to keep
    """
    x1 = dets[:, 0]
    y1 = dets[:, 1]
    x2 = dets[:, 2]
    y2 = dets[:, 3]
    scores = dets[:, 4]  #得到iou分数矩阵

    # shape of x1 = (454,), shape of scores = (454,)
    # print("shape of x1 = {0}, shape of scores = {1}".format(x1.shape, scores.shape))
    # time.sleep(5)

    areas = (x2 - x1 + 1) * (y2 - y1 + 1)
    order = scores.argsort()[::-1] # 以计算出的iou从大到小排列
    # print("shape of order {0}".format(order.size)) # (454,)
    # time.sleep(5)

    # eleminates the box which have large interception with the box which have the largest score in order
    # matain the box with largest score and boxes don't have large interception with it
    keep = []
    while order.size > 0:
        i = order[0]
        keep.append(i)
        xx1 = np.maximum(x1[i], x1[order[1:]])
        yy1 = np.maximum(y1[i], y1[order[1:]])
        xx2 = np.minimum(x2[i], x2[order[1:]])
        yy2 = np.minimum(y2[i], y2[order[1:]])

        w = np.maximum(0.0, xx2 - xx1 + 1)
        h = np.maximum(0.0, yy2 - yy1 + 1)
        inter = w * h

        # cacaulate the IOU between box which have largest score with other boxes
        if mode == "Union":
            # area[i]: the area of largest score
            ovr = inter / (areas[i] + areas[order[1:]] - inter)
        elif mode == "Minimum":
            ovr = inter / np.minimum(areas[i], areas[order[1:]])

        inds = np.where(ovr <= thresh)[0]
        order = order[inds + 1] # +1: eliminates the first element in order
        # print(inds)
        # print("shape of order {0}".format(order.shape))  # (454,)
        # time.sleep(2)

    return keep
gen_Pnet_train_data.py注释
"""
采样出positive、part、negative样本并同时得到样本的label信息(采样图片包含三种size:12,24,48),其中Pnet的输入为12
将该程序的输出作为Pnet的输入
"""
import sys
import numpy as np
import cv2
import os
sys.path.append(os.getcwd())   #在windows系统上,导入python库目录
import numpy as np
from mtcnn.data_preprocess.utils import IoU

prefix = ''
anno_file = "./anno_store/anno_train_fixed.txt"   #label存放地址,通过transform.py和wider_loader.py 将图片处理成.txt
                                                      #再通过change.py将txt的bbox提取出来形成原图标注边框,并存入该文件夹
im_dir = "./data_set/face_detection/WIDERFACE/WIDER_train/WIDER_train/images"   #Wider_face主要用于检测任务的训练,数据集,image目录
pos_save_dir = "./data_set/train/12/positive"  #正样本
part_save_dir = "./data_set/train/12/part"     #部分样本
neg_save_dir = './data_set/train/12/negative' #负样本

#  生成文件夹函数
if not os.path.exists(pos_save_dir):
    os.mkdir(pos_save_dir)
if not os.path.exists(part_save_dir):
    os.mkdir(part_save_dir)
if not os.path.exists(neg_save_dir):
    os.mkdir(neg_save_dir)

# 打开保存pos,neg,part文件名、标签的txt文件,这三个是上面代码生成的
f1 = open(os.path.join('./anno_store', 'pos_12.txt'), 'w')
f2 = open(os.path.join('./anno_store', 'neg_12.txt'), 'w')
f3 = open(os.path.join('./anno_store', 'part_12.txt'), 'w')

# 打开原始图片标注txt文件
with open(anno_file, 'r') as f:
    annotations = f.readlines()
num = len(annotations)
print("%d pics in total" % num)

p_idx = 0 # positive
n_idx = 0 # negative
d_idx = 0 # part
idx = 0
box_idx = 0


# 原始图片根据标注的bbox,生成negative,posotive,part图片,标注形式也做相应变化
for annotation in annotations: #逐行读取,每行为一个原图
    annotation = annotation.strip().split(' ') #对读取的每一行,按空格进行切片
    im_path = os.path.join(prefix, annotation[0]) # annotation[0]为图片名,图片地址拼接

    bbox = list(map(float, annotation[1:])) #从第二个开始至最后为bbox
    boxes = np.array(bbox, dtype=np.int32).reshape(-1, 4) #矩阵化,对bbox进行reshape,4个一列
    img = cv2.imread(im_path) #读取图片
    idx += 1
    if idx % 100 == 0:
        print(idx, "images done")

    height, width, channel = img.shape

    neg_num = 0
    # 生成nagative,每个原图生成50个negative sample
    while neg_num < 50:
        # size表示neg样本大小,在12和min(width, height)/2之间随机取一个整数
        size = np.random.randint(12, min(width, height) / 2)
        nx = np.random.randint(0, width - size)
        ny = np.random.randint(0, height - size)
        crop_box = np.array([nx, ny, nx + size, ny + size]) # 随机生成的bbox位置(x1,y1)左上角边框,(x2,y2)右下角边框

        Iou = IoU(crop_box, boxes) # 计算随机生成的crop_box和原图中所有标注边框bboxs的交并比

        cropped_im = img[ny: ny + size, nx: nx + size, :]# 在原图中crop对应的区域图片,作为negative sample
        resized_im = cv2.resize(cropped_im, (12, 12), interpolation=cv2.INTER_LINEAR)# 对crop的图像进行resize,大小为12*12
                                                                                     #因为PNet的输入是12*12

        if np.max(Iou) < 0.3: # 如果crop_box与所有boxes的Iou都小于0.3,那么认为它是nagative sample
            # Iou with all gts must below 0.3
            save_file = os.path.join(neg_save_dir, "%s.jpg" % n_idx)# 保存图片的地址和图片名
            f2.write(save_file + ' 0\n') # 往neg_12.txt文件中写入该negative样本的图片地址和名字,分类标签
            cv2.imwrite(save_file, resized_im)# 保存该负样本图片
            n_idx += 1
            neg_num += 1

    for box in boxes:#逐行读取,每次循环处理一个box
        # box (x_left, y_top, x_right, y_bottom)
        x1, y1, x2, y2 = box
        # w = x2 - x1 + 1
        # h = y2 - y1 + 1
        w = x2 - x1 + 1
        h = y2 - y1 + 1

        #忽略小脸
        # in case the ground truth boxes of small faces are not accurate
        if max(w, h) < 40 or x1 < 0 or y1 < 0:
            continue

        # 产生与实际边框有交叠的负样本
        for i in range(5):
            size = np.random.randint(12, min(width, height) / 2)
            # delta_x and delta_y are offsets of (x1, y1)

            delta_x = np.random.randint(max(-size, -x1), w)
            delta_y = np.random.randint(max(-size, -y1), h)
            nx1 = max(0, x1 + delta_x)
            ny1 = max(0, y1 + delta_y)

            if nx1 + size > width or ny1 + size > height:
                continue
            crop_box = np.array([nx1, ny1, nx1 + size, ny1 + size])
            Iou = IoU(crop_box, boxes)

            cropped_im = img[ny1: ny1 + size, nx1: nx1 + size, :]
            resized_im = cv2.resize(cropped_im, (12, 12), interpolation=cv2.INTER_LINEAR)

            if np.max(Iou) < 0.3:
                # Iou with all gts must below 0.3
                save_file = os.path.join(neg_save_dir, "%s.jpg" % n_idx)
                f2.write(save_file + ' 0\n')
                cv2.imwrite(save_file, resized_im)
                n_idx += 1

        # 生成 positive examples and part faces
        for i in range(20):
            size = np.random.randint(int(min(w, h) * 0.8), np.ceil(1.25 * max(w, h)))# size表示随机生成样本的大小,
                                                                                 # 在int(min(w, h) * 0.8) 和 np.ceil(1.25 * max(w, h)) 之间

            # delta 表示相对于标注box center的偏移量
            delta_x = np.random.randint(-w * 0.2, w * 0.2)
            delta_y = np.random.randint(-h * 0.2, h * 0.2)
            # nx,ny表示偏移后的box坐标位置
            nx1 = max(x1 + w / 2 + delta_x - size / 2, 0)
            ny1 = max(y1 + h / 2 + delta_y - size / 2, 0)
            nx2 = nx1 + size
            ny2 = ny1 + size
            # 去掉超出原图的box
            if nx2 > width or ny2 > height:
                continue
            crop_box = np.array([nx1, ny1, nx2, ny2])
            # bbox偏移量的计算,由 x1 = nx1 + float(size)*offset_x1 推导而来
            offset_x1 = (x1 - nx1) / float(size)
            offset_y1 = (y1 - ny1) / float(size)
            offset_x2 = (x2 - nx2) / float(size)
            offset_y2 = (y2 - ny2) / float(size)

            cropped_im = img[int(ny1): int(ny2), int(nx1): int(nx2), :]
            resized_im = cv2.resize(cropped_im, (12, 12), interpolation=cv2.INTER_LINEAR)

            box_ = box.reshape(1, -1)# 将box reshape为一行
            if IoU(crop_box, box_) >= 0.65:# Iou>=0.65的作为positive examples
                save_file = os.path.join(pos_save_dir, "%s.jpg" % p_idx)# 将图片路径,类别,偏移量写入到pos_12.txt文件中
                f1.write(save_file + ' 1 %.2f %.2f %.2f %.2f\n' % (offset_x1, offset_y1, offset_x2, offset_y2))
                cv2.imwrite(save_file, resized_im)
                p_idx += 1
            elif IoU(crop_box, box_) >= 0.4:# 0.4<=Iou<0.65的作为part faces
                save_file = os.path.join(part_save_dir, "%s.jpg" % d_idx)
                f3.write(save_file + ' -1 %.2f %.2f %.2f %.2f\n' % (offset_x1, offset_y1, offset_x2, offset_y2))
                cv2.imwrite(save_file, resized_im)
                d_idx += 1
        box_idx += 1
        print("%s images done, pos: %s part: %s neg: %s" % (idx, p_idx, d_idx, n_idx))

f1.close()
f2.close()
f3.close()
#产生交叠比小于0.3的负样本,0.4-0.65的部分样本 大于0.6的正样本
运行环境
- pytorch1.0 python3.5,win10


