Spring-Boot之@Enable*注解的工作原理
@enable*是springboot中用来启用某一个功能特性的一类注解。其中包括我们常用的
@SpringBootApplication注解中用于开启自动注入的annotation@EnableAutoConfiguration,开启异步方法的annotation@EnableAsync,开启将配置文件中的属性以bean的方式注入到IOC容器的annotation@EnableConfigurationProperties等。
一、观察任一@Enable*注解的源码,以@EnableAsync为例
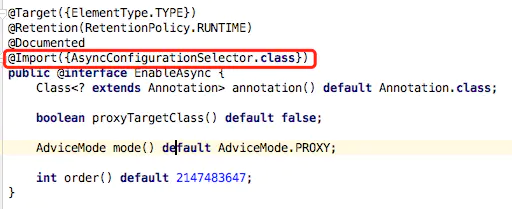
@EnableAsync源码
@EnableAsync的作用是启用异步执行,使标注@Async注解的方法能够和其他方法异步执行。读者可以Google一下@EnableAsync这个注解的使用场景,本文不再赘述
我们发现,这个注解的重点在我标红的@Import({AsyncConfigurationSelector.class})这段代码。解释一下@Import和XxxSelector.class的作用。
1)@Import
用来导入一个或多个class,这些类会注入到spring容器中,或者配置类,配置类里面定义的bean都会被spring容器托管。在这里我们加入的AsyncConfigurationSelector.class放入Spring容器中管理。
2)AsyncConfigurationSelector.class
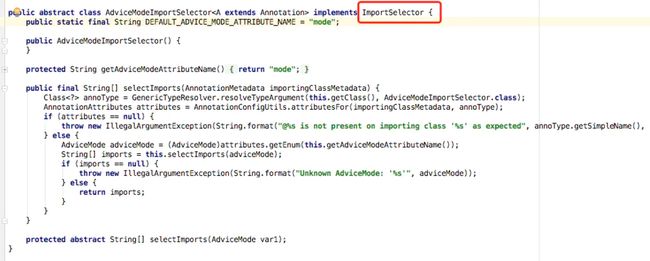
我们从源码一直追溯这个类的父类,最终找到顶端的父类ImportSelector.class
追溯父类ImportSelector.class
打开ImportSelector.class阅读源码:
ImportSelector.class
Spring会把实现ImportSelector接口的类中的SelectImport方法返回的值注入到Spring容器中。这个方法的返回值必须是一个class的全类名的String[]。举个例子:
public class MyImportSelector implements ImportSelector {

    @Override
    public String[] selectImports(AnnotationMetadata annotationMetadata) {
        return new String[]{"com.springboot.enable.User", "com.springboot.enable.Car"};
    }
}
spring容器会把com.springboot.enable包下的User和Car这两个类放入容器中。
回归正题,我们不是需要通过@Enable*注解开启一些功能嘛?答案就我自定义的MyImportSelector中。简单来说就是@Enable*会将XxxImportSelector放入容器中,当Spring启动,会执行selectImports(AnnotationMetadata annotationMetadata)方法,在这个方法中我们做了某些处理,使得和@Enable*搭配使用的注解生效。哈哈,是不是很绕,多阅读两遍,你就理解了。
还有一个和ImportSelector功能差不多的类,ImportBeanDefinitionRegistrar使用beanDefinitionRegistry对象将bean加入Spring容器中,源码如下:
ImportBeanDefinitionRegistrar
,SpringBootApplication只是把几个注解糅合在一起
- @Configuration 说明该类是spring的一个配置文件,如同xml的beans
- @EnableAutoConfiguration springboot新加的一个注解,将spring的@Enable***系列注解全部包含进来而无需开发者显式声明
- @ComponentScan 组件扫描,使用了该注解下的类所在的路径,包含子路径都进行组件扫描
@Import 与xml配置方式下的作用一样。支持导入的类型有:
- 一个或多个拥有 @Configuration 注解的配置类
- ImportSelector 接口的实现类
- ImportBeanDefinitionRegistrar 的实现类
二、小实验:
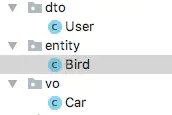
下面我们做一个小实验印证一下,下图有三个包,每个包下分别有三个bean,他们都加了@Component注解,会被spring加入到容器中。
beans
User
Bird
Car
需求是,当注入dto和vo两个包下的bean时,输出一段话:echo bean :+ bean的全类名,注入entity包下的bean时,不输出。
1)
创建EchoBeanPostProcessor.class,实现BeanPostProcessor接口,作用是实现上文的业务逻辑。我们同样可以创建一个@EchoBean,然后通过AOP的方式实现。
//实现BeanPostProcessor接口的类,放入spring容器中后,容器启动和关闭时会执行以下两个重写的方法
public class EchoBeanPostProcessor implements BeanPostProcessor {

    //getter、setter省略,读者在试验的时候要加上
    private List packages;

    //该方法在spring容器初始化前执行
    @Override
    public Object postProcessBeforeInitialization(Object bean, String s) throws BeansException {
        for (String pack : packages) {
            if (bean.getClass().getName().startsWith(pack)) {
                System.out.println("echo bean: " + bean.getClass().getName());
            }
        }
        return bean;
    }

    @Override
    public Object postProcessAfterInitialization(Object bean, String s) throws BeansException {
        return bean;
    }
}
2)
创建BamuImportBeanDefinitionRegistrar .class,实现ImportBeanDefinitionRegistrar
public class BamuImportBeanDefinitionRegistrar implements ImportBeanDefinitionRegistrar {

    @Override
    public void registerBeanDefinitions(AnnotationMetadata annotationMetadata, BeanDefinitionRegistry beanDefinitionRegistry) {

        //获取EnableEcho注解的所有属性的value
        Map attributes = annotationMetadata.getAnnotationAttributes(EnableEcho.class.getName());
        //获取package属性的value
        List packages = Arrays.asList((String[]) attributes.get("packages"));

        //使用beanDefinitionRegistry对象将EchoBeanPostProcessor注入至Spring容器中
        BeanDefinitionBuilder beanDefinitionBuilder = BeanDefinitionBuilder.rootBeanDefinition(EchoBeanPostProcessor.class);
        //给EchoBeanPostProcessor.class中注入packages
        beanDefinitionBuilder.addPropertyValue("packages", packages);
        beanDefinitionRegistry.registerBeanDefinition(EchoBeanPostProcessor.class.getName(), beanDefinitionBuilder.getBeanDefinition());
    }
}
3)
创建注解@EnableEcho,ImportBamuImportBeanDefinitionRegistrar.class
@Target({ElementType.TYPE})
@Retention(RetentionPolicy.RUNTIME)
@Documented
@Import({BamuImportBeanDefinitionRegistrar.class})
public @interface EnableEcho {
    //传入包名
    String[] packages() default "";
}
4)
在springboot启动类中加入我们创建的注解,并传入指定的包名,执行main方法:
@SpringBootApplication
@EnableEcho(packages = {"com.springboot.vo", "com.springboot.dto"})
public class BlogApplication {

    public static void main(String[] args) {

        ConfigurableApplicationContext context = SpringApplication.run(BlogApplication.class, args);
        context.close();
    }
}
控制台输出结果:只有dto和vo包下的bean初始化时输出,entity包下的bean初始化时没有输出,试验成功。
console result
以上就是springboot @Enable*注解的工作原理,如有错误还请读者告知,感谢!
作者:八目朱勇铭
链接:https://www.jianshu.com/p/3da069bd865c
來源:简书
简书著作权归作者所有,任何形式的转载都请联系作者获得授权并注明出处。


