SLAM 显示机器人运动轨迹
视觉SLAM十四讲 第2版 显示机器人运动轨迹及相机位姿
- 基于3.7可视化演示,运行plotTrajectory.cpp操作实录(详细填坑流程)
- 一、前期准备
- 二、git管理子模块及克隆源代码
- 1.学习使用Git Submodule
- 2.克隆源代码
- 1. 下载失败
- 2.github提速
- 1.修改 hosts
- 2.Use SSH
- 3.挂代理
- 4.码云
- 3.执行克隆
- 三、编译及连接源代码
- 1.安装库
- 2.编译
- 3.修改CMakeLists.txt
- 4.执行结果
- 四、显示相机的位姿
基于3.7可视化演示,运行plotTrajectory.cpp操作实录(详细填坑流程)
最近学习无人驾驶,在网上看到了高翔老师的《视觉SLAM十四讲》,感觉不错,遂买来仔细研读。前边章节学习比较顺利,学到3.7节的程序时,运行碰到极大困难,卡了一周,碰到各种坑,所幸一一填平,写篇文章记录下来,以觞来者。博文分为四块知识点,边写边整理吧,欢迎留言交流。好了,闲话少述,直接进入正题。
一、前期准备
在之前的章节中,我们首先安装了Ubuntu 1804,学习了CMake基础语法及熟悉了VIM和IDE KDevelop的用法,下面给出所用资料链接(点击右上方数字即可):
1.Ubuntu 1804安装1,在window10安装ubuntu双系统,注意是非虚拟机安装哦。
2.CMake教学材料,主要有两部分:《cmake实践》2及官方指导文档3。
3.VIM命令学习4,几篇文章凑在一起的,不想仔细读的可以拉到后边看看简化版,掌握主要用法即可。
4.KDevelop5,这个稍微详细些,不用多看,先用起来。
二、git管理子模块及克隆源代码
1.学习使用Git Submodule
为了使用Git的submodule功能管理本书依赖的第三方库,专门学习了Git Submodule使用完整教程6,通过实操,基本掌握了 git clone、checkout、pull、push及submodule的init、add、remove、commit、foreach等操作。教程中需要注意的有以下几点:
- clone时的参数–recursive改为–recurse-submodules,可能是git版本问题,已移除–recursive。
- libs/lib1与libs/lib1/lib1-features的pull和commit需要分别进行,并且会产生不同的commit id,比如你commit并push完libs1-features的修改后,还需要对lib1进行commit并push,一直没想通为什么不能统一管理,有知道的朋友请告知下(lib2情况相同)。
- 牢记git foreach操作,当包含多个字模块时,此命令可以省时省力的帮你完成任务。
git submodule foreach ls -l
git submodule foreach git pull
git submodule foreach --recursive git submodule init
git submodule foreach --recursive git submodule update
2.克隆源代码
从github克隆源代码时,会发现很多坑,诸如下载失败、网速极慢、子模块克隆失败等问题,不急,一个一个的填。
1. 下载失败
如果你没对git进行过任何设置,开始可能由于限速和缓存不够导致下载失败,如下所示:
fatal: The remote end hung up unexpectedly
fatal: 过早的文件结束符(EOF)
fatal: index-pack 失败
使用以下命令解决:
git config --global http.postBuffer 10000000
git config --global http.lowSpeedTime 0
git config --global http.lowSpeedTime 999999
2.github提速
正常下载后,发现速度很慢,峰值只有50kb左右,有四种方法可以提速:
1.修改 hosts
使用以下命令查找对应地址映射的IP,每个人根据地区而不同,比如我的如下所示:
simon@bert:~$ nslookup github.com
Server:		127.0.0.53
Address:	127.0.0.53#53

Non-authoritative answer:
Name:	github.com
Address: 13.250.177.223

simon@bert:~$ nslookup github.global.ssl.fastly.net
Server:		127.0.0.53
Address:	127.0.0.53#53

Non-authoritative answer:
Name:	github.global.ssl.fastly.net
Address: 31.13.80.17

simon@bert:~$ nslookup codeload.github.com
Server:		127.0.0.53
Address:	127.0.0.53#53

Non-authoritative answer:
Name:	codeload.github.com
Address: 54.251.140.56
记录下Address地址IP,并将映射添加到/etc/hosts中,如下所示:
sudo vim /etc/hosts
127.0.0.1       localhost
127.0.1.1       bert
0.0.0.0         account.jetbrains.com
# github config
13.250.177.223  github.com
31.13.80.17     github.global.ssl.fastly.net
54.251.140.56   codeload.github.com
以下两种命令均可重启网络服务(不用重启机器即可生效):
sudo /etc/init.d/networking restart
sudo service network restart
经测试,此方法可提高到200KiB左右。
2.Use SSH
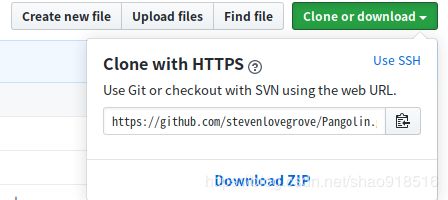
使用SSH,在github克隆或下载界面,点击Use SSH,如下图所示:

会给出如何获取SSH密钥的链接,按照官方文档一步步操作即可使用SSH下载。因为设置时没有截图,写文章时登出也找不到,故没放图片,有问题的可以在下方留言。
以上两种方法均可带来一定速度提升,Use SSH可能会快那么一丢丢,不过设置复杂一些。
3.挂代理
关于挂代理的说明,首先需要自己搭建代理服务器,对于实验性的同学来说没必要啦,但是简要说明下使用方法:
第一步,在VPS(Virtual Private Server 虚拟专用服务器)上搭建服务器端,现在普遍使用的搭建服务器端的vps主要包括3种:Linode/DigitalOcean/BandwagonHOST,推荐DigitalOcean;
第二步,使用本地shell程序连接代理服务器端;
第三步,在本地安装Shadowsocks并配置连接;
第四步,使用如下命令指定或取消git代理网址:
#指定代理
git config --global http.https://github.com.proxy 'socks5://127.0.0.1:1080'
#取消代理
git config --global --unset https.proxy
#查看代理设置
git config --global -l
单单在机器上设置代理是会被拒绝访问的哦,感兴趣的童鞋可以按着上述步骤操作下。
4.码云
这篇文章发表后,学习opencv时,发现了一个很好用的github下载工具,码云,在此补充上。试过以上方法没用的小伙伴这次一定可以帮到你。具体方法参考以下文章:《git与码云连接起来》(由于审核问题,请小伙伴们自行搜索吧)。
3.执行克隆
克隆源代码命令如下:
git clone --recurse-submodules https://github.com/gaoxiang12/slambook2.git slambook2
使用SSH请把网址改为:[email protected]:gaoxiang12/slambook2.git。
克隆完成后,进入~/slambook2/3rdparty/Pangolin,眼前一黑,目录竟然是空地,查看克隆日志,发现错误提示:子模块路径…未注册。反复执行clone命令试错之后放弃,然后递归初始化子模块,命令及结果如下:
git submodule update --init --recursive
正克隆到 '/home/simon/slam/slambook2/3rdparty/DBoW3'...
error: RPC failed; curl 56 GnuTLS recv error (-54): Error in the pull function.
fatal: The remote end hung up unexpectedly
fatal: 过早的文件结束符(EOF)
fatal: index-pack 失败
fatal: 无法克隆 'https://github.com/rmsalinas/DBow3' 到子模组路径 '/home/simon/slam/slambook2/3rdparty/DBoW3'
克隆 '3rdparty/DBoW3' 失败。按计划重试
反复执行几次,还是被KO,郁闷至极。最后想出了不得已的笨方法,针对每个子模块分别clone,终于搞定。方法如下:打开文件~/slam/slambook2/.gitmodule:
simon@bert:~/slam/slambook2$ cat .gitmodules
[submodule "3rdparty/Pangolin"]
	path = 3rdparty/Pangolin
	url = https://github.com/stevenlovegrove/Pangolin
[submodule "3rdparty/Sophus"]
	path = 3rdparty/Sophus
	url = https://github.com/strasdat/Sophus
[submodule "3rdparty/ceres-solver"]
	path = 3rdparty/ceres-solver
	url = https://github.com/ceres-solver/ceres-solver
[submodule "3rdparty/g2o"]
	path = 3rdparty/g2o
	url = https://github.com/RainerKuemmerle/g2o
[submodule "3rdparty/DBoW3"]
	path = 3rdparty/DBoW3
	url = https://github.com/rmsalinas/DBow3
[submodule "3rdparty/googletest"]
	path = 3rdparty/googletest
	url = https://github.com/google/googletest.git
以Pangolin为例,在目录~/slambook2/3rdparty,删除子模块中文件.git,并使用如下命令:
git clone --recurse-submodules [email protected]:stevenlovegrove/Pangolin.git Pangolin
正克隆到 'Pangolin'...
...#省略无关日志
接收对象中: 100% (361/361), 147.50 KiB | 245.00 KiB/s, 完成.
处理 delta 中: 100% (151/151), 完成.
子模组路径 'external/pybind11/tools/clang':检出 '6a00cbc4a9b8e68b71caf7f774b3f9c753ae84d5'
其他子模块雷同,不再累述。
写这篇文章时,实验发现在第一条克隆命令下,子模块也克隆成功了,看来这个要看运气气气…
三、编译及连接源代码
为实现教材中plotTrajectory.cpp,以支持3D绘图的程序库Pangolin为例进行编译。
1.安装库
首先,编译中需要安装很多库,以下三条命令搞定(兄弟我一个库踩一遍):
#sudo
sudo apt install libglew-dev libxkbcommon-dev wayland-protocols python3-pip doxygen graphviz graphviz-doc
sudo apt install libboost-dev libboost-thread-dev libboost-filesystem-dev
#pip3
pip3 install pytest
2.编译
然后,切换到目录~/slambook2/3rdparty/Pangolin,执行以下命令:
simon@bert:~/slam/slambook2/3rdparty/Pangolin$ mkdir build
simon@bert:~/slam/slambook2/3rdparty/Pangolin$ cd build/
simon@bert:~/slam/slambook2/3rdparty/Pangolin/build$ cmake ../
#or make,此步可根据报错调试程序
simon@bert:~/slam/slambook2/3rdparty/Pangolin/build$ cmake --build .
simon@bert:~/slam/slambook2/3rdparty/Pangolin/build$ sudo make install
3.修改CMakeLists.txt
修改cmake文件,并在代码目录执行cmake和make,我的CMakeLists.txt内容如下所示:
# 声明要求的cmake最低版本
cmake_minimum_required(VERSION 2.8)

# 声明一个cmake工程
project(plotTrajectory)

include_directories("/usr/include/eigen3")

find_package(Pangolin REQUIRED)
include_directories(${Pangolin_INCLUDE_DIRS})

# 添加一个可执行程序
# 语法:add_executable(程序名 源代码文件)
add_executable(plotTrajectory plotTrajectory.cpp)

target_link_libraries(plotTrajectory ${Pangolin_LIBRARIES})

# 把工程调为Debug编译模式
set(CMAKE_BUILD_TYPE "Debug")
4.执行结果
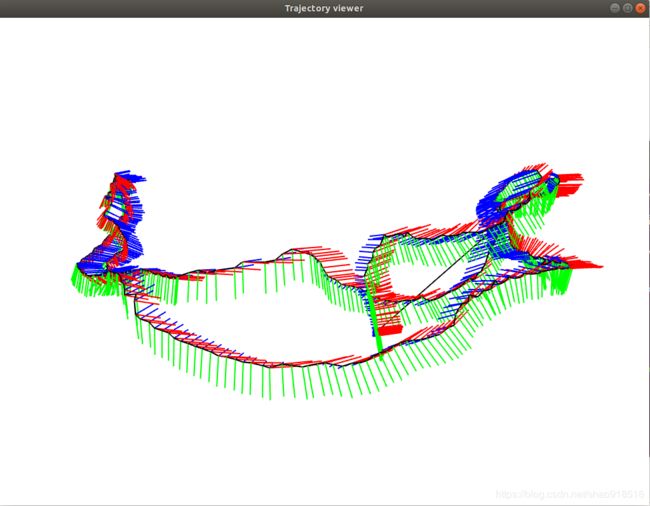
运行目标程序,在build目录下,执行:./plotTrajectory,运行结果截图为:

四、显示相机的位姿
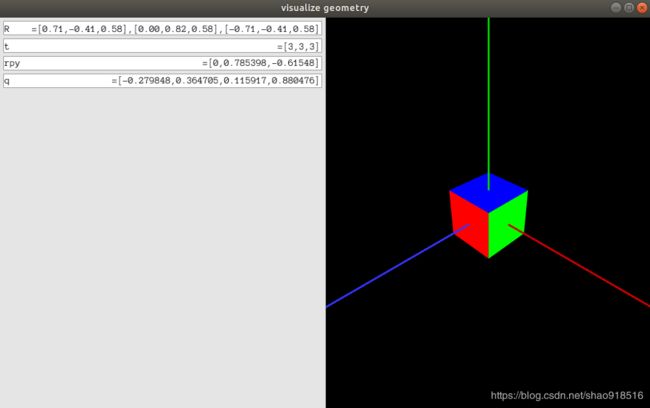
除了显示轨迹,我们也可以显示3D窗口中相机的位姿。在此程序中,我们以可视化的形式演示相机位姿的各种表达方式。当读者用鼠标操作相机时,左侧的方框会实时显示相机位姿对应的旋转矩阵、平移、欧拉角和四元数,可以看到数据是如何变化的。
程序在目录/slambook2/ch3/visualizeGeometry/,CMakeLists.txt文件内容为:
cmake_minimum_required( VERSION 2.8 )
project( visualizeGeometry )

set(CMAKE_CXX_FLAGS "-std=c++11")

# 添加Eigen头文件
include_directories( "/usr/include/eigen3" )

# 添加Pangolin依赖
find_package( Pangolin )
include_directories( ${Pangolin_INCLUDE_DIRS} )

add_executable( visualizeGeometry visualizeGeometry.cpp )
target_link_libraries( visualizeGeometry ${Pangolin_LIBRARIES} )
编译步骤如下:
simon@bert:~/slam/slambook2/ch3/visualizeGeometry$ mkdir build
simon@bert:~/slam/slambook2/ch3/visualizeGeometry$ cd build/
simon@bert:~/slam/slambook2/ch3/visualizeGeometry/build$ cmake ..
simon@bert:~/slam/slambook2/ch3/visualizeGeometry/build$ make
执行目标文件./visualizeGeometry,如下图所示:
 至此,整篇完结,有问题欢迎留言讨论。
附1:plotTrajectory.cpp程序代码:
#include附2:机器人坐标文件:trajectory.txt
附3:visualizeGeometry.cpp程序代码:
#include Ubuntu 1804安装 ↩︎
《cmake实践》百度网盘 ↩︎
cmake官方指导文档 ↩︎
linux 下vi与vim区别以及vim的使用 ↩︎
KDevelop使用笔记【中文教程】 ↩︎
Git Submodule使用完整教程 ↩︎