YOLO学习-1:win10(64位)+ python3.6 + TensorFlow + keras + yolov3测试实践
实验环境:win10(64位)、Python3.6(未安装anaconda版,用了pycharm)、TensorFlow(未安装gpu版)、keras、yolov3代码、yolov3权重文件
第一步:Python3.6安装后,安装pycharm,在pycharm中配置Python解释器。
第二步:安装TensorFlow前,先cmd进入Windows的console(win10的powershell),安装各个库文件
pip install numpy
pip install scipy
pip install Pillow
pip install matplotlib
再安装pip install tensorflow==1.8 -i https://pypi.tuna.tsinghua.edu.cn/simple/ 用国内镜像版本速度快一点。如果安装过程中报错缺什么库文件再补安装。(还有OpenCV python版)
安装后,powershell进入Python后 import TensorFlow 查看是否安装成功。
第三步: pip install keras==2.1.5 -i https://pypi.tuna.tsinghua.edu.cn/simple/
第四步:首先先从GitHub上面下载keras-yolo文件压缩包,并解压 https://github.com/qqwweee/keras-yolo3,假设该包放在D盘根目录,则解压后打开文件夹 目录为 D:\keras-yolo3-master\
第五步:下载yolov3_weights文件,https://pjreddie.com/media/files/yolov3.weights (官网作者训练好的模型权重文件?初学暂未去理清。)
第六步:将下载的yolov3_weights文件,放置在D:\keras-yolo3-master\ 目录下。
第七步:powershell下输入命令 cd D:\keras-yolo3-master,
之后输入命令: python convert.py yolov3.cfg yolov3.weights model_data/yolo.h5
第八步:如何运行程序?
(1) 尝试在pycharm中打开工程目录,运行 D:\keras-yolo3-master下的 yolo.py或yolo_video.py都没反应。
(2)在powershell中cd D:\keras-yolo3-master目录,python yolo.py D:\images\123.jpg 也没反应。
(3)原因是需要看到。https://github.com/qqwweee/keras-yolo3 中有操作说明,需要详细去看一下。
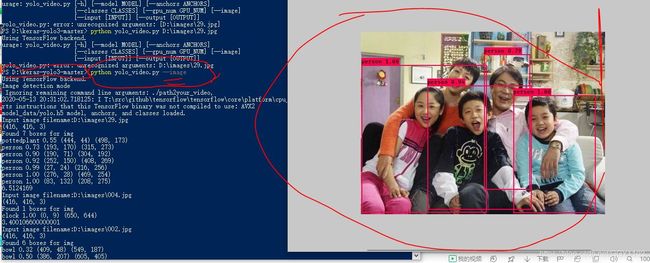
(4)所以正常的执行命令是在powershell下cd D:\keras-yolo3-master目录,python yolo_video.py --image 回车后提示输入图片或视频的目录地址。将准备的图片目录地址输入完回车即可看到结果。
第九步:如何执行短视频识别?
根据GitHub上的代码和文件说明。。在powershell上 执行 ,python yolo_video.py --input D:\images\123.mp4
就可以看到结果,由于CPU跑起来太慢,所以视频卡顿严重,感觉像是慢慢的一帧一帧的识别完 停顿很久再下一帧。
参考文献:
https://github.com/qqwweee/keras-yolo3
https://github.com/allanzelener/YAD2K
https://github.com/YunYang1994/tensorflow-yolov3
笔记本自带摄像头采集视频帧识别,参考:
https://blog.csdn.net/markwentian/article/details/100619605
https://blog.csdn.net/qq_45504119/article/details/105916699
https://blog.csdn.net/weixin_43590290/article/details/100736307?utm_medium=distribute.pc_relevant.none-task-blog-BlogCommendFromMachineLearnPai2-1.nonecase&depth_1-utm_source=distribute.pc_relevant.none-task-blog-BlogCommendFromMachineLearnPai2-1.nonecase


