d3d9 使用模板测试绘制出镜子特效
1.Direct3D 9 渲染流水线
Vertex Data:在顶点buffer 中存储的没有转换的模型顶点。
Primitive Data:通过index buffer 可以在顶点数据中索引得到包括点,直线,三角形和多边形 的图形几何原型。
Tessellation:
Vertex Processing: vertex buffer 中顶点的 Direct3D transformations
Geometry Processing:transfromed 顶点的裁剪(Clipping),背面消隐(back face culling), attribute evaluation, and 光栅化(rasterization)操作。
Textured Surface:通过IDirect3DTexture9 接口传入纹理坐标
Texture Sampler: 纹理
Pixel Processing: Pixel shader 中有关 修改顶点,纹理数据,产生输出像素颜色的 operations
Pix rendering:最后的渲染处理,配合alpha,深度(depth),或者模板检测,alpha 混合或者雾效等修改像素颜色数值。
implementation
下面用D3D 实现一个 模板检测的 镜子例子
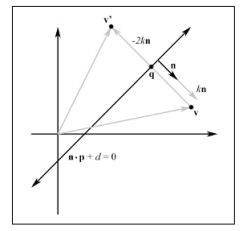
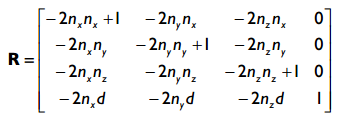
计算任意坐标点![]() 在平面
在平面![]() 的反射点
的反射点![]()
	//
	// Make walls have low specular reflectance - 20%.
	//

	WallMtrl.Specular = d3d::WHITE * 0.2f;

	//
	// Create the teapot.
	//

	D3DXCreateTeapot(Device, &Teapot, 0);

	//
	// Create and specify geometry.  For this sample we draw a floor
	// and a wall with a mirror on it.  We put the floor, wall, and
	// mirror geometry in one vertex buffer.
	//
    //   |----|----|----|
    //   |Wall|Mirr|Wall|
	//   |    | or |    |
    //   /--------------/
    //  /   Floor      /
	// /--------------/
	//
	Device->CreateVertexBuffer(
		24 * sizeof(Vertex),
		0, // usage
		Vertex::FVF,
		D3DPOOL_MANAGED,
		&VB,
		0);

	Vertex* v = 0;
	VB->Lock(0, 0, (void**)&v, 0);

	// floor
	v[0] = Vertex(-7.5f, 0.0f, -10.0f, 0.0f, 1.0f, 0.0f, 0.0f, 1.0f);
	v[1] = Vertex(-7.5f, 0.0f,   0.0f, 0.0f, 1.0f, 0.0f, 0.0f, 0.0f);
	v[2] = Vertex( 7.5f, 0.0f,   0.0f, 0.0f, 1.0f, 0.0f, 1.0f, 0.0f);

	v[3] = Vertex(-7.5f, 0.0f, -10.0f, 0.0f, 1.0f, 0.0f, 0.0f, 1.0f);
	v[4] = Vertex( 7.5f, 0.0f,   0.0f, 0.0f, 1.0f, 0.0f, 1.0f, 0.0f);
	v[5] = Vertex( 7.5f, 0.0f, -10.0f, 0.0f, 1.0f, 0.0f, 1.0f, 1.0f);

	// wall
	v[6]  = Vertex(-7.5f, 0.0f, 0.0f, 0.0f, 0.0f, -1.0f, 0.0f, 1.0f);
	v[7]  = Vertex(-7.5f, 5.0f, 0.0f, 0.0f, 0.0f, -1.0f, 0.0f, 0.0f);
	v[8]  = Vertex(-2.5f, 5.0f, 0.0f, 0.0f, 0.0f, -1.0f, 1.0f, 0.0f);

	v[9]  = Vertex(-7.5f, 0.0f, 0.0f, 0.0f, 0.0f, -1.0f, 0.0f, 1.0f);
	v[10] = Vertex(-2.5f, 5.0f, 0.0f, 0.0f, 0.0f, -1.0f, 1.0f, 0.0f);
	v[11] = Vertex(-2.5f, 0.0f, 0.0f, 0.0f, 0.0f, -1.0f, 1.0f, 1.0f);

	// Note: We leave gap in middle of walls for mirror

	v[12] = Vertex(2.5f, 0.0f, 0.0f, 0.0f, 0.0f, -1.0f, 0.0f, 1.0f);
	v[13] = Vertex(2.5f, 5.0f, 0.0f, 0.0f, 0.0f, -1.0f, 0.0f, 0.0f);
	v[14] = Vertex(7.5f, 5.0f, 0.0f, 0.0f, 0.0f, -1.0f, 1.0f, 0.0f);

	v[15] = Vertex(2.5f, 0.0f, 0.0f, 0.0f, 0.0f, -1.0f, 0.0f, 1.0f);
	v[16] = Vertex(7.5f, 5.0f, 0.0f, 0.0f, 0.0f, -1.0f, 1.0f, 0.0f);
	v[17] = Vertex(7.5f, 0.0f, 0.0f, 0.0f, 0.0f, -1.0f, 1.0f, 1.0f);

	// mirror
	v[18] = Vertex(-2.5f, 0.0f, 0.0f, 0.0f, 0.0f, -1.0f, 0.0f, 1.0f);
	v[19] = Vertex(-2.5f, 5.0f, 0.0f, 0.0f, 0.0f, -1.0f, 0.0f, 0.0f);
	v[20] = Vertex( 2.5f, 5.0f, 0.0f, 0.0f, 0.0f, -1.0f, 1.0f, 0.0f);

	v[21] = Vertex(-2.5f, 0.0f, 0.0f, 0.0f, 0.0f, -1.0f, 0.0f, 1.0f);
	v[22] = Vertex( 2.5f, 5.0f, 0.0f, 0.0f, 0.0f, -1.0f, 1.0f, 0.0f);
	v[23] = Vertex( 2.5f, 0.0f, 0.0f, 0.0f, 0.0f, -1.0f, 1.0f, 1.0f);

	VB->Unlock();

	//
	// Load Textures, set filters.
	//

	D3DXCreateTextureFromFile(Device, L"checker.jpg", &FloorTex);
	D3DXCreateTextureFromFile(Device, L"brick0.jpg", &WallTex);
	D3DXCreateTextureFromFile(Device, L"ice.bmp", &MirrorTex);

	Device->SetSamplerState(0, D3DSAMP_MAGFILTER, D3DTEXF_LINEAR);
	Device->SetSamplerState(0, D3DSAMP_MINFILTER, D3DTEXF_LINEAR);
	Device->SetSamplerState(0, D3DSAMP_MIPFILTER, D3DTEXF_LINEAR);

	//
	// Lights.
	//

	D3DXVECTOR3 lightDir(0.707f, -0.707f, 0.707f);
	D3DXCOLOR color(1.0f, 1.0f, 1.0f, 1.0f);
	D3DLIGHT9 light = d3d::InitDirectionalLight(&lightDir, &color);

	Device->SetLight(0, &light);
	Device->LightEnable(0, true);

	Device->SetRenderState(D3DRS_NORMALIZENORMALS, true);
	Device->SetRenderState(D3DRS_SPECULARENABLE, true);

	//
	// Set Camera.
	//

	D3DXVECTOR3    pos(-10.0f, 3.0f, -15.0f);
	D3DXVECTOR3 target(0.0, 0.0f, 0.0f);
	D3DXVECTOR3     up(0.0f, 1.0f, 0.0f);

	D3DXMATRIX V;
	D3DXMatrixLookAtLH(&V, &pos, &target, &up);

	Device->SetTransform(D3DTS_VIEW, &V);

	//
	// Set projection matrix.
	//
	D3DXMATRIX proj;
	D3DXMatrixPerspectiveFovLH(
			&proj,
			D3DX_PI / 4.0f, // 45 - degree
			(float)Width / (float)Height,
			1.0f,
			1000.0f);
	Device->SetTransform(D3DTS_PROJECTION, &proj);

	return true;
然后渲染出镜子中的茶壶,分为一下几个步骤
1. 对模板buffer清空,设为0
2. 把镜子图元放入 模板buffer,并且设置测试条件为总是成功,并成功后替换值为1。 mask 表示测试 位 ffffffff, 如果仅仅测试末尾,则 mask = 0x01;
3. 最后渲染反射的茶壶。测试条件为仅当模板buffer中的值为1,这样茶壶就只能渲染到镜子中。
4. reset render state
// Draw Mirror quad to stencil buffer ONLY.  In this way
	// only the stencil bits that correspond to the mirror will
	// be on.  Therefore, the reflected teapot can only be rendered
	// where the stencil bits are turned on, and thus on the mirror
	// only.
	//

    Device->SetRenderState(D3DRS_STENCILENABLE,    true);
    Device->SetRenderState(D3DRS_STENCILFUNC,      D3DCMP_ALWAYS);
    Device->SetRenderState(D3DRS_STENCILREF,       0x1);
    Device->SetRenderState(D3DRS_STENCILMASK,      0xffffffff);
    Device->SetRenderState(D3DRS_STENCILWRITEMASK, 0xffffffff);
    Device->SetRenderState(D3DRS_STENCILZFAIL,     D3DSTENCILOP_KEEP);
    Device->SetRenderState(D3DRS_STENCILFAIL,      D3DSTENCILOP_KEEP);
    Device->SetRenderState(D3DRS_STENCILPASS,      D3DSTENCILOP_REPLACE);

	// disable writes to the depth and back buffers
    Device->SetRenderState(D3DRS_ZWRITEENABLE, false);
    Device->SetRenderState(D3DRS_ALPHABLENDENABLE, true);
    Device->SetRenderState(D3DRS_SRCBLEND,  D3DBLEND_ZERO);
    Device->SetRenderState(D3DRS_DESTBLEND, D3DBLEND_ONE);

    // draw the mirror to the stencil buffer
	Device->SetStreamSource(0, VB, 0, sizeof(Vertex));
	Device->SetFVF(Vertex::FVF);
	Device->SetMaterial(&MirrorMtrl);
	Device->SetTexture(0, MirrorTex);
	D3DXMATRIX I;
	D3DXMatrixIdentity(&I);
	Device->SetTransform(D3DTS_WORLD, &I);
	Device->DrawPrimitive(D3DPT_TRIANGLELIST, 18, 2);

	// re-enable depth writes
	Device->SetRenderState( D3DRS_ZWRITEENABLE, true );

	// only draw reflected teapot to the pixels where the mirror
	// was drawn to.
	Device->SetRenderState(D3DRS_STENCILFUNC,  D3DCMP_EQUAL);
    Device->SetRenderState(D3DRS_STENCILPASS,  D3DSTENCILOP_KEEP);

	// position reflection
	D3DXMATRIX W, T, R;
	D3DXPLANE plane(0.0f, 0.0f, 1.0f, 0.0f); // xy plane
	D3DXMatrixReflect(&R, &plane);

	D3DXMatrixTranslation(&T,
		TeapotPosition.x,
		TeapotPosition.y,
		TeapotPosition.z);

	W = T * R;

	// clear depth buffer and blend the reflected teapot with the mirror
	Device->Clear(0, 0, D3DCLEAR_ZBUFFER, 0, 1.0f, 0);
	Device->SetRenderState(D3DRS_SRCBLEND,  D3DBLEND_DESTCOLOR);
    Device->SetRenderState(D3DRS_DESTBLEND, D3DBLEND_ZERO);

	// Finally, draw the reflected teapot
	Device->SetTransform(D3DTS_WORLD, &W);
	Device->SetMaterial(&TeapotMtrl);
	Device->SetTexture(0, 0);

	Device->SetRenderState(D3DRS_CULLMODE, D3DCULL_CW);
	Teapot->DrawSubset(0);

	// Restore render states.
	Device->SetRenderState(D3DRS_ALPHABLENDENABLE, false);
	Device->SetRenderState( D3DRS_STENCILENABLE, false);
	Device->SetRenderState(D3DRS_CULLMODE, D3DCULL_CCW);
Refference:
msdn.microsoft.com/en-us/library/windows/desktop/bb219679(v=vs.85).aspx
Introduce to 3D Game Programming with Directx9.0


