(JavaWeb)S5会话技术、JSP
会话技术
概念
- 会话:一次会话包含多次请求和响应
- 一次会话:浏览器第一次给服务器资源发送请求,会话建立,直到有一方断开为止
- 功能:在一次会话范围内的多次请求间,共享数据。
- 方式
- 客户端会话技术:Cookie
- 服务端会话技术:Session
Cookie:
- 概念客户端会话技术:将数据保存到客户端
快速入门
使用步骤
- 创建Cookie对象,绑定数据
new Cookie(String name, String value) - 发送Cookie对象
response.addCookie(Cookie cookie) - 获取数据,拿到数据
Cookie[] request.getCookies()
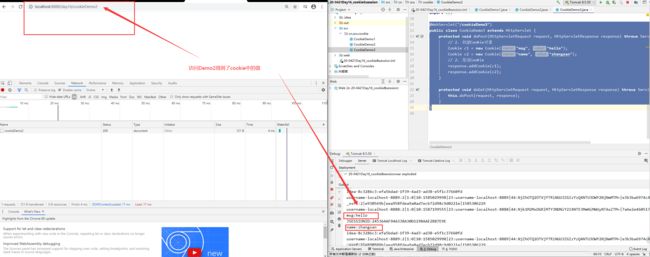
@WebServlet("/cookieDemo1")
public class CookieDemo1 extends HttpServlet {
    protected void doPost(HttpServletRequest request, HttpServletResponse response) throws ServletException, IOException {
        // 1. 创建Cookie对象
        Cookie c = new Cookie("msg", "hello");
        // 2. 发送Cookie
        response.addCookie(c);
    }

    protected void doGet(HttpServletRequest request, HttpServletResponse response) throws ServletException, IOException {
        this.doPost(request, response);
    }
}
@WebServlet("/cookieDemo2")
public class CookieDemo2 extends HttpServlet {
    protected void doPost(HttpServletRequest request, HttpServletResponse response) throws ServletException, IOException {
//        // 1. 创建Cookie对象
//        Cookie c = new Cookie("msg", "hello");
//        // 2. 发送Cookie
//        response.addCookie(c);
        //3. 获取Cookies
        Cookie[] cs = request.getCookies();
        if(cs != null){
            for (Cookie c: cs) {
                String name = c.getName();
                String value = c.getValue();
                System.out.println(name+":"+value);
            }
        }
    }

    protected void doGet(HttpServletRequest request, HttpServletResponse response) throws ServletException, IOException {
        this.doPost(request, response);
    }
}
先访问demo1发送数据,在同个页面下在访问demo2

使用原理
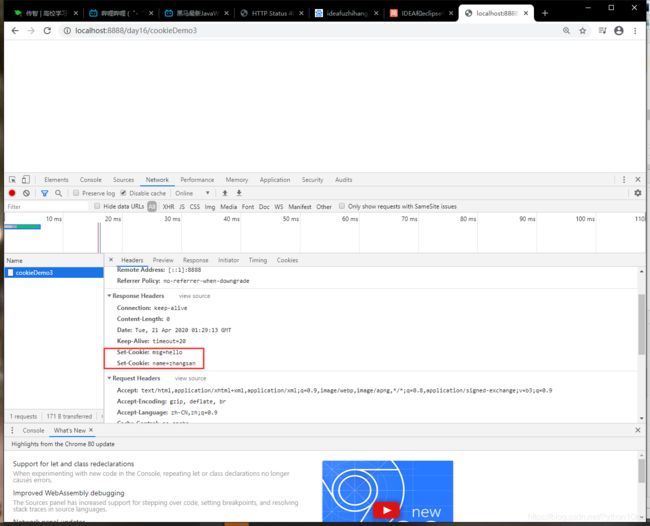
- 基于响应头set-cookie和请求头cookie实现

cookie细节
一次发送多个cookie
@WebServlet("/cookieDemo3")
public class CookieDemo3 extends HttpServlet {
    protected void doPost(HttpServletRequest request, HttpServletResponse response) throws ServletException, IOException {
        // 1. 创建Cookie对象
        Cookie c1 = new Cookie("msg", "hello");
        Cookie c2 = new Cookie("name", "zhangsan");
        // 2. 发送Cookie
        response.addCookie(c1);
        response.addCookie(c2);
    }

    protected void doGet(HttpServletRequest request, HttpServletResponse response) throws ServletException, IOException {
        this.doPost(request, response);
    }
}
cookie在浏览器中保存时间
-
默认情况下,浏览器关闭后,Cookie数据被销毁
-
设置Cookie生命周期,持久化存储
setMaxAge(int Seconds)取值情况: 1. 正数:将Cookie数据写入硬盘文件,持久化存储。Seconds是Cookie的存活时间 2. 负数:默认值, 3. 0:删除Cookie信息
cookie存中文
- 在tomcat8之前Cookie不能直接存中一般使用URL编码
- 在tomcat8中支持中文,不支持特殊字符如空格,建议使用URL编码存储,URL解码解析
cookie获取的范围
- 获取范围:在一个服务器部署多个项目,在这些项目中默认Cookie不能共享。
setPath(String path)设置Cookie获取范围,默认当前项目的虚拟目录。- 若要共享可将path设置为“/”根目录
- 不同的tomcat服务器间cookie共享
setDomain(String path):如果设置一级域名相同,name多个服务器之间cookie可以共享- 如
setDomain(".baidu.com"),则new.baidu.com与tieba.baidu.com就可数据共享
cookie特点&作用
- cookie存储数据在客户端浏览器
- 浏览器对于单个cookie的大小有限制(4kb),以及,同一个域名下的Cookie数量也有限制(20以内)
作用:
- Cookie一般存储少量不太敏感的数据
- 在不登录情况下,完成服务器对客户端的身份识别
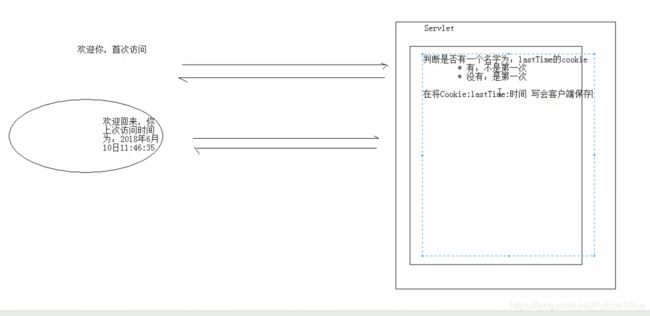
案例–记住上次访问时间
-
案例需求:
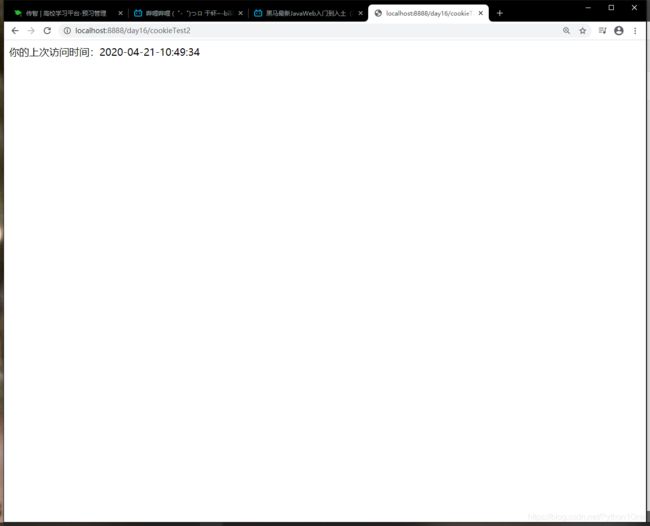
1. 访问一个Servlet,如果是第一次访问,则提示:您好,欢迎您首次访问。 2. 如果不是第一次访问,则提示:欢迎回来,您上次访问时间为:显示时间字符串 -
分析:采用Cookie完成,
 1. 判断服务器中的Servlet是否有lastime的Cookie
 	1. 有:不是第一次访问
 		1. 相应数据:欢迎回来,您上次的访问时间:xxxx
 		2. 写回Cookie:lasttiom=xxxx
 	2. 没有:第一次访问
 		1. 相应数据:您好,欢迎第一次访问
 		2. 写回Cookie:lastTime=xxxx
实现
@WebServlet("/cookieTest")
public class CookieTest extends HttpServlet {
protected void doPost(HttpServletRequest request, HttpServletResponse response) throws ServletException, IOException {
// 设置响应消息体的编码
response.setContentType("text/html;charset=utf-8");
//1. 获取所有Cookie
Cookie[] cookies = request.getCookies();
//2. 白遍历cookies数据
boolean flag = false;
if(cookies != null && cookies.length > 0){
for (Cookie cookie : cookies) {
//3. 获取cookie的名称
String name = cookie.getName();
if("lastTime".equals(name)){
// 有cookie不是第一次访问
// 设置cookie 的value
flag=true;
// 相应数据
// 获取cookie的value值
String value = cookie.getValue();
System.out.println("解码前:"+ value);
// URL解码:
value = URLDecoder.decode(value,"utf-8");
System.out.println("解码后:"+ value);
response.getWriter().write("欢迎回来,您上次的访问时间:"
+ value+ ""
);
// 获取当前时间的字符串,重新设置cookie值,重新发送cookie
Date date = new Date();
SimpleDateFormat sdf = new SimpleDateFormat("yyyy年MM月dd日 HH:mm:ss");
String str_date = sdf.format(date);
System.out.println("编码前:"+ str_date);
//URL编码
str_date = URLEncoder.encode(str_date,"utf-8");
System.out.println("编码后:"+ str_date);
cookie.setValue(str_date);
// 设置cookie存活时间
cookie.setMaxAge(60*60*24*30);
response.addCookie(cookie);
break;
}
}
}
if(cookies == null || cookies.length == 0 || flag == false){
// 第一次访问
Date date = new Date();
SimpleDateFormat sdf = new SimpleDateFormat("yyyy年MM月dd日 HH:mm:ss");
String str_date = sdf.format(date);
System.out.println("编码前:"+ str_date);
//URL编码
str_date = URLEncoder.encode(str_date,"utf-8");
System.out.println("编码后:"+ str_date);
Cookie cookie = new Cookie("lastTime",str_date);
cookie.setValue(str_date);
// 设置cookie存活时间
cookie.setMaxAge(60*60*24*30);
response.addCookie(cookie);
response.getWriter().write("您好,欢迎第一次访问"
);
}
}
protected void doGet(HttpServletRequest request, HttpServletResponse response) throws ServletException, IOException {
this.doPost(request, response);
}
}
JSP
概念:
- Java Server Page:java服务端页面
- 一个特殊的页面,既可以定义html标签,又可以定义java代码
- 用于简化书写
原理

- jsp:本质上是一个Servlet
JSP脚本
- JSP定义Java的方式
<% 代码 %>:定义的java代码,在service方法中,service方法中可以定义什么,这个脚本就可以定义什么<%! 代码 %>:定义的java代码,在JSP转换后的成员变量位置<%= 代码 %>:定义的java代码,会输出在页面上。输出语句可以定义什么,这个脚本就可以定义什么

JSP的内置对象
- 在jsp中不需要创建就可以使用的对象

- jsp一共有9个内置对象
3个内置对象
-
request
-
response
-
out:字符输出流对象。可以将数据输出到页面上,和
response.getWrite()类似。* 区别:response.getWrite()不管在什么位置都先于out * 原因:在tomcat费武器真正给客户端做出响应之前,会先找response缓冲区数据,之后再找out缓冲区
案例–改造Cookie案例
<body>
    <%
        //1. 获取所有Cookie
        Cookie[] cookies = request.getCookies();
        //2. 白遍历cookies数据
        boolean flag = false;
        if(cookies != null && cookies.length > 0){
            for (Cookie cookie : cookies) {
                //3. 获取cookie的名称
                String name = cookie.getName();
                if("lastTime".equals(name)){
                    // 有cookie不是第一次访问
                    // 设置cookie 的value

                    flag=true;
                    // 相应数据
                    // 获取cookie的value值
                    String value = cookie.getValue();
                    System.out.println("解码前:"+ value);
                    // URL解码:
                    value = URLDecoder.decode(value,"utf-8");
                    System.out.println("解码后:"+ value);
%>
                    <h1>欢迎回来,您上次的访问时间:<%=value%><h1>
                        <input>

  <%                  // 获取当前时间的字符串,重新设置cookie值,重新发送cookie
                    Date date = new Date();
                    SimpleDateFormat sdf = new SimpleDateFormat("yyyy年MM月dd日 HH:mm:ss");
                    String str_date = sdf.format(date);
                    System.out.println("编码前:"+ str_date);
                    //URL编码
                    str_date = URLEncoder.encode(str_date,"utf-8");
                    System.out.println("编码后:"+ str_date);
                    cookie.setValue(str_date);
                    // 设置cookie存活时间
                    cookie.setMaxAge(60*60*24*30);
                    response.addCookie(cookie);
                    break;
                }
            }
        }
        if(cookies == null || cookies.length == 0 || flag == false){
            // 第一次访问
            Date date = new Date();
            SimpleDateFormat sdf = new SimpleDateFormat("yyyy年MM月dd日 HH:mm:ss");
            String str_date = sdf.format(date);
            System.out.println("编码前:"+ str_date);
            //URL编码
            str_date = URLEncoder.encode(str_date,"utf-8");
            System.out.println("编码后:"+ str_date);
            Cookie cookie = new Cookie("lastTime",str_date);
            cookie.setValue(str_date);
            // 设置cookie存活时间
            cookie.setMaxAge(60*60*24*30);
            response.addCookie(cookie);
    %>

        <h1>欢迎首次访问</h1>


     <%


        }

    %>

</body>
Session
- 概念:服务器端会话技术,在一次会话的多次请求间共享数据,将数据保存在服务器端的对象中。HTTPSession
快速入门
- 获取HTTPSession对象
HttpSession s = request.getSession();
- 使用HTTPSession对象
Object getAttribute(String name)
void setAttribute(String name, Object value)
 void removeAttribute(String name)
@WebServlet("/sessionDemo1")
public class SessionDemo1 extends HttpServlet {
    protected void doPost(HttpServletRequest request, HttpServletResponse response) throws ServletException, IOException {
        //使用sessio共享数据
        //1. 获取session
        HttpSession s = request.getSession();
        //2. 存储数据
        s.setAttribute("msg","hello Session");
    }

    protected void doGet(HttpServletRequest request, HttpServletResponse response) throws ServletException, IOException {
        this.doPost(request, response);
    }
}
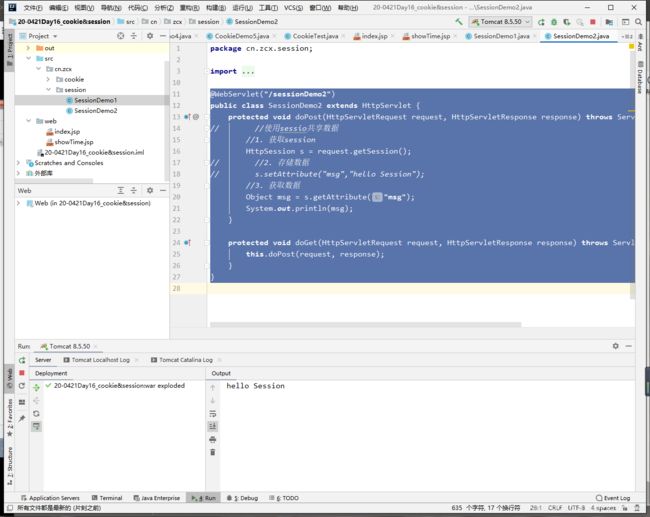
@WebServlet("/sessionDemo2")
public class SessionDemo2 extends HttpServlet {
    protected void doPost(HttpServletRequest request, HttpServletResponse response) throws ServletException, IOException {
//        //使用sessio共享数据
        //1. 获取session
        HttpSession s = request.getSession();
//        //2. 存储数据
//        s.setAttribute("msg","hello Session");
        //3. 获取数据
        Object msg = s.getAttribute("msg");
        System.out.println(msg);
    }

    protected void doGet(HttpServletRequest request, HttpServletResponse response) throws ServletException, IOException {
        this.doPost(request, response);
    }
}
原理

细节
-
当客户端关闭后,服务端不关闭,两次获取的session是不是同一个?
 * 默认情况下不是同一个
 * 可通过代码设置:创建Cookie键为`JSESSIONID`值为`session.getId()`设置Cookie的最大存活时间来持久化Session
@WebServlet("/sessionDemo3")
public class SessionDemo3 extends HttpServlet {
    protected void doPost(HttpServletRequest request, HttpServletResponse response) throws ServletException, IOException {
        //使用sessio共享数据
        //1. 获取session
        HttpSession s = request.getSession();
        System.out.println(s);
        // 通过cookie的存活时间设置JSESSIONID的Id为固定
        Cookie c = new Cookie("JSESSIONID",s.getId());
        c.setMaxAge(60*60);
        response.addCookie(c);
    }
    protected void doGet(HttpServletRequest request, HttpServletResponse response) throws ServletException, IOException {
        this.doPost(request, response);
    }
}
-
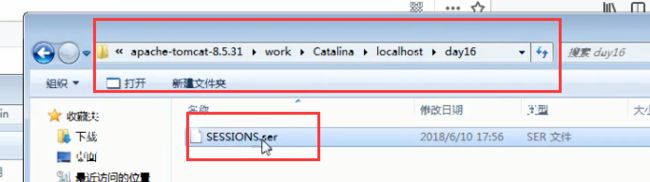
客户端不关闭,服务器关闭后,两次获取的session是否相同
 * 对象不是同一个,但是要确保数据不丢失
 * session的钝化:在服务器关闭之前,将session对象系列化到硬盘上
 * session的活化:在服务器启动后,将硬盘上的数据转化为内存中的session对象
tomcat自动钝化活化,但是idea只会钝化,不会活化
钝化目录
-
session什么时候被销毁?
 1. 服务器关闭
 2. session对象调用invalidate()
 3. session默认失效时间30分钟


session的特点
- session用来存储一次会话的多次请求,存在服务器端
- session可以存储任意类型任意大小的数据
- session与Cookie的区别
1. session存储在服务器,Cookie存在客户端
2. session没有大小限制
3. session数据安全,Cookie相对不安全
案例–验证码
- 案例需求:
- 访问带有验证码的登录页面login.jsp
- 用户输入用户名,密码以及验证码。
- 如果用户名和密码输入有误,跳转登录页面,提示:用户名或密码错误
- 如果验证码输入有误,跳转登录页面,提示:验证码错误
- 如果全部输入正确,则跳转到主页success.jsp,显示:用户名,欢迎您
- 分析

编写
- login.jsp
<%@ page contentType="text/html;charset=UTF-8" language="java" %>
<html>
<head>
    <title>登录</title>
    <script>
        window.onload = function (ev) {
            document.getElementById("p1").onclick = function (ev1) {
                this.src="/day16/yzm?time="+ new Date().getTime();
            }
        }
    </script>
    <style>
        div{
            color: red;
        }
    </style>
</head>
<body>
    <form action="/day16/loginServlet" >
        <table>
            <tr>
                <td>用户名</td>
                <td><input type="text" name="username"></td>
            </tr>
            <tr>
                <td>密码</td>
                <td><input type="password" name="password"></td>
            </tr>
            <tr>
                <td>验证码</td>
                <td><input type="text" name="checkCode"></td>
            </tr>
            <tr>
                <td colspan="2"><img src="/day16/yzm" click="on1" id="p1"></td>
            </tr>
            <tr>
                <td colspan="2"><input type="submit" value="登录" name="username"></td>
            </tr>
        </table>
    </form>
    <div><%=request.getAttribute("cc_error") == null?" ":request.getAttribute("cc_error") %></div>
    <div><%=request.getAttribute("login_error")==null?"":request.getAttribute("login_error")%></div>
</body>
</html>
- loginServlet.java
@WebServlet("/loginServlet")
public class LoginServlet extends HttpServlet {
    protected void doPost(HttpServletRequest request, HttpServletResponse response) throws ServletException, IOException {
        // 1. 设置request编码
        request.setCharacterEncoding("utf-8");
        // 2. 获取参数
        String username = request.getParameter("username");
        String password = request.getParameter("password");
        String checkCode = request.getParameter("checkCode");
        //3 . 先获取生成的验证码
        HttpSession session = request.getSession();
        String checkCode_session = (String) session.getAttribute("checkCode_session");
        // 删除session存储的验证码
        session.removeAttribute("checkCode_session");
        // 4. 判断验证码
        if(checkCode_session != null && checkCode_session.equalsIgnoreCase(checkCode)){
            // 忽略大小写equalsIgnoreCase()
            // 判断用户名和密码是否一样
            if("zhangsan".equals(username) && "1123".equals(password)){
                // 应该是查询数据库的
                //登陆成功
                //存储用户信息
                session.setAttribute("user",username);
                //从定向到success.jsp
                response.sendRedirect(request.getContextPath()+"/success.jsp");
            }else {
                // 存储提示数据到reque
                request.setAttribute("login_error","用户名或密码错误");
                // 转发到登录页
                request.getRequestDispatcher("/login.jsp").forward(request,response);
            }
        }else{
            // 验证码不一致
            // 存储提示数据到reque
            request.setAttribute("cc_error","验证码错误");
            // 转发到登录页
            request.getRequestDispatcher("/login.jsp").forward(request,response);
        }


    }

    protected void doGet(HttpServletRequest request, HttpServletResponse response) throws ServletException, IOException {
        this.doPost(request, response);
    }
}
- 验证码YanZhengMa.java
@WebServlet("/yzm")
public class YanZhengMaServlet extends HttpServlet {
    protected void doPost(HttpServletRequest request, HttpServletResponse response) throws ServletException, IOException {
        int width = 100;
        int height = 50;
        // 1. 创建对象,在内存中图片
        BufferedImage image = new BufferedImage(width,height,BufferedImage.TYPE_INT_RGB);
        // 2. 美化图片
        // 2.1 填充背景色
        Graphics g = image.getGraphics();//画笔对象
        g.setColor(Color.pink);// 设置画笔颜色
        g.fillRect(0,0,width,height);
        // 2.2 画边框
        g.setColor(Color.BLUE);
        g.drawRect(0,0,width-1,height-1);

        String str = "ABCDEFGHIJKLMNOPQRSTUVWXYZabcdefghijklmnopqrsduvwxyz1234567890";
        // 创建随机脚标
        Random ran = new Random();

        StringBuilder sb = new StringBuilder();

        for (int i = 1; i < 5; i++) {
            int index = ran.nextInt(str.length());
            // 获取字符
            char ch = str.charAt(index);// 随机字符
            sb.append(ch);


            // 2.3 写验证码
            g.drawString(ch+"" ,width/5*i,height/2);
        }
        String checkCode_session = sb.toString();
        //将验证码存入session
        request.getSession().setAttribute("checkCode_session",checkCode_session);
        // 2.4 画干扰线
        g.setColor(Color.GREEN);
        // 随机生成坐标点
        int x1 = ran.nextInt(width);
        int x2 = ran.nextInt(width);
        int y1 = ran.nextInt(height);
        int y2 = ran.nextInt(height);
        for (int i = 0; i < 10; i++) {
            int x11 = ran.nextInt(width);
            int x22 = ran.nextInt(width);
            int y11 = ran.nextInt(height);
            int y22 = ran.nextInt(height);
            g.drawLine(x11,y11,x22,y22);
        }
        // 3. 将图片输出到页面
        ImageIO.write(image,"jpg",response.getOutputStream());
    }
    protected void doGet(HttpServletRequest request, HttpServletResponse response) throws ServletException, IOException {
        this.doPost(request, response);
    }
}
- success.jsp
<%@ page contentType="text/html;charset=UTF-8" language="java" %>
<html>
<head>
    <title>登陆成功</title>
</head>
<body>
    <h1><%=request.getSession().getAttribute("user")%>,欢迎您</h1>

</body>
</html>