glTexSubImage2D的使用详解
一、函数介绍
void glTexSubImage2D(GLenum target,
GLint level,
GLint xoffset,
GLint yoffset,
GLsizei width,
GLsizei height,
GLenum format,
GLenum type,
const GLvoid * data);
参数
target
指定活动纹理单元的目标纹理。 必须是GL_TEXTURE_2D,GL_TEXTURE_CUBE_MAP_POSITIVE_X,GL_TEXTURE_CUBE_MAP_NEGATIVE_X,GL_TEXTURE_CUBE_MAP_POSITIVE_Y,GL_TEXTURE_CUBE_MAP_NEGATIVE_Y,GL_TEXTURE_CUBE_MAP_POSITIVE_Z或GL_TEXTURE_CUBE_MAP_NEGATIVE_Z。
level
指定详细级别编号。 0级是基本图像级别。 级别n是第n个mipmap缩小图像。
xoffset
指定纹理数组中x方向的像素偏移量,x方向是指纹理坐标,即左下角为(0,0)。
yoffset
指定纹理数组中y方向的纹素偏移,y方向是指纹理坐标,即左下角为(0,0)。
width
指定纹理子图像的像素宽度。
height
指定纹理子图像的像素高度。
format
指定像素数据的格式。 接受以下符号值:GL_ALPHA,GL_RGB,GL_RGBA,GL_LUMINANCE和GL_LUMINANCE_ALPHA。
type
指定像素数据的数据类型。 接受以下符号值:GL_UNSIGNED_BYTE,GL_UNSIGNED_SHORT_5_6_5,GL_UNSIGNED_SHORT_4_4_4_4和GL_UNSIGNED_SHORT_5_5_5_1。
data
指定指向内存中图像数据的指针
注意!!!
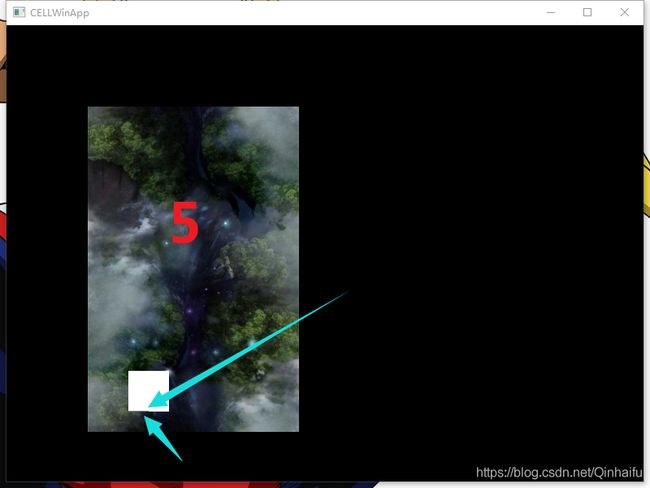
因为纹理坐标的(0,0)点是左下角,所以我们修改纹理数据的时候是从左下角开始绘制的。
顺序先沿着X轴从左至右,再沿着Y轴从下至上,即一行一行像素的绘制。
示例代码如下:
        virtual unsigned    loadTexture(const char* fileName)
        {
            unsigned    textureId   =   0;
            //1 获取图片格式
            FREE_IMAGE_FORMAT fifmt = FreeImage_GetFileType(fileName, 0);

            //2 加载图片
            FIBITMAP    *dib = FreeImage_Load(fifmt, fileName,0);

            //3 转化为rgb 24色
            dib     =   FreeImage_ConvertTo24Bits(dib);

            //4 获取数据指针
            BYTE    *pixels =   (BYTE*)FreeImage_GetBits(dib);

            int     width   =   FreeImage_GetWidth(dib);
            int     height  =   FreeImage_GetHeight(dib);

			//windows是BGR模式
			for (int i =0;i
图片修改结果如下:
二、在freetype中应用的时候要注意了!!!
代码如下
int _yStart = 0;
int _xStart = 0;
	char* readFile(const char* fileName, unsigned& length)
	{
		FILE* pFile = fopen(fileName, "rb");
		if (pFile)
		{
			fseek(pFile, 0, SEEK_END);
			length = ftell(pFile);
			fseek(pFile, 0, SEEK_SET);
			char*buffer = new char[length + 1];
			fread(buffer, 1, length, pFile);
			buffer[length] = 0;
			fclose(pFile);
			return buffer;
		}
		else
		{
			char buffer[1024];
			sprintf_s(buffer, "read %s failed", fileName);
			assert(pFile != 0 && buffer);
		}
		return 0;
	}
	void buildSystemFont(const char* font,int fontSize)
	{
		_uiProgram.initialize();

		unsigned length = 0;
		_fontBuffer = readFile(font, length);

		/**
		*   保存字体的大小
		*/
		_fontSize = fontSize;
		/**
		*   已经创建了字体则销毁
		*   支持多次调用
		*/
		if (_face)
		{
			FT_Done_Face(FT_Face(_face));
			_xStart = 0;
			_yStart = 0;
			memset(_character, 0, sizeof(_character));
		}
		/**
		*   销毁字体
		*/
		if (_sysFontTexture != -1)
		{
			glDeleteTextures(1, &_sysFontTexture);
		}
		glGenTextures(1, &_sysFontTexture);
		/**
		*   使用这个纹理id,或者叫绑定(关联)
		*/
		glBindTexture(GL_TEXTURE_2D, _sysFontTexture);
		/**
		*   指定纹理的放大,缩小滤波,使用线性方式,即当图片放大的时候插值方式
		*/
		glTexParameteri(GL_TEXTURE_2D, GL_TEXTURE_MIN_FILTER, GL_LINEAR);
		glTexParameteri(GL_TEXTURE_2D, GL_TEXTURE_MAG_FILTER, GL_LINEAR);
		glTexImage2D(
			GL_TEXTURE_2D,
			0,
			GL_ALPHA,
			_textureWidth,
			_textureHeight,
			0,
			GL_ALPHA,
			GL_UNSIGNED_BYTE,
			0
			);

		FT_Error error = FT_New_Memory_Face((FT_Library)_library,(const FT_Byte*)_fontBuffer,length,0,&(FT_Face)_face);
		if (error != 0)
		{
			return;
		}
		FT_Face ftFace = (FT_Face)_face;
		FT_Select_Charmap(ftFace, FT_ENCODING_UNICODE);
		FT_F26Dot6 ftSize = (FT_F26Dot6)(fontSize * (1 << 6));

		FT_Set_Char_Size((FT_Face)_face, ftSize, 0, 72, 72);

		assert(_face != 0);

	}

Character getCharacter(wchar_t ch)
	{
		if (_character[ch].x0 == 0 &&
			_character[ch].x0 == 0 &&
			_character[ch].x1 == 0 &&
			_character[ch].y1 == 0
			)
		{
			glPixelStorei(GL_UNPACK_ALIGNMENT, 1);

			if (_xStart + max(_fontPixelX, _fontSize) > _textureWidth)
			{
				/**
				*   写满一行,从新开始
				*/
				_xStart = 0;
				/**
				*   y开始位置要增加
				*/
				_yStart += max(_fontPixelY, _fontSize);
			}
			FT_Load_Glyph(_face, FT_Get_Char_Index(_face, ch), FT_LOAD_DEFAULT);
			FT_Glyph glyph;
			FT_Get_Glyph(FT_Face(_face)->glyph, &glyph);
			/**
			*   根据字体的大小决定是否使用反锯齿绘制模式
			*   当字体比较小的是说建议使用ft_render_mode_mono
			*   当字体比较大的情况下12以上,建议使用ft_render_mode_normal模式
			*/
			if (!(ch >= L'0' && ch <= L'9'))
			{
				FT_Glyph_To_Bitmap(&glyph, ft_render_mode_normal, 0, 1);
			}
			else
			{
				FT_Glyph_To_Bitmap(&glyph, ft_render_mode_mono, 0, 1);
			}
			FT_BitmapGlyph bitmap_glyph = (FT_BitmapGlyph)glyph;
			FT_Bitmap& bitmap = bitmap_glyph->bitmap;
			FT_Bitmap ftBitmap;
			FT_Bitmap_New(&ftBitmap);

			if (bitmap.pixel_mode == FT_PIXEL_MODE_MONO)
			{
				if (FT_Bitmap_Convert((FT_Library)_library, &bitmap, &ftBitmap, 1) == 0)
				{
					/**
					*   Go through the bitmap and convert all of the nonzero values to 0xFF (white).
					*/
					for (unsigned char* p = ftBitmap.buffer, *endP = p + ftBitmap.width * ftBitmap.rows; p != endP; ++p)
						*p ^= -*p ^ *p;
					bitmap = ftBitmap;
				}
			}
			/**
			*   如果没有数据,则不写,直接过去
			*/
			if (bitmap.width == 0 || bitmap.rows == 0)
			{

				char    mem[1024 * 32];
				memset(mem, 0, sizeof(mem));

				_character[ch].x0 = _xStart;
				_character[ch].y0 = _yStart;
				_character[ch].x1 = _xStart + _fontSize / 2;
				_character[ch].y1 = _yStart + _fontSize - 1;
				_character[ch].offsetY = _fontSize - 1;
				_character[ch].offsetX = 0;

				glBindTexture(GL_TEXTURE_2D, _sysFontTexture);

				glTexSubImage2D(
					GL_TEXTURE_2D,
					0,
					_xStart,
					_yStart,
					_fontSize / 2,
					_fontSize,
					GL_ALPHA,
					GL_UNSIGNED_BYTE,
					mem
				);
				_xStart += _fontSize / 2;

			}
			else
			{
				glBindTexture(GL_TEXTURE_2D, _sysFontTexture);

				_character[ch].x0 = _xStart;
				_character[ch].y0 = _yStart;
				_character[ch].x1 = _xStart + bitmap.width;
				_character[ch].y1 = _yStart + bitmap.rows;

				_character[ch].offsetY = bitmap_glyph->top;
				_character[ch].offsetX = bitmap_glyph->left;

				glPixelStorei(GL_UNPACK_ALIGNMENT, 1);
				glTexSubImage2D(
					GL_TEXTURE_2D,
					0,
					_xStart,
					_yStart,
					max(1, bitmap.width),
					max(1, bitmap.rows),
					GL_ALPHA,
					GL_UNSIGNED_BYTE,
					bitmap.buffer
				);
				_xStart += (bitmap.width + 1);
				_fontPixelY = max(_fontPixelY, bitmap.rows);
				_fontPixelX = max(_fontPixelX, bitmap.width);
			}

			FT_Bitmap_Done((FT_Library)_library, &ftBitmap);
		}
		return  _character[ch];
	}
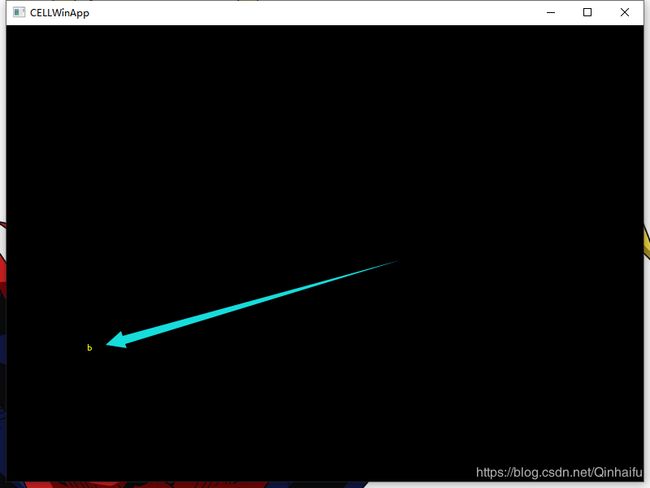
主要的内容在getCharacter函数,将字库里的数据,通过glTexSubImage2D贴到我们自己的纹理上。
但由于glTexSubImage2D绘制的特性(从下往上),所以我们的字是倒过来的。
我们再使用该纹理写字的时候务必注意倒过来

