中正平和的机器人学笔记——3.几个MATLAB实例

0. 轨迹

学机器人学前最想知道的,就是如何把机器人末端执行器平滑地从A点移动到B点,也许不太准确,应当说从位姿A移动到位姿B。

0.1 关节空间运动

考虑末端执行器在以下两个笛卡尔位姿之间移动
下面两种语法都可以表示(x,y,z,θ)的位姿

mdl_puma560  %载入提供的puma560机械臂模型
T1 = transl(0.4, 0.2, 0) * trotx(pi);
%T1 = SE3(0.4, 0.2, 0) * SE3.Rx(pi);

T2 = transl(0.4, -0.2, 0) * trotx(pi/2);
%T2 = SE3(0.4, -0.2 0) * SE3.Rx(pi/2);

那么与之对应的关节坐标就是

q1 = p560.ikine6s(T1);
q2 = p560.ikine6s(T2);

我们再给出时间向量

t = [0:0.05:2]';

通过对q1和q2两个位姿之间进行平滑插值就可以得到一个关节空间轨迹,我们用如下函数

q = jtraj(q1, q2, qt); 
%jtraj相当于具有tpoly插值的mtraj,
%但优化了多轴情况,且允许使用额外参数设置v0和vt
%以后就不用下面两个插值函数
%q = mtraj(@tpoly, q1, q2, t);
%q = mtraj(@lspb, q1, q2, t);
%[q,qd,qdd] = jtraj(q1, q2, t);
%以下是SerialLink类提供的jtraj更简便的用法
q = p560.jtraj(T1, T2, t);

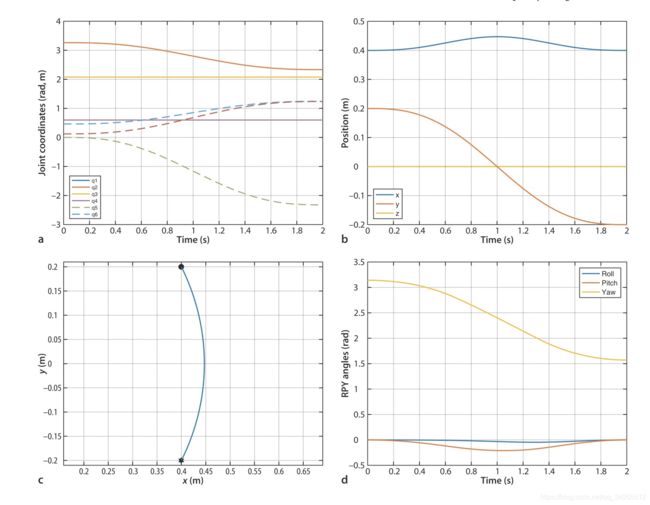
最终得到的轨迹可以绘制出来观察,包括关节角的变化都可以看到

p560.plot(q) %绘制关节角的变化如图a
plot(t, q) %绘制关节角随时间的变化,如图a

T = p560.fkine(q); %得到三位笛卡尔轨迹
p = transl(T);%轨迹的位移部分
% plot(p(:,1),p(:,2)) %绘制xy平面内的轨迹,如图c
% plot(t, tr2rpy(T)) %画出另一种位姿表达,如图d
中正平和的机器人学笔记——3.几个MATLAB实例_第1张图片
从图c可以看到,显然我们做的这条轨迹不是一条直线。这个很好理解,我们只给机器人初始点和结束点两个坐标,那么机器人在运动时,转动其腰部关节,显然会是一个弧线。那么我们如何保证机器人末端在笛卡尔空间中也划出一条直线轨迹呢?
其实很简单,将原来的jtraj函数换成ctraj就可以,当然这里的简单只得是用MATLAB仿真起来很简单,并不是其他的。

Ts = ctraj(T1, T2, length(t));
%plot(t, transl(Ts) )
%plot(t, tr2rpy(Ts) )
qc = p560.ikine6s(Ts);
plot(t,q)
p560.plot(qc)

中正平和的机器人学笔记——3.几个MATLAB实例_第2张图片
相比刚才的图我们可以看到,图b中x现在是一条直线了,图d中俯仰角为0了,最直观的是图c,在xy平面内,轨迹是一条直线了!
仔细观察图a,与原来的有些差别,正是这些区别导致了直线笛卡尔运动!

1. 应用1——绘图

这一部分我们讲如何让机器人画出一个字母“E”,过程中实际上就是应用正逆运动学的知识!
首先我们给出字母E的一些途径点,

path = [1 0 1
1 0 0
0 0 0
0 2 0
1 2 0
1 2 1
0 1 1
0 1 0
1 1 0
1 1 1];

分段路径可绘制如下:

plot3(path(:,1), path(:,2), path(:,3), 'color', 'k', 'Linewidth', 2);

那么如何转化为连续路径呢?

p = mstraj(path, [10 10 10], [], [2 2 2], 0.02, 0.01);
%第二个参数规定了xyz三个方向上的最大速度
%第四个参数规定了初始坐标、采样间隔、加速时间

接下来我们给出字母的起点

Tp = transl(0.1 * p);
Tp = homtrans( transl(0.4, 0, 0), Tp);
%Tp是一系列的齐次变换矩阵,代表了路径上每一个点的位姿

最后我们就可以通过逆运动学求出一系列的关节坐标

p560.tool = trotx(pi); %考虑姿态,保证z轴向下
q = p560.ikine6s(Tp);
p560.plot(q)  %绘制出动画

中正平和的机器人学笔记——3.几个MATLAB实例_第3张图片
如此,我们就完成了一个基本的机器人学小应用,原理就是我们学过的最基本的正逆运动学啦。

2. 应用2——步行机器人

walking部分其实仔细想想和写字是差不的,
我们要建立好一条腿的模型,规定其走动的姿态变化,比如抬腿,前移,放下等等;完成一条腿的步行仿真后,再以此设置其他三条腿的变化,这里我以Peter Corke给出的walking example为例讲解,实际上下载下来的原版有点小错误,我已经修改并验证过好用了。

% set the dimensions of the two leg links


% Copyright (C) 1993-2017, by Peter I. Corke
%
% This file is part of The Robotics Toolbox for MATLAB (RTB).
% 
% RTB is free software: you can redistribute it and/or modify
% it under the terms of the GNU Lesser General Public License as published by
% the Free Software Foundation, either version 3 of the License, or
% (at your option) any later version.
% 
% RTB is distributed in the hope that it will be useful,
% but WITHOUT ANY WARRANTY; without even the implied warranty of
% MERCHANTABILITY or FITNESS FOR A PARTICULAR PURPOSE.  See the
% GNU Lesser General Public License for more details.
% 
% You should have received a copy of the GNU Leser General Public License
% along with RTB.  If not, see .
%
% http://www.petercorke.com

function walking(varargin)

    
    opt.niterations = 500;
    opt.movie = [];
    
    opt = tb_optparse(opt, varargin);
    
L1 = 0.1; L2 = 0.1;  %这一句是单腿模型长度的设置,相当于设置大腿和小腿长度

fprintf('create leg model\n');

% create the leg links based on DH parameters  按照DH参数法设置腿足
%                    theta   d     a  alpha  
links(1) = Link([    0       0    0   pi/2 ], 'standard');
links(2) = Link([    0       0    L1   0   ], 'standard');
links(3) = Link([    0       0   -L2   0   ], 'standard');

% now create a robot to represent a single leg 设置一条腿的模型
leg = SerialLink(links, 'name', 'leg', 'offset', [pi/2   0  -pi/2]);

% define the key parameters of the gait trajectory, walking in the
% x-direction       下面几句是设置步行是抬起的高度限制之类的
xf = 5; xb = -xf;   % forward and backward limits for foot on ground
y = 5;              % distance of foot from body along y-axis
zu = 2; zd = 5;     % height of foot when up and down
% define the rectangular path taken by the foot
segments = [xf y zd; xb y zd; xb y zu; xf y zu] * 0.01;

% build the gait. the points are:
%   1 start of walking stroke
%   2 end of walking stroke
%   3 end of foot raise
%   4 foot raised and forward
%
% The segments times are :
%   1->2  3s
%   2->3  0.5s
%   3->4  1s
%   4->1  0.5ss
%
% A total of 4s, of which 3s is walking and 1s is reset.  At 0.01s sample
% time this is exactly 400 steps long.
%
% We use a finite acceleration time to get a nice smooth path, which means
% that the foot never actually goes through any of these points.  This
% makes setting the initial robot pose and velocity difficult.
%
% Intead we create a longer cyclic path: 1, 2, 3, 4, 1, 2, 3, 4. The
% first 1->2 segment includes the initial ramp up, and the final 3->4
% has the slow down.  However the middle 2->3->4->1 is smooth cyclic
% motion so we "cut it out" and use it.
fprintf('create trajectory\n');

segments = [segments; segments];
tseg = [3 0.25 0.5 0.25]';
tseg = [tseg; tseg];
x = mstraj(segments, [], tseg, segments(1,:), 0.01, 0.1);   设定好连续姿态

% pull out the cycle
fprintf('inverse kinematics (this will take a while)...');
xcycle = x(100:500,:);
qcycle = leg.ikine( transl(xcycle), 'mask', [1 1 1 0 0 0] );

% dimensions of the robot's rectangular body, width and height, the legs
% are at each corner.
W = 0.1; L = 0.2;

% a bit of optimization.  We use a lot of plotting options to 
% make the animation fast: turn off annotations like wrist axes, ground
% shadow, joint axes, no smooth shading.  Rather than parse the switches 
% each cycle we pre-digest them here into a plotopt struct.
% plotopt = leg.plot({'noraise', 'nobase', 'noshadow', ...
%     'nowrist', 'nojaxes'});
% plotopt = leg.plot({'noraise', 'norender', 'nobase', 'noshadow', ...
%     'nowrist', 'nojaxes', 'ortho'});

fprintf('\nanimate\n');

plotopt = {'noraise', 'nobase', 'noshadow', 'nowrist', 'nojaxes', 'delay', 0};

% create 4 leg robots.  Each is a clone of the leg robot we built above,
% has a unique name, and a base transform to represent it's position
% on the body of the walking robot.   这里是设置4条腿
legs(1) = SerialLink(leg, 'name', 'leg1');
legs(2) = SerialLink(leg, 'name', 'leg2', 'base', transl(-L, 0, 0));
legs(3) = SerialLink(leg, 'name', 'leg3', 'base', transl(-L, -W, 0)*trotz(pi));
legs(4) = SerialLink(leg, 'name', 'leg4', 'base', transl(0, -W, 0)*trotz(pi));

% create a fixed size axis for the robot, and set z positive downward
clf; axis([-0.3 0.1 -0.2 0.2 -0.15 0.05]); set(gca,'Zdir', 'reverse')
hold on
% draw the robot's body
patch([0 -L -L 0], [0 0 -W -W], [0 0 0 0], ...
    'FaceColor', 'r', 'FaceAlpha', 0.5)
% instantiate each robot in the axes
for i=1:4
    legs(i).plot(qcycle(1,:), plotopt{:});
end
hold off

% walk!  循环四条腿的动作,完整的步行
k = 1;
A = Animate(opt.movie);

for i=1:opt.niterations
    legs(1).animate( gait(qcycle, k, 0,   0));
    legs(2).animate( gait(qcycle, k, 100, 0));
    legs(3).animate( gait(qcycle, k, 200, 1));
    legs(4).animate( gait(qcycle, k, 300, 1));
    drawnow
    k = k+1;
    A.add();
end

end

中正平和的机器人学笔记——3.几个MATLAB实例_第4张图片

本篇的几个例子通过MATLAB实现起来都比较容易,但是还是那句话,重要的不是会敲几行代码,而是理解背后的原理。

你可能感兴趣的:(机器人学)