VS2019创建自己的项目使用Realsense2.0 SDK+PCL(使用“PassThrough”过滤器,小于1m的点云显示为绿色)
源码来自RealSense源码包 librealsense/wrappers/pcl/pcl/rs-pcl.cpp
头文件需要改一个:
#include "example.hpp"
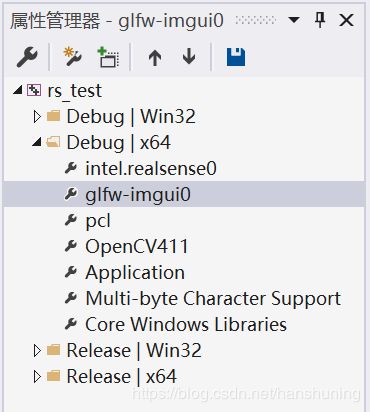
添加realsense SDK中的属性文件和pcl属性文件:
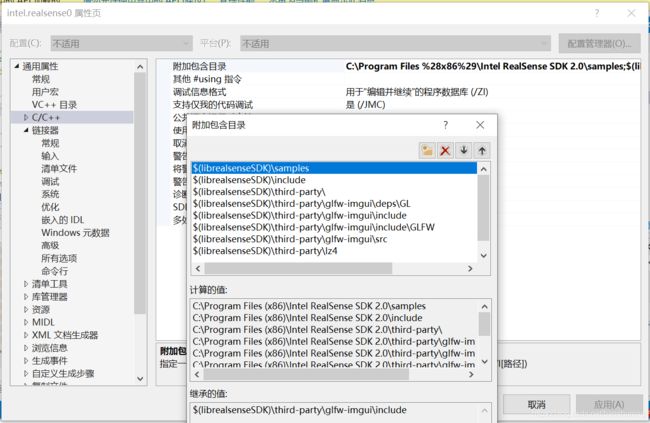
intel.realsense0属性,添加example.hpp所在路径:
出现类似错误:
main.obj : error LNK2019: 无法解析的外部符号 glfwInit,该符号在函数 "public: __cdecl window::window(int,int,char const *)" (??0window@@QEAA@HHPEBD@Z) 中被引用
解决:打开glfw-imgui0属性:连接器加入glfw-imgui.lib
编辑后的glfw-imgui0.props:
    $(IncludePath)


      $(librealsenseSDK)\third-party\glfw-imgui\include;%(AdditionalIncludeDirectories)


      glfw-imgui.lib;glmf32.lib;glu32.lib;opengl32.lib;%(AdditionalDependencies)
      C:\Program Files (x86)\Intel RealSense SDK 2.0\samples\x64\Debug\;C:\Program Files (x86)\Microsoft Visual Studio\2019\Enterprise\SDK\ScopeCppSDK\SDK\lib;%(AdditionalLibraryDirectories)
编辑后的intel.realsense0.props:
    $(ProgramFiles)\Intel RealSense SDK 2.0


      $(librealsenseSDK)\samples;$(librealsenseSDK)\include;$(librealsenseSDK)\third-party\;$(librealsenseSDK)\third-party\glfw-imgui\deps\GL;$(librealsenseSDK)\third-party\glfw-imgui\include;$(librealsenseSDK)\third-party\glfw-imgui\include\GLFW;$(librealsenseSDK)\third-party\glfw-imgui\src;$(librealsenseSDK)\third-party\lz4;%(AdditionalIncludeDirectories)


      $(librealsenseSDK)\lib\$(PlatformShortName);%(AdditionalLibraryDirectories)
      realsense2.lib;%(AdditionalDependencies)


      xcopy /y "$(librealsenseSDK)\bin\$(PlatformShortName)\realsense2.dll" "$(OutDir)"


      Copy Intel RealSense SDK 2.0 shared module next to the application


      $(librealsenseSDK)
代码:
// License: Apache 2.0. See LICENSE file in root directory.
// Copyright(c) 2015-2017 Intel Corporation. All Rights Reserved.

#include  // Include RealSense Cross Platform API
#include "example.hpp" // Include short list of convenience functions for rendering

#include
#include

// Struct for managing rotation of pointcloud view用于管理点云视图旋转的结构
struct state {
	state() : yaw(0.0), pitch(0.0), last_x(0.0), last_y(0.0),
		ml(false), offset_x(0.0f), offset_y(0.0f) {}
	double yaw, pitch, last_x, last_y; bool ml; float offset_x, offset_y;
};

using pcl_ptr = pcl::PointCloud::Ptr;

// Helper functions
void register_glfw_callbacks(window& app, state& app_state);
void draw_pointcloud(window& app, state& app_state, const std::vector& points);
//转pcl数据类型
pcl_ptr points_to_pcl(const rs2::points& points)
{
	pcl_ptr cloud(new pcl::PointCloud);

	auto sp = points.get_profile().as();
	cloud->width = sp.width();
	cloud->height = sp.height();
	cloud->is_dense = false;
	cloud->points.resize(points.size());
	auto ptr = points.get_vertices();
	for (auto& p : cloud->points)
	{
		p.x = ptr->x;
		p.y = ptr->y;
		p.z = ptr->z;
		ptr++;
	}

	return cloud;
}

float3 colors[]{ { 0.8f, 0.1f, 0.3f },//红色
				  { 0.1f, 0.9f, 0.5f },//绿色
};

int main(int argc, char* argv[]) try
{
	// Create a simple OpenGL window for rendering:创建一个简单的OpenGL窗口进行渲染:
	window app(1280, 720, "RealSense PCL Pointcloud Example");
	// Construct an object to manage view state构造一个对象来管理视图状态
	state app_state;
	// register callbacks to allow manipulation of the pointcloud注册状态变量和回调以允许鼠标控制点云
	register_glfw_callbacks(app, app_state);

	// Declare pointcloud object, for calculating pointclouds and texture mappings声明pointcloud对象,用于计算pointclouds和纹理映射
	rs2::pointcloud pc;
	// We want the points object to be persistent so we can display the last cloud when a frame drops我们希望points对象是持久的,以便在帧丢弃时显示最后一个云
	rs2::points points;

	// Declare RealSense pipeline, encapsulating the actual device and sensors声明RealSense管道,封装实际设备和传感器
	rs2::pipeline pipe;
	// Start streaming with default recommended configuration使用默认推荐配置启动流式处理
	pipe.start();

	// Wait for the next set of frames from the camera等待相机的下一组帧
	auto frames = pipe.wait_for_frames();

	auto depth = frames.get_depth_frame();

	// Generate the pointcloud and texture mappings生成realsense点云和纹理映射
	points = pc.calculate(depth);

	auto pcl_points = points_to_pcl(points);//转为PCL点云

	pcl_ptr cloud_filtered(new pcl::PointCloud);
	pcl::PassThrough pass;
	pass.setInputCloud(pcl_points);//输入点云数据
	pass.setFilterFieldName("z");//z方向过滤
	pass.setFilterLimits(0.0, 1.0);//设置设置过滤限制
	pass.filter(*cloud_filtered);

	std::vector layers;
	layers.push_back(pcl_points);
	layers.push_back(cloud_filtered);

	while (app) // Application still alive?
	{
		draw_pointcloud(app, app_state, layers);
	}

	return EXIT_SUCCESS;
}
catch (const rs2::error& e)
{
	std::cerr << "RealSense error calling " << e.get_failed_function() << "(" << e.get_failed_args() << "):\n    " << e.what() << std::endl;
	return EXIT_FAILURE;
}
catch (const std::exception& e)
{
	std::cerr << e.what() << std::endl;
	return EXIT_FAILURE;
}

// Registers the state variable and callbacks to allow mouse control of the pointcloud注册状态变量和回调以允许鼠标控制点云
void register_glfw_callbacks(window& app, state& app_state)
{
	//响应鼠标左键
	app.on_left_mouse = [&](bool pressed)
	{
		app_state.ml = pressed;
	};
	//响应鼠标滚动
	app.on_mouse_scroll = [&](double xoffset, double yoffset)
	{
		app_state.offset_x += static_cast(xoffset);
		app_state.offset_y += static_cast(yoffset);
	};
	//响应鼠标移动(左键)
	app.on_mouse_move = [&](double x, double y)
	{
		if (app_state.ml)
		{
			app_state.yaw -= (x - app_state.last_x);
			app_state.yaw = std::max(app_state.yaw, -120.0);
			app_state.yaw = std::min(app_state.yaw, +120.0);
			app_state.pitch += (y - app_state.last_y);
			app_state.pitch = std::max(app_state.pitch, -80.0);
			app_state.pitch = std::min(app_state.pitch, +80.0);
		}
		app_state.last_x = x;
		app_state.last_y = y;
	};

	app.on_key_release = [&](int key)
	{
		if (key == 32) // Escape
		{
			app_state.yaw = app_state.pitch = 0; app_state.offset_x = app_state.offset_y = 0.0;
		}
	};
}

// Handles all the OpenGL calls needed to display the point cloud处理显示点云所需的所有OpenGL调用
void draw_pointcloud(window& app, state& app_state, const std::vector& points)
{
	// OpenGL commands that prep screen for the pointcloud  OpenGL命令为pointcloud准备屏幕
	glPopMatrix();
	glPushAttrib(GL_ALL_ATTRIB_BITS);

	float width = app.width(), height = app.height();

	glClearColor(153.f / 255, 153.f / 255, 153.f / 255, 1);
	glClear(GL_COLOR_BUFFER_BIT | GL_DEPTH_BUFFER_BIT);

	glMatrixMode(GL_PROJECTION);
	glPushMatrix();
	gluPerspective(60, width / height, 0.01f, 10.0f);

	glMatrixMode(GL_MODELVIEW);
	glPushMatrix();
	gluLookAt(0, 0, 0, 0, 0, 1, 0, -1, 0);

	glTranslatef(0, 0, +0.5f + app_state.offset_y * 0.05f);
	glRotated(app_state.pitch, 1, 0, 0);
	glRotated(app_state.yaw, 0, 1, 0);
	glTranslatef(0, 0, -0.5f);

	glPointSize(width / 640);
	glEnable(GL_TEXTURE_2D);//2D

	int color = 0;

	for (auto&& pc : points)
	{
		auto c = colors[(color++) % (sizeof(colors) / sizeof(float3))];

		glBegin(GL_POINTS);
		glColor3f(c.x, c.y, c.z);

		/* this segment actually prints the pointcloud *///显示点云
		for (int i = 0; i < pc->points.size(); i++)
		{
			auto&& p = pc->points[i];
			if (p.z)
			{
				// upload the point and texture coordinates only for points we have depth data for仅为具有深度数据的点上载点和纹理坐标
				glVertex3f(p.x, p.y, p.z);
			}
		}

		glEnd();
	}

	// OpenGL cleanup
	glPopMatrix();
	glMatrixMode(GL_PROJECTION);
	glPopMatrix();
	glPopAttrib();
	glPushMatrix();
}
运行结果:
从相机捕获一个深度帧,将其转换为“pcl::PointCloud”对象,并执行基本的“PassThrough”过滤器。通过过滤器的所有点(Z小于1米)将标记为绿色,其余点将标记为红色。


