PYNQ-Z2初识(四)——BNN(二值化神经网络)
文章目录
- BNN神经网络
- 二值化
- PYNQ上的BNN
- 导入BNN压缩包
- 通过python脚本实现解压缩
- 案例1:MNIST数字识别
- 基本加载
- 载入图像
- 格式转换
- 通过PL端(Programmable Logic)硬件识别
- 通过PS端(Processing System)软件识别
- 进行自定义识别
- 案例2:交通标志识别
- 打开图片
- 进行识别
- 单个图像中的多个标志
BNN神经网络
二值神经网络是在浮点神经网络的基础上,对权值和激活值(特征值)做二值化处理,即取值是+1或-1。BNN网络结构与CNN相同,主要在梯度下降、权值更新、卷积运算上做了一些优化处理。
BNN可以用于嵌入式或移动场景,这些场景没有GPU且计算能力和存储容量相对较弱且限制较大。
二值化
PYNQ上的BNN
导入BNN压缩包
百度网盘地址提取码:630r
csdn地址
所有内容皆来源于铱元素科技的pynq直播课
打开192.168.2.99进入jupyterbook
upload我们的bnn_pynq.zip压缩包
通过python脚本实现解压缩
(当然了,其实你完全可以解压完了再上传到jupyter notebook)
首先新建一个python脚本,输入以下代码
import zipfile
f = zipfile.ZipFile("./bnn_pynq.zip","r")
for file in f.namelist():
    f.extract(file,"./BNN")
f.close()
简单解释:
Python 中 zipfile 模块提供了对 zip 压缩文件的一系列操作。
f=zipfile.ZipFile(“test.zip”,mode="")
其中的mode可以为
- r:解压
- w:压缩
- a:追加压缩
此处我们使用了r,解压。
接下来是将文件解压到目录
f.extract(file,"./BNN")
其参数为文件名和目标路径。(可选参数pwd = “密码!”)

ok现在在BNN路径下有我们的解压结果了,可以把压缩包无情删除。
案例1:MNIST数字识别
基本加载
打开第一个案例 01_BNN_MNIST
首先第一步是导入必要的库(python用多了满脑子调库)
import bnn
print(bnn.available_params(bnn.NETWORK_LFC))
classifier = bnn.PynqBNN(network=bnn.NETWORK_LFC)  # 初始化分类器
这其实是一个自定义的overlay,在/BNN/bnn_pynq/bitstreams中可以看到。

接下来加载神经网络的参数,这里使用mnist
(MNIST 手写数字识别可是被誉为神经网络里的hello world啊hhhhh)
classifier.load_parameters("mnist")
载入图像
加载图像image.jpg(pillow库估计大伙都挺熟了),然后做一些图像增强之类的。
from PIL import Image as PIL_Image
from PIL import ImageEnhance
from PIL import ImageOps

orig_img_path = 'image.jpg'
# !fswebcam  --no-banner --save {orig_img_path} -d /dev/video0 2> /dev/null # Loading the image from the webcam

img = PIL_Image.open(orig_img_path).convert("L")                          # convert in black and white
#Image enhancement
contr = ImageEnhance.Contrast(img)
img = contr.enhance(3)                                                    # The enhancement values (contrast and brightness)
bright = ImageEnhance.Brightness(img)                                     # depends on backgroud, external lights etc
img = bright.enhance(4.0)

#Adding a border for future cropping
img = ImageOps.expand(img,border=80,fill='white')
img
其输出img结果为

而原图为(好像差不多嗷)

接下来进行裁剪。
from PIL import Image as PIL_Image
import numpy as np
import math
threshold = 180
img = img.point(lambda p: p > threshold and 255)
immat = img.load()
(X, Y) = img.size
m = np.zeros((X, Y))
# Spanning the image to evaluate center of mass
for x in range(X):
    for y in range(Y):
        m[x, y] = immat[(x, y)] <= 250
m = m / np.sum(np.sum(m))
dx = np.sum(m, 1)
dy = np.sum(m, 0)

# Evalate center of mass
cx = math.ceil(np.sum(dx * np.arange(X)))
cy = math.ceil(np.sum(dy * np.arange(Y)))
img = img.crop((cx-80,cy-80,cx+80,cy+80))

img
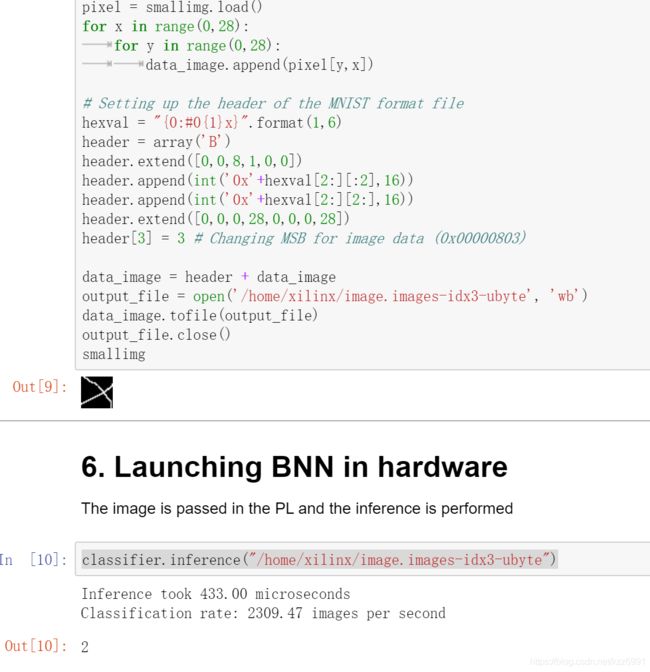
格式转换
把它整成BNN可以识别的格式
from array import *
from PIL import Image as PIL_Image
#Resize the image and invert it (white on black)
smallimg = img.resize((28, 28))
smallimg = ImageOps.invert(smallimg)


data_image = array('B')

pixel = smallimg.load()
for x in range(0,28):
	for y in range(0,28):
		data_image.append(pixel[y,x])

# Setting up the header of the MNIST format file
hexval = "{0:#0{1}x}".format(1,6)
header = array('B')
header.extend([0,0,8,1,0,0])
header.append(int('0x'+hexval[2:][:2],16))
header.append(int('0x'+hexval[2:][2:],16))
header.extend([0,0,0,28,0,0,0,28])
header[3] = 3 # Changing MSB for image data (0x00000803)

data_image = header + data_image
output_file = open('/home/xilinx/image.images-idx3-ubyte', 'wb')
data_image.tofile(output_file)
output_file.close()
smallimg
图片变成了这么个样式
![]()
通过PL端(Programmable Logic)硬件识别
classifier.inference("/home/xilinx/image.images-idx3-ubyte")
其输出结果为

飞快的微秒级识别
通过PS端(Processing System)软件识别
这次是通过ARM核来进行运算了
classifier_sw3 = bnn.PynqBNN(network=bnn.NETWORK_LFC,runtime=bnn.RUNTIME_SW)
classifier_sw3.load_parameters("mnist")
classifier_sw3.inference("/home/xilinx/image.images-idx3-ubyte")
其结果为

嗯慢了很多嗷
进行自定义识别
瞎jb画个数字

放到jupyter notebook里面
来到之前的读取图片的位置,把目标图片名称改为"num.png"
ok直接变黑白了

不过裁剪之后怪怪的
来康康识别结果
翻车了欸!!!我写的明明是8
应该是裁剪的地方太过分了吧
要是跳过裁剪那一步直接来到识别,倒是能很好的认出来这是个8。

案例2:交通标志识别
来到04_Road_Signs_Batch.ipynb中
仍然还是调库,初始化分类器
import bnn
print(bnn.available_params(bnn.NETWORK_CNV))
### 输出结果为['streetview', 'road-signs', 'cifar10']
classifier = bnn.CnvClassifier('road-signs')
可以输出一下其包含的分类,有
print(classifier.bnn.classes)
['20 Km/h', '30 Km/h', '50 Km/h', '60 Km/h', '70 Km/h', '80 Km/h', 'End 80 Km/h', '100 Km/h', '120 Km/h', 'No overtaking', 'No overtaking for large trucks', 'Priority crossroad', 'Priority road', 'Give way', 'Stop', 'No vehicles', 'Prohibited for vehicles with a permitted gross weight over 3.5t including their trailers, and for tractors except passenger cars and buses', 'No entry for vehicular traffic', 'Danger Ahead', 'Bend to left', 'Bend to right', 'Double bend (first to left)', 'Uneven road', 'Road slippery when wet or dirty', 'Road narrows (right)', 'Road works', 'Traffic signals', 'Pedestrians in road ahead', 'Children crossing ahead', 'Bicycles prohibited', 'Risk of snow or ice', 'Wild animals', 'End of all speed and overtaking restrictions', 'Turn right ahead', 'Turn left ahead', 'Ahead only', 'Ahead or right only', 'Ahead or left only', 'Pass by on right', 'Pass by on left', 'Roundabout', 'End of no-overtaking zone', 'End of no-overtaking zone for vehicles with a permitted gross weight over 3.5t including their trailers, and for tractors except passenger cars and buses']
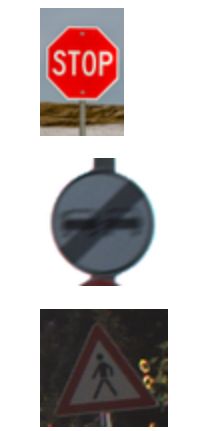
打开图片
from PIL import Image
import numpy as np
from os import listdir
from os.path import isfile, join
from IPython.display import display

imgList = [f for f in listdir("/home/xilinx/jupyter_notebooks/BNN/bnn_pynq/notebooks/road_signs/") if isfile(join("/home/xilinx/jupyter_notebooks/BNN/bnn_pynq/notebooks/road_signs/", f))]

images = []

for imgFile in imgList:
	img = Image.open("/home/xilinx/jupyter_notebooks/BNN/bnn_pynq/notebooks/road_signs/" + imgFile)
	images.append(img)
	img.thumbnail((64, 64), Image.ANTIALIAS)
	display(img)
其图片为
进行识别
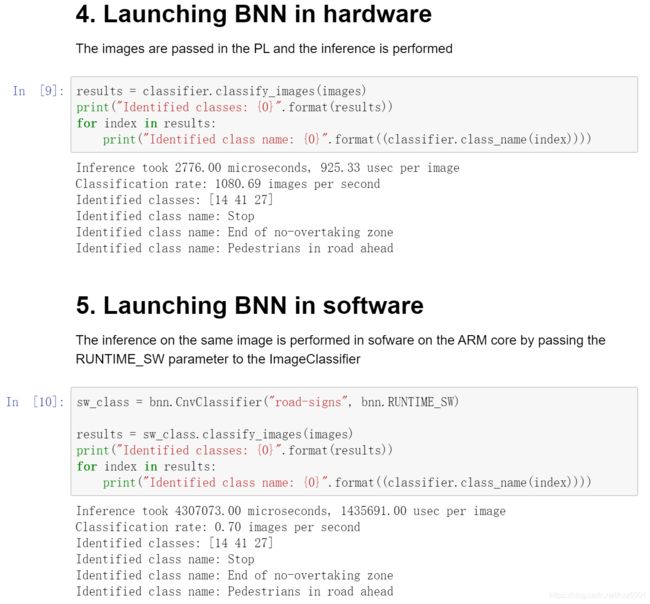
嗯嗯,和上一个案例区别不大。
单个图像中的多个标志
from PIL import Image
image_file = "/home/xilinx/jupyter_notebooks/BNN/bnn_pynq/notebooks/street_with_stop.JPG"
im = Image.open(image_file)
im

通过框框将其区分开来
results = classifier.classify_images(images)
stop = results == 14
indicies = []
indicies = stop.nonzero()[0]
from PIL import ImageDraw
im2 = Image.open(image_file)
draw2 = ImageDraw.Draw(im2)
for i in indicies:
    draw2.rectangle(bounds[i], outline='red')

im2
找出导入的stop标志
result = classifier.classify_images_details(images)
result=result.reshape(len(images),43)
from PIL import ImageDraw

draw = ImageDraw.Draw(im)
i=0
for image in images:
    if result[i][14] > 370:
        draw.rectangle(bounds[i], outline='red')
    i=i+1

im