Webots学习笔记 6.轮式机器人建模和简单控制
轮式机器人建模和简单控制
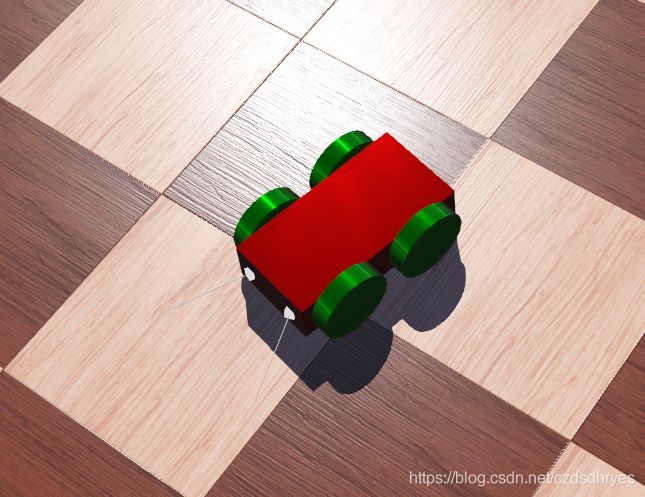
本章目标:建立如下图四轮小车,并进行简易操控
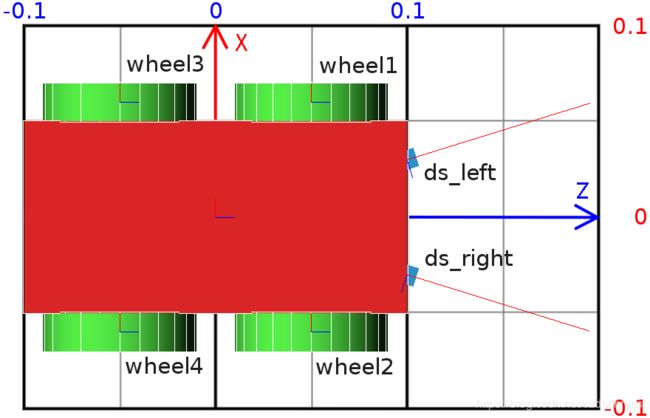
对于Webots,xyz坐标方向如下图:
一.建模
1.分解机器人模型
预备知识:
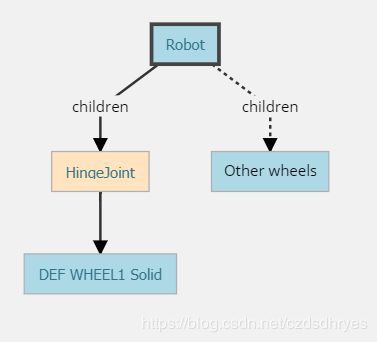
包含solid node和其派生节点的集合统称为solid node
机器人模型由树状solid node组成,根节点为robot node。不同的solid node由joint node连结。device node应该是robot node或者joint node的子节点。
joint node 被用来在它的父&子节点间添加自由度(DOF),这里的父&子节点均为solid node。
joint node 派生的节点可以在被连结的节点音添加不同的约束。比如机器人中常用的 HingeJoint 来约束其它可旋转的电机包括轮子。
可以通过添加一个对应的 PositionSensor node或者motor node来检测或者驱动joint node。
所以:
1.判断需要创建solid node的部分,比如轮式机器人,躯体+4个轮子一共需要5个solid node。
根据建模预期适当减少DOF对于获取有效仿真很重要。比如仿真一个脚轮需要2个DOF,如果对于仿真来说精度是不需要的,可以将其模拟为一个球体,跟地面摩擦系数为0。
2.选择合适的robot node(通常为对称中心,便于计算)
$ 新建solid,选中->右键->Transform to -> robot(作为机器人节点) 这里把车体作为robot node
$ 插入相关节点,如下图,box 尺寸为(0.1,0.05,0.2)
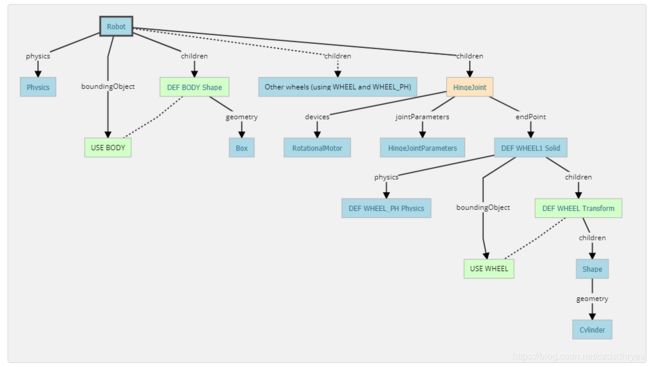
2.HingeJoints 铰链关节设置
轮子的初始位置由translation和rotation决定(solid node)
旋转方向(anchor)和旋转轴由HingeJoint node的HingeJointParameters决定
对于第一个轮子,Solid translation设置为(0.06,0,0.05),以便让车轮与车身有相对间隙。HingeJointParameters anchor设置为(0.06,0,0.05),定义相对于车身的旋转原点。最后HingeJointParameters axis 定义旋转轴,设置为x轴,即(1,0,0)
为什么要用Transform来放Cylinder?
因为Cylinder被定义旋转轴为y轴,故这里用Transfrom来封装Shape,以达到沿x轴的目的。
$旋转 Transform node (0,0,1,Pi/2),设置Cylinder的半径为0.04,高度为0.02,颜色为绿色。
$添加4个HingeJoint(在Robot child节点下面),使用预定义的DEF Transform node。(四个车轮的相对位置在end Point Solid的translation设置。)
$为了控制车轮,分别给4个HingeJoint下添加RotationalMotor,并添加名字(不是DEF)从wheel1到wheel4。
3.传感器
可以直接在Robot node的children下面添加DistanceSensor node。注意距离传感器仅能获取+x的数据,需要调整传感器安装方向。
$ 添加两个距离传感器,随便找个Shape装上即可。
二、控制器实现代码
#include
#include

#define TIME_STEP 64

int main(int argc, char **argv) {

  wb_robot_init();

  WbDeviceTag wheels[4];
  char wheels_names[4][8] = {
   "wheel1", "wheel2", "wheel3", "wheel4"
 };
  int i;
  for (i=0; i<4 ; i++)
    wheels[i] = wb_robot_get_device(wheels_names[i]);

  double speed = 1.5; // [rad/s]

  for (i=0; i<4 ; i++)
  {
    wb_motor_set_position(wheels[i], INFINITY);
    wb_motor_set_velocity(wheels[i], speed);
  }

  /* main loop
   * Perform simulation steps of TIME_STEP milliseconds
   * and leave the loop when the simulation is over
   */
  while (wb_robot_step(TIME_STEP) != -1) {
    /*
     * Read the sensors :
     * Enter here functions to read sensor data, like:
     *  double val = wb_distance_sensor_get_value(my_sensor);
     */

    /* Process sensor data here */

    /*
     * Enter here functions to send actuator commands, like:
     * wb_motor_set_position(my_actuator, 10.0);
     */
  };

  /* Enter your cleanup code here */

  /* This is necessary to cleanup webots resources */
  wb_robot_cleanup();

  return 0;
}
三、实现效果