Pysyft框架
一 简介
Syft是 OpenMined 的open source堆栈,提供Python 中secure的private数据科学。Syftprivate data使用联合学习、差分隐私和加密计算等技术将模型训练与模型训练分离。这是通过类似numpy的界面和与Deep Learning框架的集成来完成的,因此您Data Scientist可以在使用这些新的privacy-enhancing techniques.
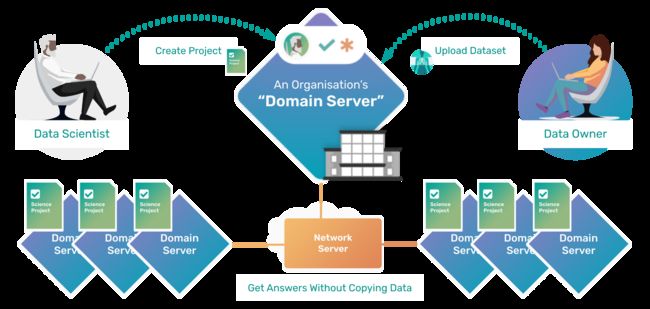
Syft允许 aData Scientist询问questionsadataset并在 的privacy limits集合内data owner获取answers这些questions,所有这些都无需获取copy数据本身的 a 。我们称这个过程Remote Data Science。这意味着在domains整个社会中,与某人risks共享信息(copying数据)的潮流,例如隐私侵犯、IP 盗窃和勒索,将不再阻碍benefits安全访问将提供的大量创新、见解和科学发现。
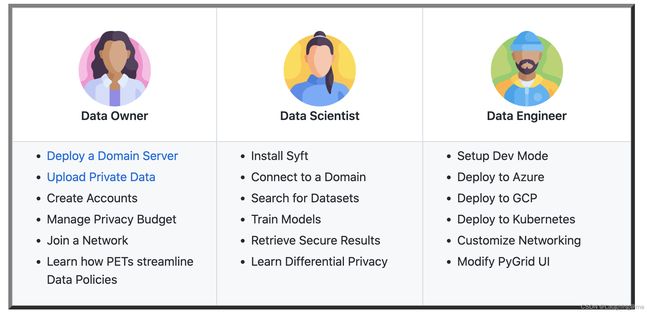
数据拥有方:
- 部署domain server
- 上传数据到 自己的domain server中
- 创建账户,加入网络到 organisation domain server中
数据分析统计:
- 安装syft,grid,
- 通过账户连接domain
import syft as sy
domain_client = sy.login(
       port=8081,
       email="[email protected]",
       password="changethis"
    )
二 使用
- 上传数据在domian中,建立数据使用账户,数据拥有方上传数据
import pandas as pd
import syft as sy

#load data
canada_data = pd.read_csv("../datasets/ca - feb 2021.csv")[0:40000]
canada_data.head()

#loggin domain
# Let's login into the domain
ca = sy.login(email="[email protected]", password="changethis", port=8081)

# update data
# We will upload only the first 40k rows and three columns
# All these three columns are of `int` type
sampled_canada_dataset = sy.Tensor(canada_data[["Trade Flow Code", "Partner Code", "Trade Value (US$)"]].values)
sampled_canada_dataset.public_shape = sampled_canada_dataset.shape

ca.load_dataset(
    assets={"feb2020-40k": sampled_canada_dataset},
    name="Canada Trade Data - First 40000 rows",
    description="""A collection of reports from Canada's statistics
                    bureau about how much it thinks it imports and exports from other countries.""",
)

# create user
ca.users.create(
    **{
        "name": "Sheldon Cooper",
        "email": "[email protected]",
        "password": "bazinga",
        "budget":10
    }
)

# Accept/Deny Requests to the Domain

ca.requests.pandas
ca.requests[-1].accept()
- 数据分析师连接domain,使用连接domian下的数据
import pandas as pd
import syft as sy
import numpy as np
sy.logger.remove()

# Logging into the domain Nodes

# We will login into Canada and Italy domain node
ca = sy.login(email="[email protected]", password="bazinga", port=8081)
it = sy.login(email="[email protected]", password="bazinga", port=8082)

ca_data = ca.datasets[0]['feb2020-40k']
it_data = it.datasets[0]['feb2020-40k']

result = ca_data + it_data

# 发送数据查看请求
result.request("I'd like to see the result of the sum of imports/exports across italy and canada.")

# 查看最终结果
result.get()
- mpc mul 示例
import syft as sy
sy.logger.remove()
import numpy as np
data = sy.Tensor(np.array([1,2,3],dtype=np.int32))

# 登陆
gryffindor = sy.login(email="[email protected]",password="changethis",port="8081")
slytherin =  sy.login(email="[email protected]",password="changethis",port="8082")
hufflepuff = sy.login(email="[email protected]",password="changethis",port="8083")

#同步数据
tensor_1 = data.send(gryffindor)
tensor_2 = data.send(slytherin)
tensor_3 = data.send(hufflepuff)


mpc_1 = tensor_1 + tensor_2
mpc_2  = tensor_2 + tensor_3
mpc3 = mpc_1 + mpc_2 + 3

mpc3.block.reconstruct()

# output
array([ 7, 11, 15], dtype=int32)
三 部署
前置环境依赖
We will be setting up the following dependencies before PySyft and PyGrid:
Python >=3.9
pip
Conda
Jupyter notebook
Docker
pip install jupyterlab
# 启动 jupyter lab

pip install syft hagrid -i https://mirrors.aliyun.com/pypi/simple/

# Congrats for making it this far! You only have one final step remaining, before you unleash the power of Hagrid! The final step is to launch a domain # node, which is as easy as:
hagrid launch

# stop domain
hagrid land
1.quickstart
https://github.com/OpenMined/PySyft/blob/dev/notebooks/quickstart/00-quickstart.ipynb
- 检查domain,syft,docker,及启动测试环境容器
https://github.com/OpenMined/PySyft/blob/dev/notebooks/quickstart/01-install-wizard.ipynb
- 部署domain server
https://github.com/OpenMined/PySyft/blob/dev/notebooks/quickstart/data-owner/00-deploy-domain.ipynb
- 上传数据到domain server
https://github.com/OpenMined/PySyft/blob/dev/notebooks/quickstart/data-owner/01-upload-data.ipynb
- 测试mpc simple
https://github.com/OpenMined/PySyft/blob/dev/notebooks/smpc/Simple%20SMPC.ipynb


