Webots入门(一)-build up a world
以Webots的guide.pdf为例建立一个拥有a floor, four obstacles 和 a surrounding wall的环境。我想大部分人都可以照着guide一步一步实现整个world的建立,但是对于其中的组件的使用不是特别理解,比如为什么要用这个组件,不用另外的组件。这里跳过色彩方面的讲解,因为自己也不是很了解。下面进入正题:
先上一张感性的截图,让大家直观的感受下这个wall是什么样子的:
Let us create the walls!
1. Select the last Solid node in the scene tree window(which is the floor) and click on the insert after button.
那么问题来了,这里为什么要选择Solid,我们来看看Solid类的介绍
父类为Transform
Solid{
SFString name " "
SFString model " "
SFString description " "
SFNode boundingObject NULL
SFNode physics NULL
SFBool locked FALSE
}
派生类:DistanceSensor,Servo, Robot, Camera....
描述:
Solid节点代表了一个实体诸如形状和体型的物理属性描述。Solid类是碰撞检测实体的基类。机器人和其他设备类都是它的子类。
Solid域:
这里我们着重了解下成员类boundingObject(SFNode意味着当前未被实现),边界实体指定了碰撞检测的几何形状。如果boundingObject域为NULL,则不做碰撞检测实体可以直接穿过该实体。下面继续讨论boundingObject域:
How to use the boundingObject field?
除了children域boundingObject的其他域都可以进行指定。由于碰撞检测对CPU要求较高,因此常采用一些简单的几何模型来作为boundingObject.
各种节点组合可以实现boundingObject,包括:1)Box 2)Cylinder 3)Sphere 4)IndexedFaceSet 5)由上述模型实现的Shape 6)由上述模型实现的Transform 7)由几个子节点组成的Group,每个子节点都是由上述模型实现。
因此后面我们将使用Solid域中的boundingObject来实现碰撞检测,马上将会用到
言归正传:
实现一个墙的形状,如图7.2,从截面看这是一个窄条长方形折了3次90°。
4.Select thechildren field and insert after aShape node.
这个为什么使用Shape很简单不用多解释了
10. 这里墙需要阻止机器人穿过,正是通过boundingObject域来实现,要记住边界障碍物只能用一些简单模型实现。这里选择的是(用原话来说Select the boundingObject field of the wall and create a Group node that will contain the four walls. In this Group, insert a Transform node in the children field. Add a Shape to the unique children of the Transform node in the children field. Add a Shape to the unique children of the Transform. Create a Material in th node Appearance and set its diffuseColor and specularColor to white......Now creat a Box as a geometry for this Shape node. Set the size of the Box to [0.01 0.1 1], so that it matches the size of a wall. Set the translation field of the Transform node to [0.495 0.05 0], so that it matches the position of the first wall.)这一大堆话我总结一下,就是在boundingObject的children域添加一个Group节点,在Group的children节点添加一个Transform节点,在Transform的children节点添加一个shape节点,在shape节点的appearance域添加一个Appearance节点,然后再其中的material域添加一个Material节点,修改颜色作为碰撞检测条件,最后在shape节点的geometry域添加一个Box节点,最后移动match墙的尺寸。
那么问题来了,回想最早实现墙那么简单,在solid的children节点添加一个shape节点,再在geometry域添加一个Extrusion节点,最后在cross-section处标注convex点即可。那么为什么不能在boundingObject上采用同样的方式,而要如此麻烦呢。
如图可见确实没有Extrusion节点可用,第一想法就是Extrusion模型过于复杂,不适合作为边界模型,再翻看一下reference manual手册即可找到答案。
我们看下Extrusion,带圆角的方框代表了几何节点(geometry node),可以用于shape中geometry域的实现。而加了灰色阴影的是可以直接被用于boundingObject的。
言归正传:
如何在walls上match一个boundingObject呢?先上一个已经match上的一个bounding object图(白线包围的就是bounding object)
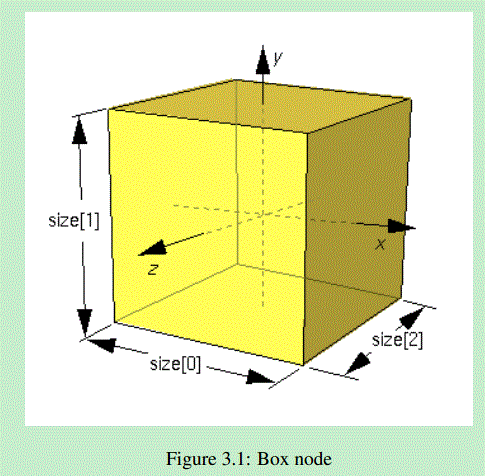
这里的bounding object匹配的是0167围成的wall,那么要建立一个长为0.01,宽1,高0.1的长方体。这里先了解下BOX节点的geometry图
如何确定一个BOX的位置,其实就是确定质心的位置。因此我们将刚才设计的立方体放置到(x,y,z) = (0.495,0.05,0)处即可。
其他的wall都可以通过rotation进行旋转放置,这里rotation有4个域{x,y,z,alpha},x,y,z = 0,1 alpha = -3.14~3.14,这里alpha取大于0的数时代表逆时针旋转。x,y,z取1代表绕值为1的轴旋转。
Now,let us create the obstacles:
和建立walls类似,首先选择一个Solid节点。剩下的步骤几乎一样。就不做详细讨论了,大家按照文档一步一步就能完成,我偷个懒随便放了两个障碍物
Now,let us create a Robot
这里的robot是一个DifferentialWheels节点,它包括几个孩子节点:一个Transform节点作为body,两个Solid节点作为wheels,两个DistanceSensor节点作为infra-red sensor,一个Shape节点作为face
Robot
Derived from Solid.
Robot {
SFString controller "void"
SFString controllerArgs ""
SFBool synchronization TRUE
MFFloat battery []
3.36. ROBOT 89
SFFloat cpuConsumption 0 # [0,inf)
SFBool selfCollision FALSE
}
Direct derived nodes:DifferentialWheels, Supervisor
由于Robot直接派生DifferentialWheels类,因此首先建立一个DifferentialWheels节点。好吧我想说剩下的步骤都一样直接上图,robot这块有不明白的留言吧。。。。


