Kinect学习笔记二DepthFrame
Kinect v2学习笔记第二篇DepthFrame
(C#)
深度图信息简述:
Kinect的红外激光装置能够获取空间的深度与红外图像。
深度图像每个像素点的深度值由2个字节,16位组成。(Unshort)
高十三位代表深度值,低三位代表用户ID 0代表未找到用户,最多支持追踪6人。
深度值表示的是该像素点到kinect红外摄像头所在的平面的水平距离。
可识别深度范围是0.5M-4.5M,不在识别范围之内的为全0。识别精度1MM(最小单位)。
深度帧512*424 (一代320*240)分辨率,fps=30.
DepthFrame8阶灰度显示代码实例分析(WPF):与ColorFrame重复部分查看ColorFrame
using System;
using System.Collections.Generic;
using System.Linq;
using System.Text;
using System.Threading.Tasks;
using System.Windows;
using System.Windows.Controls;
using System.Windows.Data;
using System.Windows.Documents;
using System.Windows.Input;
using System.Windows.Media;
using System.Windows.Media.Imaging;
using System.Windows.Navigation;
using System.Windows.Shapes;
using Microsoft.Kinect;
namespace myDepthFrameViewer
{
///
/// MainWindow.xaml 的交互逻辑
///
public partial class MainWindow : Window
{
private const int MapDepthToByte = 8000 / 256;//深度到字节,每色阶跨度
private KinectSensor kinectSensor = null;
private DepthFrameReader depthFrameReader = null;
FrameDescription depthFrameDescription = null;
private WriteableBitmap depthBitmap = null;
private byte[] depthPixels = null;
Byte[]depthPixels用来存储处理后的深度数据
public MainWindow()
{
InitializeComponent();
}
private void myDepthFrame_Loaded(object sender, RoutedEventArgs e)
{
this.kinectSensor = KinectSensor.GetDefault();
this.depthFrameReader = kinectSensor.DepthFrameSource.OpenReader();
this.depthFrameDescription = this.kinectSensor.DepthFrameSource.FrameDescription;
this.depthFrameReader.FrameArrived += this.Reader_DepthFrameArrived;
this.depthBitmap = new WriteableBitmap(this.depthFrameDescription.Width ,this.depthFrameDescription.Height, 96.0, 96.0,PixelFormats.Gray8, null);
this.depthPixels = new byte[this.depthFrameDescription.Width * this.depthFrameDescription.Height];
this.kinectSensor.Open();
this.DataContext = this;
}
以下为事件处理方法:
深度数帧depthFrame接受事案参数传来的深度帧,然后将其锁住得一帧数据给KinectBuff,
检查数据是否大小匹配,然后对其执行转化函数ProcessDepthFrameDate(),转化结束即可使用ReaderDepthPixels更新数据
public void Reader_DepthFrameArrived(object sender,DepthFrameArrivedEventArgs e)
{
bool Processed = false;
using (DepthFrame depthFrame=e.FrameReference.AcquireFrame())
{
if(depthFrame!=null)
{
using(Microsoft.Kinect.KinectBuffer depthBuffer=depthFrame.LockImageBuffer())
{
if(((this.depthFrameDescription.Width*this.depthFrameDescription.Height)==(depthBuffer.Size/this.depthFrameDescription.BytesPerPixel))&&
(this.depthFrameDescription.Width==this.depthBitmap.PixelWidth)&&(this.depthFrameDescription.Height==this.depthBitmap.Height))
{
ushort maxDepth = ushort.MaxValue;//获得ushort的最大值
this.ProcessDepthFrameData(depthBuffer.UnderlyingBuffer, depthBuffer.Size, depthFrame.DepthMinReliableDistance, maxDepth);//转化方法
Processed = true;
}
}
}
}
if (Processed) this.ReaderDepthPixels();//更新深度帧数据
}
以下为转化方法,接收到的深度数据正好是每一个16位,相当于ushort类型,通过强制类型转换,得到数组指针(此处用指针好处是不用复制数组,节省运算资源,处理加速),
然后对整帧的每一个深度数据进行转换,就是通过除以MapDepthToByte,大小缩小MapDepthToByte倍,化为256以内,用于8阶灰度值的显示。其中不可视的近处与远处默认为0。
private unsafe void ProcessDepthFrameData(IntPtr depthFrameDate,uint depthFrameDateSize,ushort minDepth,ushort maxDepth)
{
ushort * frameDate = (ushort *)depthFrameDate;//强制深度帧数据转为ushort型数组,frameDate指针指向它
for (int i = 0; i < (int)(depthFrameDateSize / this.depthFrameDescription.BytesPerPixel); ++i)
{
//深度帧各深度(像素)点逐个转化为灰度值
ushort depth = frameDate[i];
this.depthPixels[i] = (byte)((depth >= minDepth) && (depth <= maxDepth )? (depth / MapDepthToByte) : 0);
}
}
以下进行depthmap的更新像素值操作,通过depthBitmap.WritePixels完成,其中,new int32REct制定屏幕矩形范围。
private void ReaderDepthPixels()
{
this.depthBitmap.WritePixels(
new Int32Rect(0, 0, this.depthBitmap.PixelWidth, this.depthBitmap.PixelHeight),//范围
this.depthPixels,//提供数据的数组
this.depthBitmap.PixelWidth,//步幅,数据的某一单位的大小?
0);//偏移量
/*//另一种输出
this.DepthImageName.Source = BitmapSource.Create(this.depthFrameDescription.Width, this.depthFrameDescription.Height, 96.0, 96.0, PixelFormats.Gray8, null,
this.depthPixels, this.depthBitmap.PixelWidth);*/
}
//图源
public ImageSource DepthImage
{
get
{
return this.depthBitmap;
}
}
private void myDepthFrame_Closing(object sender, System.ComponentModel.CancelEventArgs e)
{
if(depthFrameReader!=null)
{
this.depthFrameReader.Dispose();
this.depthFrameReader = null;
}
if(kinectSensor!=null)
{
this.kinectSensor.Close();
this.kinectSensor = null;
}
}
}
}
由以上也可以看出来,这Kinect V2给我们的深度数据(16位)应该是已经经过移位运算处理了的,不需要像一代那样要手动移3位。
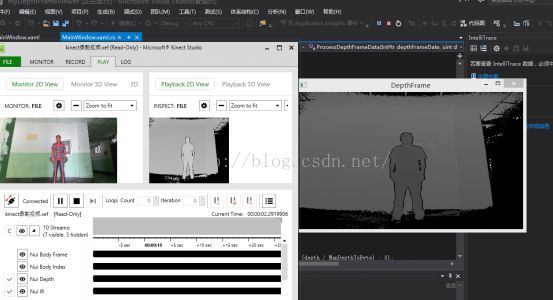
效果图如下:人物若有长宽变形,属于窗口的长宽设置问题。
程序流程:
1.KinectSensor.open()开启传感器。
2.获取KinectSensor传感器对象,初始化
Reader 、FrameDescription、bitmap、窗口、注册帧到达事件
DepthBitmap的初始化构造,声明接受转换后表示8阶灰度数据的数组。
3.实现帧到达触发的事件,其中包括转化方法。
4.根据提供的每一帧每一像素8阶灰度数据,构造深度图像用于显示。
5.关闭流,关闭传感器。
附:
若不想用灰度显示,貌似需要在初始三个RGB值,来表示每个像素点的RGB,然后每像素点RGB值的确定由其深度决定,具体看你是想怎么显示了(依据一定深度范围一定颜色来定),在这我没实验就不再附代码与图。(详情参考映射第三例的通过内存处理)
深度数据写入txt文件来查看(必须获得一帧,因输出所有超慢,耗费资源,速度慢!)
stride为图片步长,colorframeBgr32 例如ColorFrame.width*4
将以下代码放置在ProcessDepthFrameData方法中,并添加头文件using System.IO;
在开头初始化时加上int x=0;
if (x == 0)
{
FileStream fs = new FileStream("D:\\depth.txt", FileMode.Create);
StreamWriter sw = new StreamWriter(fs);
for (int i = 0; i < 424; i++)
{
for (int j = 0; j < 512; j++)
{
sw.Write("[{0:D3}]", frameDate[i * 424 + j]/(8000/256));//数据缩小(8000/256)倍
}
sw.Write("\n\r");
}
sw.Close();
fs.Close();
x = 1;//控制写一帧
}
Xaml添加部分代码:
<Image HorizontalAlignment="Left" Name="DepthImageName" Source="{Binding DepthImage}" Stretch="Fill" VerticalAlignment="Top" />
另一种通过拷贝数组方法显示,但注释部分引起缓存不足,不可行,未解决。
using System;
using System.Collections.Generic;
using System.Linq;
using System.Text;
using System.Threading.Tasks;
using System.Windows;
using System.Windows.Controls;
using System.Windows.Data;
using System.Windows.Documents;
using System.Windows.Input;
using System.Windows.Media;
using System.Windows.Media.Imaging;
using System.Windows.Navigation;
using System.Windows.Shapes;
using System.IO;
using Microsoft.Kinect;
namespace myDepthFrameViewer
{
///
/// MainWindow.xaml 的交互逻辑
///
public partial class MainWindow : Window
{
private const int MapDepthToByte = 8000 / 256;//深度到字节,每色阶跨度
private KinectSensor kinectSensor = null;
private DepthFrameReader depthFrameReader = null;
FrameDescription depthFrameDescription = null;
private WriteableBitmap depthBitmap = null;
private byte[] depthPixels = null;
private ushort[] depth = null;
public MainWindow()
{
InitializeComponent();
}
private void myDepthFrame_Loaded(object sender, RoutedEventArgs e)
{
this.kinectSensor = KinectSensor.GetDefault();
this.depthFrameReader = kinectSensor.DepthFrameSource.OpenReader();
this.depthFrameDescription = this.kinectSensor.DepthFrameSource.FrameDescription;
this.depthFrameReader.FrameArrived += this.Reader_DepthFrameArrived;
this.depthBitmap = new WriteableBitmap(this.depthFrameDescription.Width ,this.depthFrameDescription.Height, 96.0, 96.0,PixelFormats.Gray8, null);
this.depthPixels = new byte[this.depthFrameDescription.Width * this.depthFrameDescription.Height];
this.kinectSensor.Open();
this.DataContext = this;
}
public void Reader_DepthFrameArrived(object sender, DepthFrameArrivedEventArgs e)
{
bool Processed = false;
using (DepthFrame depthFrame = e.FrameReference.AcquireFrame())
{
if (depthFrame != null)
{
using (Microsoft.Kinect.KinectBuffer depthBuffer = depthFrame.LockImageBuffer())
{
if (((this.depthFrameDescription.Width * this.depthFrameDescription.Height) == (depthBuffer.Size / this.depthFrameDescription.BytesPerPixel)) &&
(this.depthFrameDescription.Width == this.depthBitmap.PixelWidth) && (this.depthFrameDescription.Height == this.depthBitmap.Height))
{
Processed = true;
depth = new ushort[depthBuffer.Size / this.depthFrameDescription.BytesPerPixel];
depthFrame.CopyFrameDataToArray(depth);
}
/*if (Processed)
{
this.DepthImageName.Source = BitmapSource.Create(this.depthFrameDescription.Width, this.depthFrameDescription.Height, 96.0, 96.0, PixelFormats.Gray8, null,
depth, depth.Length);
}*/
depth = null;
}
}
}
}
private void myDepthFrame_Closing(object sender, System.ComponentModel.CancelEventArgs e)
{
if(depthFrameReader!=null)
{
this.depthFrameReader.Dispose();
this.depthFrameReader = null;
}
if(kinectSensor!=null)
{
this.kinectSensor.Close();
this.kinectSensor = null;
}
}
}
}
