V-REP 添加Vision Sensor与图像获取 | V-REP Adding Vision Sensor and Image Acquisition
文章目录
- V-REP端操作
- 1.打开scene
- 2.添加vision sensor
- 3.添加Floating View
- 4.Associate Vison_sensor
- 5.修改vision sensor参数
- 6.移动与旋转传感器
- Python端操作
- 代码
- 测试结果
- 注解
在完成此文之前必须完成V-REP与Python的通信部分,参考 Python与V-REP联合仿真 | Joint simulation of Python and V-REP
V-REP端操作
1.打开scene
UR5plusRG2_PickAndPlaceDemo1.ttt
2.添加vision sensor
视图界面右键add-vision sensor-Perspective projection-type
vision sensor两个类型区别如下:
3.添加Floating View
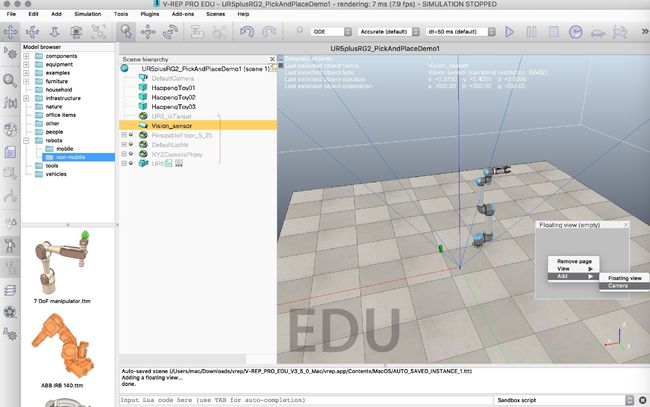
仿真界面右键,add-Floating View
4.Associate Vison_sensor
操作如下
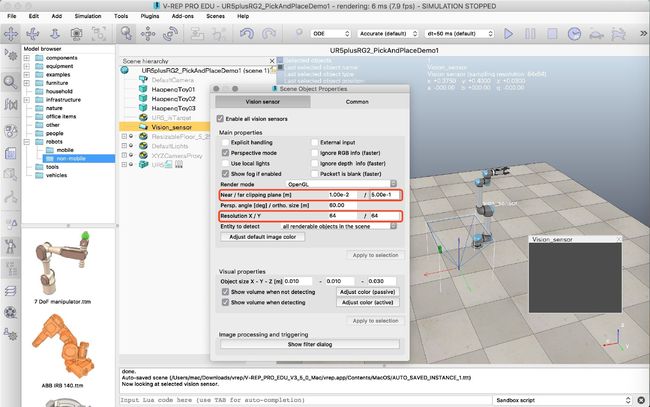
5.修改vision sensor参数
Near/far clipping plane代表检测范围的大小
Resolution是分辨率
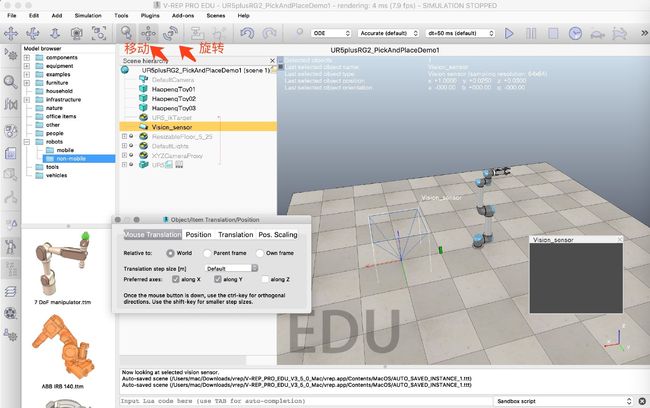
6.移动与旋转传感器
点击移动按钮,可以直接拖动物体
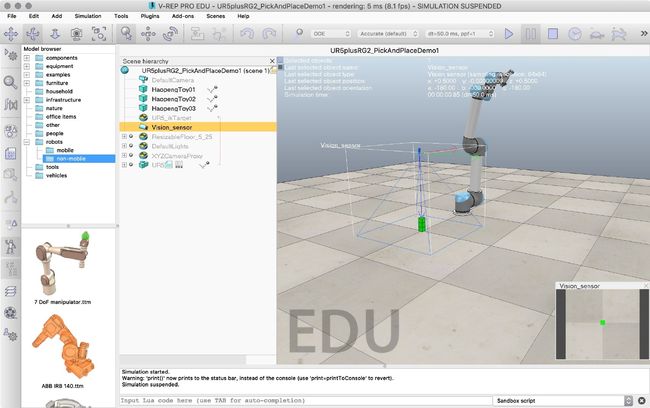
旋转一定角度,运行仿真可以看见如下绿点,Vison sensor V-REP端配置完成
Python端操作
代码
#!/usr/bin/env python
# encoding: utf-8

"""
Enable the vision sensor in V-REP,Python
use the scene:VisionSensorDemo.ttt

@Author: Zane
@Contact: [email protected]
@File: VisionSensorDemo.py
@Time: 2019-07-23 15:55
"""
import vrep
import sys
import numpy as np
import math
import matplotlib.pyplot as mpl
import time

class Usage(Exception):
    def __init__(self, msg):
        self.msg = msg

def main(argv=None):
    if argv is None:
        argv = sys.argv

    #Python connect to the V-REP client
    vrep.simxFinish(-1)

    clientID = vrep.simxStart('127.0.0.1', 19999, True, True, 5000, 5)

    if clientID != -1:
        print("Connected to remote API server")
    else:
        print("Connection not successful")
        sys.exit("Connected failed,program ended!")

    #Get the handle of vision sensor
    errorCode,visionSensorHandle = vrep.simxGetObjectHandle(clientID,'Vision_sensor',vrep.simx_opmode_oneshot_wait)

    #Get the image of vision sensor
    errprCode,resolution,image = vrep.simxGetVisionSensorImage(clientID,visionSensorHandle,0,vrep.simx_opmode_streaming)
    time.sleep(0.1)
    errprCode,resolution,image = vrep.simxGetVisionSensorImage(clientID,visionSensorHandle,0,vrep.simx_opmode_buffer)

    #Process the image to the format (64,64,3)
    sensorImage = []
    sensorImage = np.array(image,dtype = np.uint8)
    sensorImage.resize([resolution[0],resolution[1],3])

    #Use matplotlib.imshow to show the image
    mpl.imshow(sensorImage,origin='lower')


if __name__ == "__main__":
    sys.exit(main())
测试结果
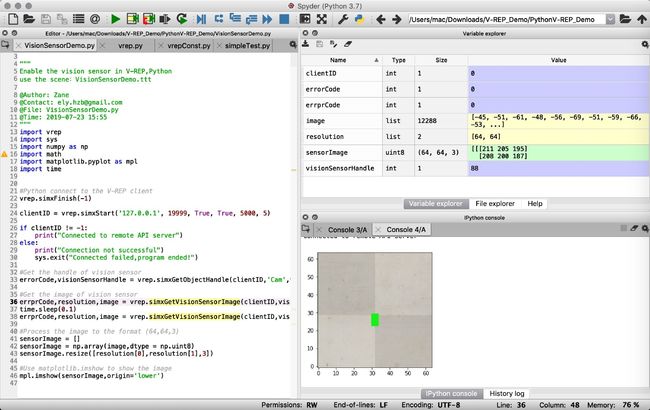
运行结果如下,可以在python中捕获到Vison Sensor的实时图片
注解
注解1:
vrep.simxFinish(-1)
clientID = vrep.simxStart(‘127.0.0.1’, 19999, True, True, 5000, 5)
每次重新开始仿真都需要重新运行这两段代码,获取新的clientID
注解2:
errorCode,visionSensorHandle = vrep.simxGetObjectHandle(clientID,‘Vision_sensor’,vrep.simx_opmode_oneshot_wait)
这里的Vision_sensor对应的就是V-REP中的VisionSensor命名
如果是handle名称错误,会出现errorCode=8,具体见errorCode:[V-REP Constant](file:///Users/mac/Downloads/vrep/V-REP_PRO_EDU_V3_5_0_Mac/helpfiles/en/remoteApiConstants.htm)
注解3:
errprCode,resolution,image = vrep.simxGetVisionSensorImage(clientID,visionSensorHandle,0,vrep.simx_opmode_streaming)
time.sleep(0.1)
errprCode,resolution,image = vrep.simxGetVisionSensorImage(clientID,visionSensorHandle,0,vrep.simx_opmode_buffer)
resolution是之前的设置的图像大小,这里安装本文设置resolution = [64,64]
获取image,需要两次使用simxGetVisionSensorImage,第一次用的simx_opmode_streaming,第二次是simx_opmode_buffer。第三个参数设置为0,代表获取RGB模式的图片
经过测试time.sleep(0.1)必须添加。如果没有暂停同时运行两次simxGetVisionSensorImage,读取不到image
注解4:
mpl.imshow(sensorImage,origin=‘lower’)
实际图像会和V-REP里面接收到的上下颠倒,origin='lower’恢复原图像

