V-REP循迹小车仿真(matlab)
利用MATLAB与VREP做了一个循迹小车的联合仿真,用到了视觉传感器,导入mesh,等一些操作.
文章目录
- 最终效果
- VREP中的设计
- Matlab中的设计
- 其他设置
最终效果
VREP中的设计
可以参考https://www.jianshu.com/p/eb3f38c0c5fa的前三篇教程,跟着这个教程做完第三篇的设计后,进行以下几步:
1.添加一个用于支撑视觉传感器的杆,名称为gan(随便什么名),菜单栏->Add->Primitive shape->Cylinder,参数设置如下:

然后选中刚才加的shape,做平移,参数如下:
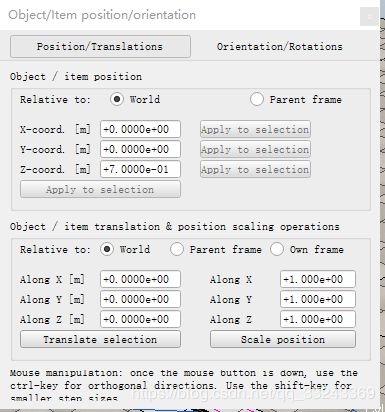
2.添加视觉传感器,菜单栏->Add->Vision sensor->perspective type,选中它,更改名称为Visio_lll,然后位移,参数如下:
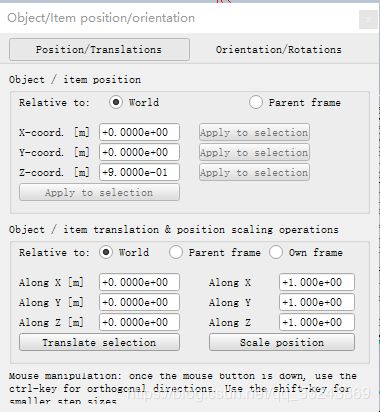
然后旋转,参数如下:

3.添加两个力传感器,连接视觉传感器与杆,杆和车身.操作是,菜单栏->Add->Force sensor
,名称是Force_sensor1与Force_sensor0,保持原名称就行,两个力传感器的位移分别如下:

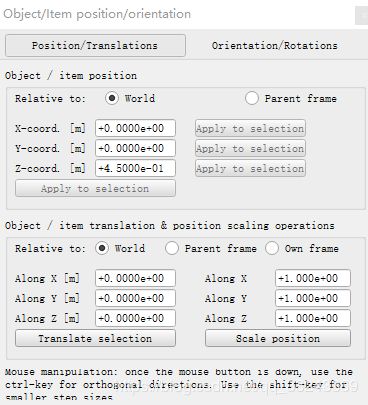
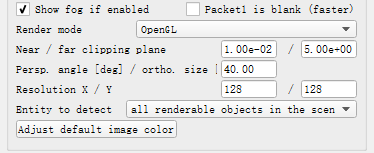
4.对视觉传感器的参数设置,双击视觉传感器图标,进行以下设置:
5.车速过快,有可能会翻车,所以在后面再加两个圆球:
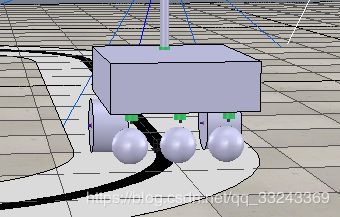
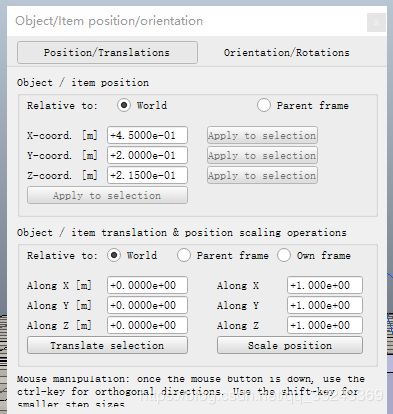
直接对原来中间的圆球和力传感器进行复制粘贴两次,保留层次关系,然后进行平移,参数分别如下:

7.然后导入赛道,菜单栏->File->import->mesh ,选择在solider中画的赛道.导入后即上图中的STL开头的那两个.
Matlab中的设计
1.首先需要建立工作目录,目录下需要有remApi.m,remoteApi.dll等几个文件.
这几个文件在
C:\Program Files (x86)\V-REP3\V-REP_PRO_EDU\programming\remoteApiBindings\matlab\matlab,以及C:\Program Files (x86)\V-REP3\V-REP_PRO_EDU\programming\remoteApiBindings\lib\lib\64Bit,
如果是32位电脑复制32Bit文件夹下的,把这两个文件夹下的文件都复制到工作目录下.
3.程序设计,
主程序如下:
clear
disp('Program started');
vrep=remApi('remoteApi'); % using the prototype file (remoteApiProto.m)
vrep.simxFinish(-1); % just in case, close all opened connections
clientID=vrep.simxStart('127.0.0.1',19999,true,true,5000,5);
if (clientID>-1)
disp('Connected to remote API server');
vrep. simxSynchronous(clientID,true);
 vrep. simxStartSimulation(clientID,vrep.simx_opmode_oneshot);
 [rec ,handle]=vrep.simxGetObjectHandle (clientID,'Visio_lll',vrep.simx_opmode_blocking);
 [rec ,left_handle]=vrep.simxGetObjectHandle (clientID,'Leftmotor',vrep.simx_opmode_blocking);
 [rec ,right_handle]=vrep.simxGetObjectHandle (clientID,'Rightmotor',vrep.simx_opmode_blocking);
 t=clock;
   currentTime=t(5)*60+t(6);
   startTime=t(5)*60+t(6);
out=0;
max_force=5;
v_max=12;
  while (currentTime-startTime < 5000)
 [rec,arr, image]=vrep.simxGetVisionSensorImage2( clientID, handle,1 , vrep.simx_opmode_oneshot);
 if(arr(1)==128)
 a_out=ident_ima(image);
 out= dir_cmd(a_out);
 if(out>12)
      out=12;
 end
  if(out<-12)
     out=-12;
  end
vrep.simxPauseCommunication(clientID,1);
 if(max_force<9)
     max_force=max_force+0.1
 end
 rec=vrep.simxSetJointForce(clientID,left_handle,max_force,vrep.simx_opmode_oneshot);
 rec=vrep.simxSetJointForce(clientID,right_handle,max_force,vrep.simx_opmode_oneshot);
%rec=vrep.simxSetJointForce(clientID,left_b_handle,max_force,vrep.simx_opmode_oneshot);
 %rec=vrep.simxSetJointForce(clientID,right_b_handle,max_force,vrep.simx_opmode_oneshot);
 rec=vrep.simxSetJointTargetVelocity(clientID,left_handle,v_max+out,vrep.simx_opmode_oneshot);
 rec=vrep.simxSetJointTargetVelocity(clientID,right_handle,v_max-out,vrep.simx_opmode_oneshot);
vrep.simxPauseCommunication(clientID,0);
currentTime=currentTime+10;
 vrep.simxSynchronousTrigger(clientID);
  end
  end
     vrep.simxStopSimulation(clientID,vrep.simx_opmode_blocking);
        vrep.simxFinish(clientID);
else
        disp('Failed connecting to remote API server');
end
    vrep.delete(); % call the destructor!
    disp('Program ended');
其中控制函数dir_cmd如下:
function output = dir_cmd(input)
persistent last_err;
if isempty(last_err)
   last_err=0;
end
err=64-input;
if(abs(err)<2)
    output=0;
else
output=err*0.2+50*(err-last_err);
end
last_err=err;
end
其中图像识别函数如下:
function out = ident_ima(img)
img=imbinarize(img');
out=64*ones(70,30);
cnt=1;
for i=1:1:70
    for j=1:1:128
        if (img(129-i,129-j)==0)
            out(i,cnt)=128-j;
            cnt=cnt+1;
        end
    end
    cnt=1;
end
out=mean(out);
out=mean(out);
out=round(out);
end
其他设置
作为动力的两个转动关节初值设置如下:
后添加的两个小球,质量0.01
车身质量3
车轮质量都是1
杆的质量保持默认
中间的球质量 1
完整工程下载: https://download.csdn.net/download/qq_33243369/11234052

