通过COM组件在Web上实现Kinect骨骼追踪、声控截屏保存的功能
前些天在淘宝上订购了Kinect,刚刚到货,对于这个新鲜的玩意儿,自己赶紧卸开包裹,插上PC机,先前已经装好了Kinect SDK(官方下载地址:http://research.microsoft.com/en-us/um/redmond/projects/kinectsdk/download.aspx)
希望自己的机子能够跑得动DEMO,最后送了一口气,正常运行:)。当然了,既然Kinect已经入手,自己打算也小小地练一下手,因为自己目前主要从事Web方面的开发,自然想到,如果能够在网页上能够运行Kinect该有多好啊!后来考虑了三种方案:
1)在Web应用程序上引用Kinect SDK的DLL(Microsoft.Research.Kinect.dll),可以正常引用,通过img标签或者页面输出图像流的方式显示Bitmap图像,当然你还需要定时刷新页面,当然这种方式的缺点可想而知,就是不够实时性。并且增加了服务器的负担。
2)通过Silverlight应用程序的方式,但是目前SL4/5均不支持Kinect的dll,这是由于Kinect是个.Net Framework的类库,非SL支持的客户端类库。另外,在非OOB的模式下,也SL目前不支持自定义的COM组件,希望微软团队将来能够让SL也支持Kinect。
3)通过ActiveX的COM组件技术,通过开发窗体组件,产生ActiveX插件,嵌套在IE浏览器中进行显示。
于是,我考虑了最简单的方式,通过ActiveX的技术在网页上对Kinect相关基本功能进行展示。
本文会分成三个部分来叙述:
一、ActiveX插件的实现;
二、Kinect基本功能的实现;
三、ActiveX的安装;
具体实现
第一部分 ActiveX插件的实现
1) 创建一个新的解决方案,叫做MyFirstKinect。
2)接着创建一个Windows窗体控件库,用于做ActiveX的插件,项目叫做MyFirstKinectControl
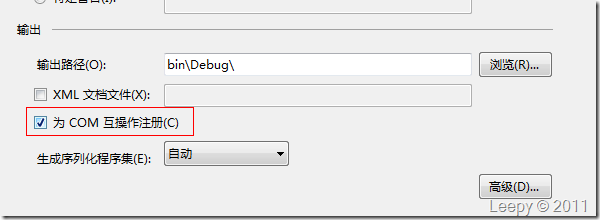
3)在MyFirstKinectControl项目的右键点击“属性”,选择“生成”项:
将”为COM互操作注册”勾上,然后关闭。
4)打开AssemblyInfo.cs:
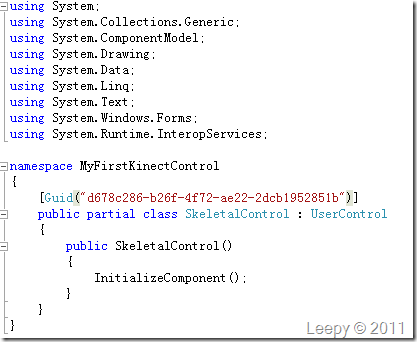
将ComVisible设置为true,并将下面这行注释掉(这个很重要,切记!)
对应地,需要在自定义窗体控件上加上该Guid:
至此,一个基本的COM组件已经实现了,现在来看下该如何在浏览器上显示ActiveX插件。
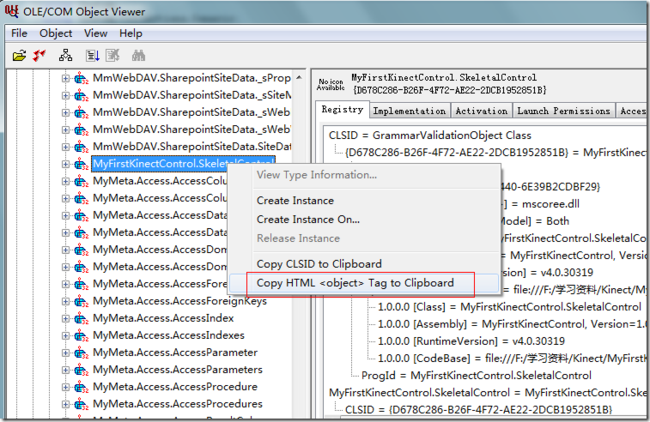
5)打开Visual Studio的命令提示符:输入“oleview”,页面会打开一个“OLE/COM Object Viewer”应用程序:
由于我是使用C#创建的COM组件,于是在“.NET Category”寻找刚才创建的”MyFirstKinectControl”:
右键选择“Copy HTML<object> Tag to Clipboard”,得到:
6)然后我在自定义窗体控件上(SkeletalControl.cs),随便加入点东西上去,比如按钮、标签等等。
7)然后新创建一个Web应用程序的项目(WebApp),重新编译。将上面的代码复制到Html或相关页面中。
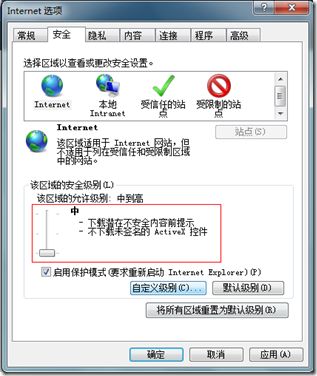
在IE正常状态下,发现插件无法正常显示。于是,把浏览器的安全级别调低:
继续运行:
就可以正常显示插件了。当然这种方式造成了浏览器使用上的危害性,所以不建议这样来使用。
8)如果想要在不调整浏览器安全级别的情况下,又能够在浏览器上正常显示插件,这样就必须调整一些代码:
[Guid("CB5BDC81-93C1-11CF-8F20-00805F2CD064"), InterfaceType(ComInterfaceType.InterfaceIsIUnknown)]
public interface IObjectSafety
{
    // methods
    void GetInterfacceSafyOptions(
        System.Int32 riid,
        out System.Int32 pdwSupportedOptions,
        out System.Int32 pdwEnabledOptions);
    void SetInterfaceSafetyOptions(
        System.Int32 riid,
        System.Int32 dwOptionsSetMask,
        System.Int32 dwEnabledOptions);
}
添加一个IObjectSafety的接口,并且Guid是固定的。
SkeletalControl继承这个接口:
[Guid("d678c286-b26f-4f72-ae22-2dcb1952851b")]
public partial class SkeletalControl : UserControl, IObjectSafety
{
    public SkeletalControl()
    {
        InitializeComponent();
    }

    #region IObjectSafety 成员

    public void GetInterfacceSafyOptions(Int32 riid, out Int32 pdwSupportedOptions, out Int32 pdwEnabledOptions)
    {
        pdwSupportedOptions = 1;
        pdwEnabledOptions = 2;
    }

    public void SetInterfaceSafetyOptions(Int32 riid, Int32 dwOptionsSetMask, Int32 dwEnabledOptions)
    {

    }

    #endregion
}
接着重新编译并运行Web程序,运行结果为:
这样,你就不需要调整浏览器的安全级别,就可以正常显示ActiveX插件了。
第二部分 Kinect的基本功能实现
从这一部分起,我将开始介绍Kinect如何实现一些基本功能:包括视频监控、骨骼追踪以及声控截屏的功能。
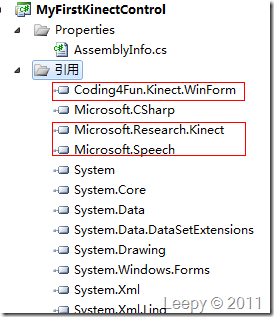
1)项目中引用以下的Dll:
其中Microsoft.Research.Kinect就是在电脑上装好Kinect SDK后可以引用的类库;
另外地,Coding4Fun.Kinect.WinForm是一个基于SDK的DLL的相关封装好的一些功能类库,网上开源地址为:http://c4fkinect.codeplex.com/;
Microsoft.Speech是一个微软提供的语音识别的基本类库,也包含相关的SDK,并且和Kinect进行绑定的相关类库,具体地址在Kinect SDK中的相关文档也有说明:
- Speech Platform Runtime (v10.2) x86. Even on x64 platforms the x86 needs to be used because the MSR Kinect SDK runtime is x86
http://www.microsoft.com/downloads/en/details.aspx?FamilyID=bb0f72cb-b86b-46d1-bf06-665895a313c7
- Speech Platform SDK (v10.2)
http://www.microsoft.com/downloads/en/details.aspx?FamilyID=1b1604d3-4f66-4241-9a21-90a294a5c9a4&displaylang=en
- Kinect English Language Pack: MSKinectLangPack_enUS.msi (available in the same location as the Kinect For Windows SDK)
2)在控件页面上创建三个PictureBox的控件:
三个图片框将分别用来存放:深度图视频、普通视频、以及骨骼追踪。
3)编写相关代码:
using Microsoft.Research.Kinect.Nui;
using Coding4Fun.Kinect.WinForm;

Runtime nui;

private void SkeletalControl_Load(object sender, EventArgs e)
{
    nui = new Runtime();

    try
    {
        nui.Initialize(
            RuntimeOptions.UseDepthAndPlayerIndex
            | RuntimeOptions.UseSkeletalTracking
            | RuntimeOptions.UseColor);
    }
    catch (InvalidOperationException)
    {
        MessageBox.Show("Runtime initialization failed. Please make sure Kinect device is plugged in.");
        return;
    }

    try
    {
        nui.VideoStream.Open(ImageStreamType.Video, 2, ImageResolution.Resolution640x480, ImageType.Color);
        nui.DepthStream.Open(ImageStreamType.Depth, 2, ImageResolution.Resolution320x240, ImageType.DepthAndPlayerIndex);
    }
    catch (InvalidOperationException)
    {
        MessageBox.Show("Failed to open stream. Please make sure to specify a supported image type and resolution.");
        return;
    }

    nui.DepthFrameReady += new EventHandler


   (nui_DepthFrameReady);
    nui.SkeletonFrameReady += new EventHandler


     (nui_SkeletonFrameReady); nui.VideoFrameReady += new EventHandler

      (nui_VideoFrameReady); }
其中DepthFrameReady,VideoFrameReady,SkeletonFrameReady分别用来追踪深度图、普通视图、骨骼图所产生的事件。
void nui_DepthFrameReady(object sender, ImageFrameReadyEventArgs e)
 {
     pictureBoxDepth.Image = e.ImageFrame.ToBitmap();
 }

 void nui_VideoFrameReady(object sender, ImageFrameReadyEventArgs e)
 {
     pictureBoxVideo.Image = e.ImageFrame.ToBitmap();
 }

 void nui_SkeletonFrameReady(object sender, SkeletonFrameReadyEventArgs e)
 {
     Graphics graphics = this.pictureBoxSkeleton.CreateGraphics();

     pictureBoxSkeleton.Refresh();

     SkeletonFrame skeletonFrame = e.SkeletonFrame;
     int iSkeleton = 0;

     foreach (SkeletonData data in skeletonFrame.Skeletons)
     {
         if (SkeletonTrackingState.Tracked == data.TrackingState)
         {
             // Draw bones
             graphics.DrawLines(pen, getBodySegment(data.Joints, JointID.HipCenter, JointID.Spine, JointID.ShoulderCenter, JointID.Head));
             graphics.DrawLines(pen, getBodySegment(data.Joints, JointID.ShoulderCenter, JointID.ShoulderLeft, JointID.ElbowLeft, JointID.WristLeft, JointID.HandLeft));
             graphics.DrawLines(pen, getBodySegment(data.Joints, JointID.ShoulderCenter, JointID.ShoulderRight, JointID.ElbowRight, JointID.WristRight, JointID.HandRight));
             graphics.DrawLines(pen, getBodySegment(data.Joints, JointID.HipCenter, JointID.HipLeft, JointID.KneeLeft, JointID.AnkleLeft, JointID.FootLeft));
             graphics.DrawLines(pen, getBodySegment(data.Joints, JointID.HipCenter, JointID.HipRight, JointID.KneeRight, JointID.AnkleRight, JointID.FootRight));
         }
         iSkeleton++;
     } // for each skeleton
 }

 private Point getDisplayPosition(Joint joint)
 {
     float depthX, depthY;
     nui.SkeletonEngine.SkeletonToDepthImage(joint.Position, out depthX, out depthY);
     depthX = Math.Max(0, Math.Min(depthX * 320, 320));  //convert to 320, 240 space
     depthY = Math.Max(0, Math.Min(depthY * 240, 240));  //convert to 320, 240 space
     int colorX, colorY;
     ImageViewArea iv = new ImageViewArea();
     // only ImageResolution.Resolution640x480 is supported at this point
     nui.NuiCamera.GetColorPixelCoordinatesFromDepthPixel(ImageResolution.Resolution640x480, iv, (int)depthX, (int)depthY, (short)0, out colorX, out colorY);

     // map back to skeleton.Width & skeleton.Height
     return new Point((int)(this.pictureBoxSkeleton.Width * colorX / 640.0), (int)(this.pictureBoxSkeleton.Height * colorY / 480));
 }

 Point[] getBodySegment(Microsoft.Research.Kinect.Nui.JointsCollection joints, params JointID[] ids)
 {
     Point[] points = new Point[ids.Length];
     for (int i = 0; i < ids.Length; ++i)
     {
         points[i] = getDisplayPosition(joints[ids[i]]);
     }

     return points;
 }
其中,getBodySegment,getDisplayPosition方法将确定骨骼追踪中的20个骨骼点的具体位置。
4)接着编译并运行程序,查看Web页面,连上Kinect传感设备,运行结果为: 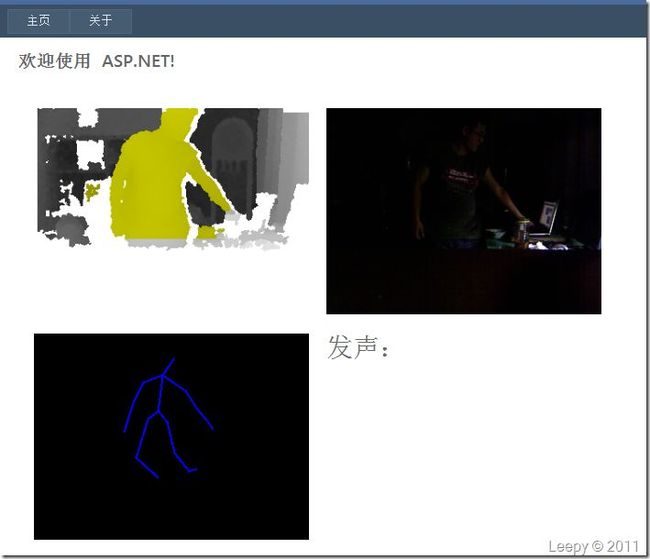
5)接着,来实现一些声控截屏功能:
using Microsoft.Research.Kinect.Audio;
using Microsoft.Speech.AudioFormat;
using Microsoft.Speech.Recognition;


private const string RecognizerId = "SR_MS_en-US_Kinect_10.0";
private KinectAudioSource kinectSource;
private SpeechRecognitionEngine sre;


// 声控截屏功能
RecognizerInfo ri = SpeechRecognitionEngine.InstalledRecognizers().Where(r => r.Id == RecognizerId).FirstOrDefault();
if (ri == null)
{
    MessageBox.Show("Could not find speech recognizer: {0}. Please refer to the sample requirements.", RecognizerId);
    return;
}

sre = new SpeechRecognitionEngine(ri.Id);

var colors = new Choices();
colors.Add("cut"); //添加cut的英文发音

var gb = new GrammarBuilder();
gb.Culture = ri.Culture; //本地化处理
gb.Append(colors);

var g = new Grammar(gb);

sre.LoadGrammar(g);
sre.SpeechRecognized += SreSpeechRecognized;                    //发音匹配以后的后续处理事件
sre.SpeechHypothesized += SreSpeechHypothesized;                //发音的英文识别事件
sre.SpeechRecognitionRejected += SreSpeechRecognitionRejected;  //拒绝之后的后续处理事件

var thread = new Thread(StartDMO);
thread.Start();


private void StartDMO()
 {
     kinectSource = new KinectAudioSource();
     kinectSource.SystemMode = SystemMode.OptibeamArrayOnly;
     kinectSource.FeatureMode = true;
     kinectSource.AutomaticGainControl = false;
     kinectSource.MicArrayMode = MicArrayMode.MicArrayAdaptiveBeam;
     var kinectStream = kinectSource.Start();
     sre.SetInputToAudioStream(kinectStream, new SpeechAudioFormatInfo(
                                           EncodingFormat.Pcm, 16000, 16, 1,
                                           32000, 2, null));
     sre.RecognizeAsync(RecognizeMode.Multiple);
 }

 void SreSpeechRecognitionRejected(object sender, SpeechRecognitionRejectedEventArgs e)
 {

 }

 void SreSpeechHypothesized(object sender, SpeechHypothesizedEventArgs e)
 {

 }

 void SreSpeechRecognized(object sender, SpeechRecognizedEventArgs e)
 {
     lblSpeech.Text = e.Result.Text;

     //屏幕截屏
     Bitmap bmp = new Bitmap(Screen.PrimaryScreen.Bounds.Width, Screen.PrimaryScreen.Bounds.Height);
     Graphics g = Graphics.FromImage(bmp);
     g.CopyFromScreen(0, 0, 0, 0, bmp.Size);
     g.Dispose();

     SaveFileDialog fileDialog = new SaveFileDialog();
     fileDialog.Filter = "JPG File(*.jpg)|*.jpg||";
     DialogResult result = fileDialog.ShowDialog();
     if (result == DialogResult.OK)
     {
         bmp.Save(fileDialog.FileName, System.Drawing.Imaging.ImageFormat.Jpeg);
     }
 }
执行屏幕截图的相关操作。
(注:记得这里需要添加代码gb.Culture = ri.Culture; 如果没有这句代码,有可能导致sre.LoadGrammar(g); 语法加载失败!)
6. 运行结果:
我将刚才发的英文单词,通过文本的方式显示在页面中。
第三部分 ActiveX插件的安装
由于本文使用的是C#来开发ActiveX插件,所以当你需要安装插件的时候,需要使用regasm命令。那么开始编写脚本:
1)安装脚本:
@echo off
echo 开始安装MyFirstKinectControl......
echo.
set FrameworkPath=%SystemRoot%\Microsoft.NET\Framework\v4.0.30319
if exist "%FrameworkPath%\regasm.exe" goto :Start
set FrameworkPath=%SystemRoot%\Microsoft.NET\Framework\v3.5
if exist "%FrameworkPath%\regasm.exe" goto :Start
set FrameworkPath=%SystemRoot%\Microsoft.NET\Framework\v3.0
if exist "%FrameworkPath%\regasm.exe" goto :Start
set FrameworkPath=%SystemRoot%\Microsoft.NET\Framework\v2.0.50727
if exist "%FrameworkPath%\regasm.exe" goto :Start
set FrameworkPath=%SystemRoot%\Microsoft.NET\Framework\v1.1.4322
if exist "%FrameworkPath%\regasm.exe" goto :Startv
set FrameworkPath=%SystemRoot%\Microsoft.NET\Framework\1.0.3705
if exist "%FrameworkPath%\regasm.exe" goto :Start

:Start
%FrameworkPath%\regasm.exe MyFirstKinectControl.dll /codebase MyFirstKinectControl.dll

echo 安装完成!
echo.

pause
2)卸载脚本:
@echo off
echo 开始卸载MyFirstKinectControl......
echo.
set FrameworkPath=%SystemRoot%\Microsoft.NET\Framework\v4.0.30319
if exist "%FrameworkPath%\regasm.exe" goto :Start
set FrameworkPath=%SystemRoot%\Microsoft.NET\Framework\v3.5
if exist "%FrameworkPath%\regasm.exe" goto :Start
set FrameworkPath=%SystemRoot%\Microsoft.NET\Framework\v3.0
if exist "%FrameworkPath%\regasm.exe" goto :Start
set FrameworkPath=%SystemRoot%\Microsoft.NET\Framework\v2.0.50727
if exist "%FrameworkPath%\regasm.exe" goto :Start
set FrameworkPath=%SystemRoot%\Microsoft.NET\Framework\v1.1.4322
if exist "%FrameworkPath%\regasm.exe" goto :Startv
set FrameworkPath=%SystemRoot%\Microsoft.NET\Framework\1.0.3705
if exist "%FrameworkPath%\regasm.exe" goto :Start

:Start
%FrameworkPath%\regasm.exe /u MyFirstKinectControl.dll

echo 卸载完成!
echo.

pause
这样通过注册COM组件就可以实现Kinect的插件在浏览器上的展示。
附上本文的源代码:MyFirstKinect.rar 谢谢大家阅读!


