图形学基础 | ERP采样成为CubeMap
https://stackoverflow.com/questions/37929806/opengl-rendering-to-cubemap
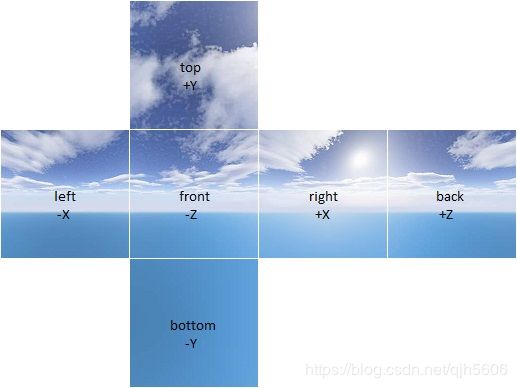
关于 CubeMap
- 可作为天空盒,作为背景.
- 可作为环境贴图
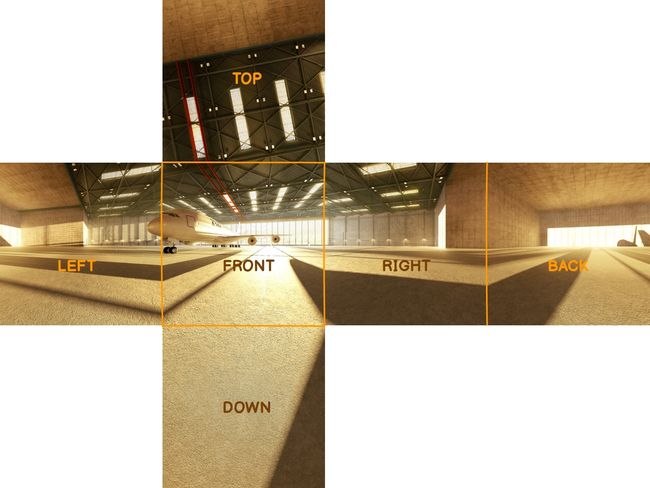
ERP采样成为CubeMap
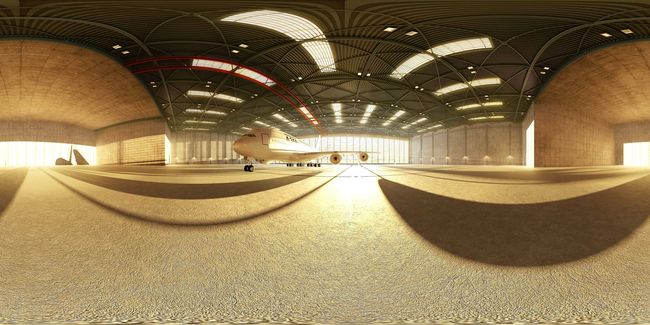
这个网站里面有很多免费使用的HDR光照贴图 sIBL
需要注意的是,这个网站里面的HDR贴图并不是CubeMap的形式,而是EquirectangularMap的形式进行保存的.
CubeMap的顺序和面关系应如下:
举例:
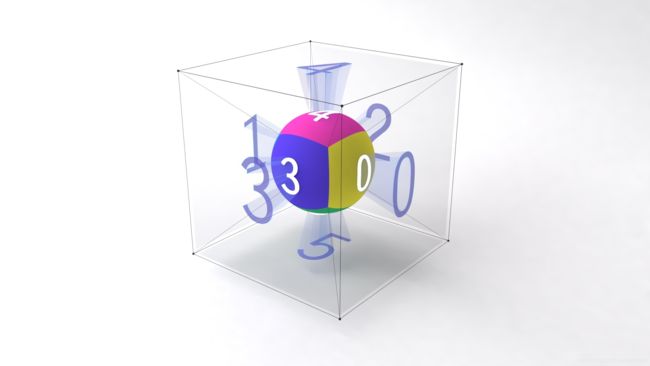
1. 实现原理
为了生成CubeMap. 本质上就是需要渲染生成6张Texutre.
- 渲染一个球 (实际上只需渲染一个立方体)
- 通过对不同的
view方向进行渲染. - 计算uv坐标采样得到纹理.
2. 具体细节
采样渲染到纹理的方式.
2.1 创建一个 GL_TEXTURE_CUBE_MAP
void Texture::setTextureCube(GLuint width, GLenum format, GLenum internalFormat, GLenum type, GLenum minFilter) {
		this->texType = GL_TEXTURE_CUBE_MAP;

		glGenTextures(1, &this->texID);
		glActiveTexture(GL_TEXTURE0);
		glBindTexture(this->texType, this->texID);

		check_gl_error();

		for (GLuint i = 0; i < 6; ++i) {
			if (this->texWidth == NULL || this->texHeight == NULL || this->texComponents == NULL) {
				this->texWidth = width;
				this->texHeight = width;
				this->texFormat = format;
				this->texInternalFormat = internalFormat;
			}

			if (format == GL_RED)
				this->texComponents = 1;
			else if (format == GL_RGB)
				this->texComponents = 3;
			else if (format == GL_RGBA)
				this->texComponents = 4;

			glTexImage2D(GL_TEXTURE_CUBE_MAP_POSITIVE_X + i, 0, this->texInternalFormat, this->texWidth, this->texHeight, 0, this->texFormat, type, NULL);
		}

		glTexParameteri(GL_TEXTURE_CUBE_MAP, GL_TEXTURE_MAG_FILTER, GL_LINEAR);
		glTexParameteri(GL_TEXTURE_CUBE_MAP, GL_TEXTURE_MIN_FILTER, minFilter);
		glTexParameteri(GL_TEXTURE_CUBE_MAP, GL_TEXTURE_WRAP_S, GL_CLAMP_TO_EDGE);
		glTexParameteri(GL_TEXTURE_CUBE_MAP, GL_TEXTURE_WRAP_T, GL_CLAMP_TO_EDGE);
		glTexParameteri(GL_TEXTURE_CUBE_MAP, GL_TEXTURE_WRAP_R, GL_CLAMP_TO_EDGE);

		glBindTexture(this->texType, 0);
	}
2.2 渲染到纹理
- 设置投影矩阵!
- 注意: 投影矩阵为:
glm::perspective(glm::radians(90.0f), 1.0f, 0.1f, 100.0f); - FOV大小90°. 宽高比为1.
- 注意: 投影矩阵为:
- 每次的 view矩阵不同. 朝向不同的 方向
glm::mat4 envMapView[6] = {
		glm::lookAt(glm::vec3(0.0f, 0.0f, 0.0f),glm::vec3(1.0f,  0.0f,  0.0f),glm::vec3(0.0f, -1.0f,  0.0f)),
		glm::lookAt(glm::vec3(0.0f, 0.0f, 0.0f),glm::vec3(-1.0f,  0.0f,  0.0f),glm::vec3(0.0f, -1.0f,  0.0f)),
		glm::lookAt(glm::vec3(0.0f, 0.0f, 0.0f),glm::vec3(0.0f,  1.0f,  0.0f),glm::vec3(0.0f, 0.0f,  1.0f)),
		glm::lookAt(glm::vec3(0.0f, 0.0f, 0.0f),glm::vec3(0.0f, -1.0f,  0.0f),glm::vec3(0.0f, 0.0f,  -1.0f)),
		glm::lookAt(glm::vec3(0.0f, 0.0f, 0.0f),glm::vec3(0.0f,  0.0f,  1.0f),glm::vec3(0.0f, -1.0f,  0.0f)),
		glm::lookAt(glm::vec3(0.0f, 0.0f, 0.0f),glm::vec3(0.0f,  0.0f, -1.0f),glm::vec3(0.0f, -1.0f,  0.0f))
	};
- 分六次渲染. 每次
GL_TEXTURE_CUBE_MAP_POSITIVE_X + i绑定到帧缓冲.
for (unsigned int i = 0; i < 6; i++) {
		glUniformMatrix4fv(glGetUniformLocation(latlongToCubeShader.Program, "view"), 1, GL_FALSE,
			glm::value_ptr(envMapView[i]));
		glFramebufferTexture2D(GL_FRAMEBUFFER, GL_COLOR_ATTACHMENT0,
			GL_TEXTURE_CUBE_MAP_POSITIVE_X + i, envMapCube.getTexID(), 0);
		glClear(GL_COLOR_BUFFER_BIT | GL_DEPTH_BUFFER_BIT);
		envCubeRender.draw(); // 渲染立方体
}
2.3 计算uv坐标采样得到纹理
vs 顶点着色器
#version 330 core
layout (location = 0) in vec3 pos;

out vec3 WorldPos;

uniform mat4 projection;
uniform mat4 view;

void main()
{
    WorldPos = pos;

    gl_Position =  projection * view * vec4(WorldPos, 1.0);
}
片元着色器
#version 330 core
out vec4 FragColor;
in vec3 WorldPos;

uniform sampler2D envMap;

float PI  = 3.14159265359f;

vec2 getSphericalCoord(vec3 normalCoord)
{
    float phi = acos(-normalCoord.y);
    float theta = atan(1.0f * normalCoord.x, -normalCoord.z) + PI;

    return vec2(theta / (2.0f * PI), phi / PI);
}


void main()
{
    vec2 uv = getSphericalCoord(normalize(WorldPos));
    vec3 color = texture(envMap, uv).rgb;
    FragColor = vec4(color, 1.0);
}